Table of Contents
Advertisement
Quick Links
Advertisement
Table of Contents

Related Manuals for Bush VHS01A17Z


Summary of Contents for Bush VHS01A17Z
- Page 1 Service Manual Vacuum Cleaner VHS01A17Z...
- Page 2 Midea LOGO Contents 1 Specifications…………………………………………………………1-2 2 Electrical Diagram…………..…………………………….…………..3 3 Schematic Diagram……………………………..…………………….4 4 Repair of Main Parts…………………………………….……………5 4.1 Upper and Lower Body……………………………………………6 4.2 Cord Reel Assembly…………………………………………..……7 4.3 Motor……………………………………………………………………..8 4.4 Connection Hose, Hose…………………………………………..9 5 Trouble Shooting Chart……………………………………..…….10 6 Replacement Parts List…………………………………………….11 7 Packing Instruction……………………………………………….…12 (备注:黄色部分根据实际机型调整)
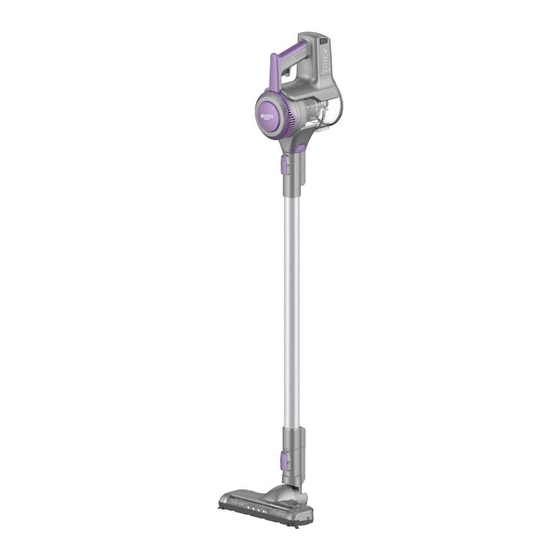
- Page 3 Follow caution information wherever you see this symbol. 1 Specifications MODEL VHS01A17Z POWER SOURCE 21.6V DC BATTERY VOLTAGE 21.6V BATTERY CAPACITY 2000mA MAX. VACUUM CAPACITY 8.0kPA RUNNING TIME 19~20mins RECHARGING TIME 3hrs DUST CAPACITY 0.35L WEIGHT(MAIN BODY) 2.4kg DIMENSION(WxLxH) 170x1100x250...
- Page 4 3 Schematic Diagrams 4 Repairs of Main Parts 4.1 Upper and Lower Body Detach the parts 1. Discharge the power brush from the connection tube (Fig1), and removes the connecton tube from the unit body(Fig2).
- Page 5 2. Detach the battery package from the unit body(Fig3), and rotate the motor upper cover and lift it up from the body(Fig4). 3. Rotate the dust cup and inner separator , discharge the dust cup and separator from body(Fig5); 4. Remove the 3screws ,and take out the motor housing cover and motor assy. (Fig6) 5.
- Page 6 6. Discharge the main PCB assy , and dust cup body finally(Fig9). Assembly 1. Assemble the main PCB to dust cup body(Fig 10), and fix handle frame and battery pack holder to dust body(Fig 11). 2. Assemble the power switch and handle cover to unit body (Fig 12), Fix the motor assy to body, connect the wires and screw the motor housing cover to body.
- Page 7 14). Connect the unit body with tube and power brush finally. 5 Trouble Shooting Chart Trouble Possible Causes Countermeasure 1.The plug is not plugged in 1.Re plug The vacuum cleaner does 2.The power switch didn't open. 2.Press the power switch not work, or power brush 3.Internal wiring of loose 3.Re connect the internal...
- Page 8 主控板 Main PCB 3… 电机组件 Motor Assy 上尘杯组件 Dust cup body 分离器组件 Cup separator HEPA 组件 HEPA 电池导轨 Battery holder 手柄盖 Handle cover 开关组件 Power switch 电机上罩 Motor housing cover 7 Packing Instructions...
Need help?
Do you have a question about the VHS01A17Z and is the answer not in the manual?
Questions and answers
When I try to put the vacuum on charge the Charging light flashes for a few seconds and then stops , unable to charge
The charging light on the Bush vacuum model VHS01A17Z flashes when the battery power is low or when charging is needed. If it flashes for a few seconds and then stops, it may indicate that the battery is not properly connected, the power adapter is not suitable, or the unit is not charging correctly. Make sure to use the provided power adapter (YLS0241A-U250080) and check all connections.
This answer is automatically generated