Table of Contents
Advertisement
Advertisement
Table of Contents

Related Manuals for Bush VUS34AE2O


Summary of Contents for Bush VUS34AE2O
- Page 1 Instruction manual Bush Upright Vacuum Cleaner Model: VUS34AE2O...
- Page 2 Sound good? Then let’s get started. We’re here to help you get the most from your Bush Upright Vacuum Cleaner. If you require any technical guidance or find that your product is not operating as intended, a simple solution can often be found in the...
-
Page 3: Table Of Contents
Power source Ventilation heat and moisture Warning Plug / Wiring advice Getting to know your vacuum cleaner Accessories Part identification Assembling your vacuum cleaner Assembly Using your vacuum Operating the appliance How to use accessories Nozzle use Care and maintenance Maintenance Emptying the dust container Cleaning the filters... - Page 4 If you require any technical guidance or find that your product is not operating as intended, a simple solution can often be found in the Troubleshooting section of these instructions...
-
Page 6: Power Source
Safety information Important - Please read these instructions fully before assembling or operating FOR HOUSEHOLD USE ONLY. When using the vacuum cleaner,basic safety precautions should always be observed, including the following: Only use the vacuum cleaner indoors on dry surfaces. Do not handle the plug or vacuum cleaner with wet hands. -
Page 7: Ventilation Heat And Moisture
Safety information Important - Please read these instructions fully before assembling or operating the cord away from heated surfaces. Do not put any objects into openings. Do not use with any openings blocked and do not restrict air-flow. Keep all open- ings free of dust, lint, hair or anything that might reduce airflow. -
Page 8: Warning
Safety information Important - Please read these instructions fully before assembling or operating WARNING: Always switch o and unplug the vacuum clean- er from the electrical outlet before assembling, opening or emptying the dirt container, connecting/ disconnecting the attachments, or carrying out maintenance or troubleshooting checks. -
Page 9: Plug / Wiring Advice
Safety information Important - Please read these instructions fully before assembling or operating Plug / Wiring advice The wires in this mains lead are coloured in accordance with the Non-rewireable plug This appliance may be fitted with a “non-rewireable” plug. If you need to change the fuse in a “non-rewireable”... - Page 10 If you require any technical guidance or find that your product is not operating as intended, a simple solution can often be found in the Troubleshooting section of these instructions...
- Page 11 vacuum cleaner...
-
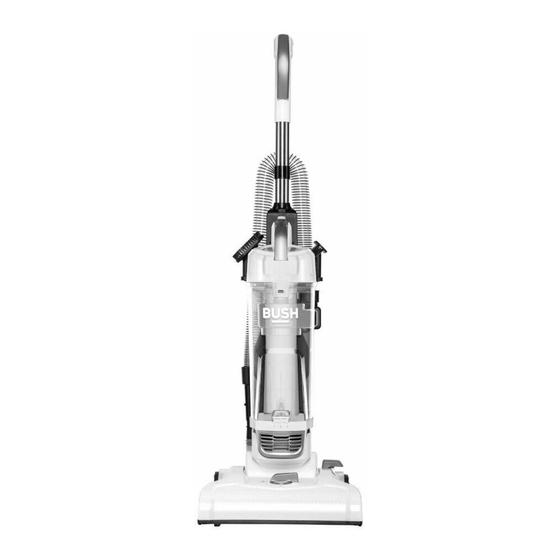
Page 12: Getting To Know Your Vacuum Cleaner
Getting to know your vacuum You’ll be up and running in no time Vacuum cleaner Accessories Accessories: long Crevice tool, Brush tool, upholstery tool. Crevice tool Vacuum cleaner Handle Dusting brush Upholstery tool If you require any technical guidance or find that your product is not operating as intended, a simple solution can often be found in the Troubleshooting section of these instructions... -
Page 13: Part Identification
Getting to know your vacuum You’ll be up and running in no time Part identification 1. Handle 9. Crevice Tool 2. Dust Container Clamp 10. Power Cord Holder 3. Dust Container Assembly 11. Brush Tool 4. Height adjustment Button 12. Handle Clamp 5. - Page 14 If you require any technical guidance or find that your product is not operating as intended, a simple solution can often be found in the Troubleshooting section of these instructions...
-
Page 15: Assembling Your Vacuum Cleaner
Assembling your vacuum cleaner... -
Page 16: Assembly
Assembling your vacuum Bringing it all together Assembly Click! Vacuum cleaner Slide handle into Insert bent end of Loop hose over with dust cup. top of vacuum hose into opening hose retainer. cleaner. Push at back of dust cup. down until it Twist hose clicks. -
Page 17: Using Your Vacuum
Using your vacuum... -
Page 18: Operating The Appliance
Using your vacuum Let’s get started Operating the appliance Put plug into power socket Turn height adjustment knob to Step on power on/o button to adjust from Low to high pile carpet or turn vacuum cleaner on. hard floor setting as appropriate. Step on again to turn o Empty dust container after every use Step on cleaner release... -
Page 19: How To Use Accessories
Using your vacuum Let’s get started How to use accessories Caution: When using tools, always place handle in upright position. Make sure vacuum cleaner is turned o while attaching tools. 1. Place vacuum in upright position. 2. Turn height adjustment knob to highest position. 3. - Page 20 If you require any technical guidance or find that your product is not operating as intended, a simple solution can often be found in the Troubleshooting section of these instructions...
-
Page 22: Care And Maintenance
Care and maintenance Looking after your appliance Maintenance Switch o and disconnect from the mains supply before carrying out cleaning and maintenance. To ensure your vacuum cleaner works at optimum e ciency, keep the ventilation holes and vacuum cleaner surface free from dirt. Ensure that the dust container is emptied and the air filters are washed regularly. -
Page 23: Cleaning The Filters
Care and maintenance Looking after your appliance Cleaning the filters 1. The frequency that the filters should be cleaned will depend on appliance usage. For maximum e ciency the filter at the top of the dust container should be cleaned every time the dust container is emptied and the exhaust filter every two months. -
Page 24: How To Clear A Blockage
Care and maintenance Looking after your appliance How to clear a blockage Caution: Make sure vacuum is turned o and power cord is unplugged. If vacuum is not cleaning carpet, or if no suction at end of hose, check to be sure air path is not blocked. 1. -
Page 25: How To Maintain Brush Roll Bar
Care and maintenance Looking after your appliance How to maintain brush roll bar Caution: Make sure vacuum is turned o and power cord is unplugged. • Step on handle release to lower handle. • Turn vacuum face down on floor. •... -
Page 26: How To Replace Brush Roll Bar Or Belt
Care and maintenance Looking after your appliance How to replace brush roll bar or belt Caution: Make sure vacuum is turned o and power cord is unplugged. • Put the product in a flat surface, with wheel face upwards • Use a Philips screwdriver to remove 6 screws at the bottom of the base (Fig 1) lift o brush cover •... - Page 27 Fig 3 Fig 4 Fig 5 Or by calling one of our experts on 0345 604 0105...
-
Page 28: Other Information
Other information Technical Specification Model VUS34AE2O 136566433 Cat No 3185458 Rated voltage 220-240V 50/60Hz Power 400W Class rating II(double insulated) BS 1362 fuse Capacity Noise 80 dB(A) Recycling electrical products You should now recycle your waste electrical goods and in doing so help the environment. -
Page 30: Product Support
Product support Help is always at hand TROUBLE SHOOTING In case of malfunction, please refer to the following table. NOTICE: Thermal cut-off This vacuum cleaner has a special thermostat that protects the vacuum in case of motor overheating. If the vacuum suddenly shuts off, proceed as follows: 1) Push the power switch to o and unplug the vacuum. - Page 31 *Calls to Bush enquiry lines may attract a charge and set up fee from residential lines depending on your call plan / tari . Mobile and providers costs may vary, see www.bt.com/pricing for details For security and training purposes, telephone calls to and from customer service centres maybe recorded and monitored.
- Page 32 Call us now and register your 12 month guarantee Thank you for choosing Bush. Your new product is guaranteed against faults and breakdowns for 12 months. Don’t forget to register it with us today so we can provide you with our best possible after-sales service and useful updates.
- Page 33 Product support Help is always at hand Important Data Protection Information Bush has appointed Domestic & General Insurance PLC to provide product registration services and protection plans to accompany its products. What we do with your information At Domestic & General we want to reassure you that we use your information both responsibly and securely to provide you with the best possible service.
- Page 34 Product support Help is always at hand Keeping your information We keep your Personal Information for six years after you terminate your policy so that we can deal with any claims. Your goods information we keep for a bit longer, normally 10 years (the average life of an appliance) for health and safety.
- Page 35 Or by calling one of our experts on 0345 604 0105...
- Page 36 Should you require any guidance; call our Help line on 0345 604 0105. Further contact details can be found online at: www.bush-support.co.uk Produced for Bush 489-499 Avebury Boulevard, Milton Keynes MK9 2NW Made in China. Bush is a registered trademark of Argos Ltd.
Need help?
Do you have a question about the VUS34AE2O and is the answer not in the manual?
Questions and answers