Table of Contents
Advertisement
Quick Links
Advertisement
Table of Contents

Subscribe to Our Youtube Channel
Related Manuals for BenQ DVY32


Summary of Contents for BenQ DVY32
- Page 1 DVY32 Video Conference Camera User Manual...
- Page 2 Disclaimer BenQ Corporation makes no representations or warranties, either expressed or implied, with respect to the contents of this document. BenQ Corporation reserves the right to revise this publication and to make changes from time to time in the contents thereof without obligation to notify any person of such revision or changes.
-
Page 3: Table Of Contents
Table of Contents Important notices ..............4 Application instructions ..............4 Electric safety..................4 Transport caution................4 Careful installation................4 Magnetic Interference..............4 Do not disassemble discretionarily ..........4 Package contents ..............5 Features.................. 6 Installation instructions ............7 Product interface ................7 Camera operation ................ -
Page 4: Important Notices
Important notices Important notices This manual briefly introduces the camera functions, installation, and operations. Please read carefully before application. Application instructions To prevent damages to this camera or any products connected to it, this product can only be used within the specified range: 1. -
Page 5: Package Contents
Package contents Package contents Open the sales package and check the contents. If any item is missing or damaged, please contact your dealer immediately. Camera Remote control USB cable Privacy Cover Quick start guide • Before discarding the package, check that you haven't left any accessories inside the box. •... -
Page 6: Features
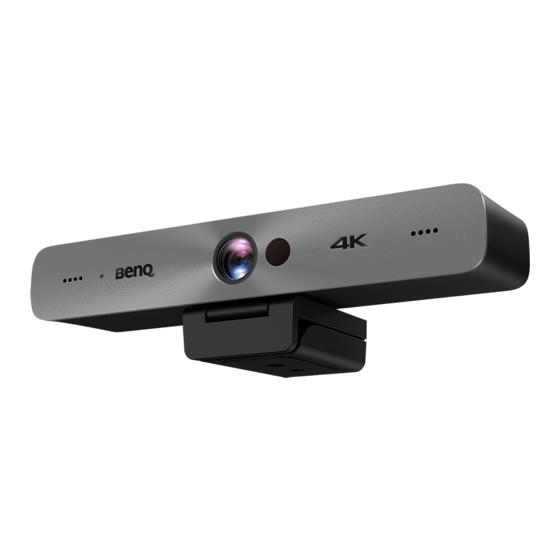
Features Features This product is a new 4K ePTZ video conference camera. It is built with AI functions, which can automatically frame all people in the meeting and center them in the scene. It also has ideal functions and superior performance, adopting advanced ISP processing algorithms so as to provide vivid images with evenly clear brightness, strong color layering, high resolution, and fantastic color rendition. -
Page 7: Installation Instructions
Installation instructions Installation instructions Product interface Name Omni-Directional microphones for audio input LED for indicating when the camera is activated Lens (fixed focus) IR sensor for remote control Screw hole for tripod Mounting and locating hole Flexible clip/base USB 3.0 output interface... -
Page 8: Camera Operation
Installation instructions Camera operation 1. Fix the product on top of the display, place it directly on a desktop, or install it on a tripod or mount. 2. The tilt angle of the camera mount should be less than 85 degrees. 85°... -
Page 9: Using The Privacy Cover
Installation instructions Using the privacy cover 1. Flip up the cap of the privacy cover. 2. Lean the privacy cover slightly forward on the front of the camera and make sure that the cap is lined up with the camera lens. 3. -
Page 10: Application Instructions
Application instructions Application instructions Remote control Remote Control Indicator LED Lights up anytime a button is pressed. Disable Camera Key Disables/Enables video from the camera. Arrow Keys • Allows you to navigate and select items in the OSD settings menu. •... -
Page 11: Menu Settings
Application instructions Menu settings Main Menu Press the menu key on the remote control to display the camera’s OSD settings menu, and then use the arrow and OK keys to navigate and select submenus or items. The sections below will detail the available settings in each submenu. - Page 12 Application instructions Preset Setting Descriptions Sets the current zoom in/out position as preset setup. Select a value from 1 -10. Recalls the preset position. Call Select a value from 1 -10.
- Page 13 Changes the look of the image to preset styles. Image Style The options include: BenQ Color (Default) / Low Light Source / Zoom Optimized / Custom. Flips the OSD menu if the image is not presented in a mirrored orientation.
- Page 14 Application instructions Exposure: Setting Descriptions Configures the exposure to preset modes based on the settings listed below. Mode The options include: Auto / Manual / SAE / Bright. Enables/Disables the exposure value for the image (only available in Auto mode). The options include: ON / OFF Activates a backlight for the image (only available in Auto mode).
- Page 15 Application instructions Color: Name Descriptions Configures the white balance setting to preset modes based on the settings listed below. WB Mode The options include: Auto / Manual / One Push / VAR Adjusts the amount of red in the image (only available in Auto or Manual mode).
- Page 16 Application instructions Image: Name Descriptions Adjusts the brightness level for the image. Brightness Select a value from 0 - 100 (by intervals of 1). Adjusts the contrast level (the difference between dark and light colors) for the image. Contrast Select a value from 0 - 100 (by intervals of 1). Adjusts the sharpness level (the distinctness between different tones or colors) for the image.
- Page 17 Application instructions Noise Reduction: Name Descriptions Disables or adjusts the level of 2D noise reduction. NR-2D The options include: OFF or a value from 1 to 7 (by intervals of 1). Disables or adjusts the level of 3D noise reduction. NR-3D The options include: OFF or a value from 1 to 8 (by intervals of 1).
- Page 18 Application instructions Version This menu displays the version number for the camera. Restore Default Select YES for this option and press OK to restore the camera’s settings to their default values.
-
Page 19: Appendix A: The Optional Wall Mount
Appendix A: The Optional Wall Mount Appendix A: The Optional Wall Mount If you purchase an optional wall mount, first open the package and check the contents. If any item is missing or damaged, please contact your dealer immediately. Mount 1/4-20 screw (for Camera) Bracket stopper M6 screw anchor x 4... -
Page 20: Installing The Wall Mount
Appendix A: The Optional Wall Mount Installing the wall mount To install the wall mount: 1. Choose the location on the wall for the mount and then mark the four screw anchor installation points on the wall. The screw holes on the mount for the measure 100mm x 50mm. 2. - Page 21 Appendix A: The Optional Wall Mount 5. Secure the wall mount onto the wall with the four sets of nuts and washers. 6. Install the camera onto the wall mount so that the bracket stopper on the mount fits into the tripod screw hole on the camera, and then secure the camera by screwing the 1/4-20 screw into the camera’s mounting hole.
-
Page 22: Appendix B: The Optional Display Mount
Appendix B: The Optional Display Mount Appendix B: The Optional Display Mount If you purchase an optional display mount, first open the package and check the contents. If any item is missing or damaged, please contact your dealer immediately. Mount Bracket stopper Rubber washer x 4 Cape screw x 2... -
Page 23: Installing The Display Mount On A Display
Appendix B: The Optional Display Mount Installing the display mount on a display To install the display mount directly on a display: 1. Flip open the neck of the mount. 2. Rotate the legs of the mount outward. 3. Install the bracket stopper onto the mount. 4. - Page 24 Appendix B: The Optional Display Mount 7. Install the camera onto the wall mount so that the bracket stopper on the mount fits into the tripod screw hole on the camera, and then secure the camera by screwing the 1/4-20 screw into the camera’s mounting hole.
-
Page 25: Installing The Display Mount On A Display With A Vesa Mount
Appendix B: The Optional Display Mount Installing the display mount on a display with a VESA mount To install the display mount a display with a VESA mount: 1. Flip open the neck of the mount. 2. Rotate the legs of the mount outward. 3. - Page 26 Appendix B: The Optional Display Mount 7. Install the camera onto the wall mount so that the bracket stopper on the mount fits into the tripod screw hole on the camera, and then secure the camera by screwing the 1/4-20 screw into the camera’s mounting hole.
-
Page 27: Product Information
Power Consumption 5W (max) Windows 7, 8.1, or 10, Linux, Chrome OS*, macOS 10.10 and higher Operating Systems Compatibility *Contact BenQ service for available Chromebook models Plug and Play Dimensions (HxWxD) 180.1mm x 47.4mm × 44.0mm Dimensions Weight 0.4 kg... - Page 28 Product information Specifcations Item DVY32 • 4K UHD conference cam • Remote control Package Included Contents • USB 3.0 Type-B cable • Privacy cover...
-
Page 29: Dimensions
Product information Dimensions Unit: mm... -
Page 30: Maintenance And Troubleshooting
Maintenance and troubleshooting Maintenance and troubleshooting Maintenance 1. Please disconnect the camera if it is not used for a long time. 2. Use soft cloth or tissue to clean the camera cover. 3. Wipe it with a soft, dry cloth when cleaning the camera lens. Wipe it gently with a mild detergent if needed.
Need help?
Do you have a question about the DVY32 and is the answer not in the manual?
Questions and answers
dvy32 conference camera
The BenQ DVY32 conference camera has the following features:
- 4K UHD resolution
- Zoom Certified
- High-performance Sony image sensor
- 120° wide field of view with 5x digital zoom
- AI-powered auto framing
- Omnidirectional microphones with up to 26ft (8m) audio pickup range
- H.265 video encoding
- 3D DNR with SNR >50dB
- Echo cancellation
- USB 3.0 output
- Video compression formats: MJPEG, YUY2, H.264, H.265
- Compatible with Windows, Linux, Chrome OS, and macOS 10.10 and higher
- USB plug and play functionality
- Includes a remote control, USB 3.0 Type-B cable, and privacy cover
- Compact design with dimensions of 180.1mm x 47.4mm x 44.0mm
- Lightweight at 0.4 kg
- Power consumption of 5W (max)
This answer is automatically generated