Table of Contents
Advertisement
Quick Links
Advertisement
Table of Contents

Related Manuals for BenQ DVY22


Summary of Contents for BenQ DVY22
- Page 1 DVY22 4K AI Camera User Manual...
- Page 2 Disclaimer BenQ Corporation makes no representations or warranties, either expressed or implied, with respect to the contents of this document. BenQ Corporation reserves the right to revise this publication and to make changes from time to time in the contents thereof without obligation to notify any person of such revision or changes.
-
Page 3: Table Of Contents
Table of Contents Table of Contents Important notices ..............4 How to use ..................4 Electric safety..................4 Handle with care................4 Install with caution ................4 Do not disassemble the product without permission .... 4 Installation instructions ............. 5 Product interface ................ -
Page 4: Important Notices
Important notices Important notices This manual introduces functions, installation and operations for the camera in details. Please read this manual thoroughly before installation and use. How to use To prevent damage to this product or any product connected to it, this product can only be used within the specified range: 1. -
Page 5: Installation Instructions
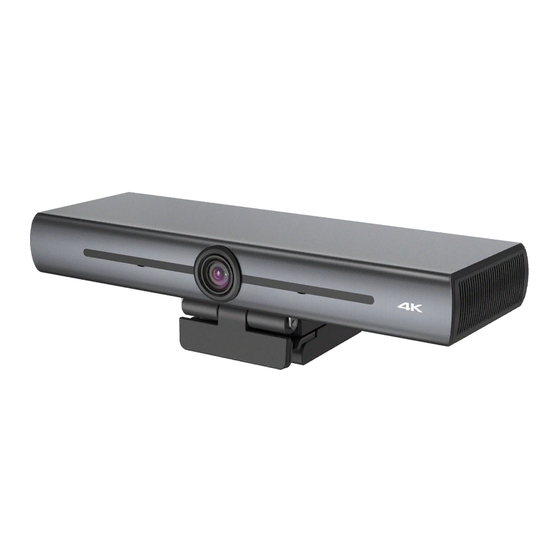
Installation instructions Installation instructions Product interface Name Camera lens Bracket Built-in MIC Tripod fixing hole Positioning hole USB 3.0 output interface Camera operation 1. Product installation: Fix the device on top of the display; directly put it on desk or on tripod mounting and wall mount. -
Page 6: Interface Instruction
Installation instructions • Auto framing: With excellent facial detection algorithm, automatically adjust the zoom according to the number of people in the meeting. It can frame all the meeting people and make them shown in the scene. • Wide view angle without distortion: 120° super wide view angle lens for options •... -
Page 7: Application Instructions
Application instructions Application instructions Remote control Standby Key • After long press for three seconds, the camera will be in standby mode. • Long press for three seconds again, and the camera will self-test again and back to HOME position. Note: If preset 0 is set and there is no operation within 12 seconds, the camera head will automatically point to the specified preset 0 position. - Page 8 Application instructions Electronic Pan/Tilt Control Key Press Key: Press Key: Press Key: Press Key: “HOME” Key: Return to the middle position or enter into the sub-menu. BLC Control Key Back Light ON/OFF: Turn on or off the back light Menu Setting Open or close the OSD menu Enter/exit the OSD menu or return to the...
-
Page 9: Applications
Application instructions Applications Power on the camera, then press the “SET” and “*” keys at the same time for five seconds. The indicator light will be on. Then release the button and power on the camera again when the light is flashing. The pairing process will be done when the indicator light stops flashing. -
Page 10: Menu Settings
Application instructions Menu settings Main Menu To use MJPG/H.264/H.265 compression, press MENU key to display the menu and use the scroll arrow to point at or highlight the selected items. 1. Language Setting: Press / key to select a language. 2. - Page 11 Application instructions 3. Exposure Setting: Move the pointer to EXPOSURE in the Main Menu, click “HOME” and enter the (EXPOSURE SET) as follows: Name Descriptions Auto, Manual, Shutter priority, Iris priority and Mode Brightness priority. On/Off (only available in auto mode) Compensation Level -7~7 (only available in auto mode when EV is ON) ON/OFF for options (only available in auto mode)
- Page 12 Application instructions 4. Color Setting: Move the pointer to COLOR in the Main Menu, click “HOME” and enter the (COLOR SET) as follows: Name Descriptions WB Mode Auto, Manual, One Push, 3, VAR RG Tuning -10~10 BG Tuning -10~10 Red Gain 0~255 (only available in Manual mode) Blue Gain 0~255 (only available in Manual mode)
- Page 13 Application instructions 5. Image Setting: Move the pointer to IMAGE in the Menu, click “HOME” and enter the (IMAGE) as follows: Name Descriptions Brightness 0~14 Contrast 0~14 Sharpness 0~15 Flip-H On/Off Flip-V On/Off B&W Mode Color, Black/White Gamma Default, 0.45, 0.50, 0.55, 0.63 Dynamic Contrast: Off,1~8 Low-Light Mode Close/Open...
- Page 14 Application instructions 6. Noise Reduction Setting: Move the pointer to NOISE REDUCTION in the Menu, click “HOME” and enter the (NOISE REDUCTION) as follows: Name Descriptions 2D Noise Reduction Auto, close, 1~7 3D Noise Reduction Close, 1~8 Dynamic Hot Pixel Close, 1~5 7.
-
Page 15: Product Information
Product information Product information Specifications Specifcations Item DVY22 Image sensor 1/2.5 Inch High Quality 4K CMOS Sensor Effective pixels 8.28MP 16:9 1 × USB 3.0, Type B, support audio output over Video output port USB 3.0 Audio input 2 built-in omnidirectional microphones View angle 126°(D)/120°(H)/85°(V) - Page 16 Product information Input voltage Input current 1A(Max.) Power consumption 5W(Max.) Store temperature C ~ 60 Store humidity C ~ 90 Other Parameters Working temperature C ~ 50 Working humidity C ~ 80 Dimensions (W*H*D) 222mm × 93.25mm × 56.5mm Weight 0.53kg Application Indoor...
-
Page 17: Dimensions
Product information Dimensions Unit: mm... -
Page 18: Maintenance And Troubleshooting
Maintenance and troubleshooting Maintenance and troubleshooting Maintenance 1. Please disconnect the camera if it is not used for a long time. 2. Use soft cloth or tissue to clean the camera cover. 3. Wipe it with a soft, dry cloth when cleaning the camera lens. Wipe it gently with a mild detergent if needed.
Need help?
Do you have a question about the DVY22 and is the answer not in the manual?
Questions and answers