
Summary of Contents for Monster MSB3788W
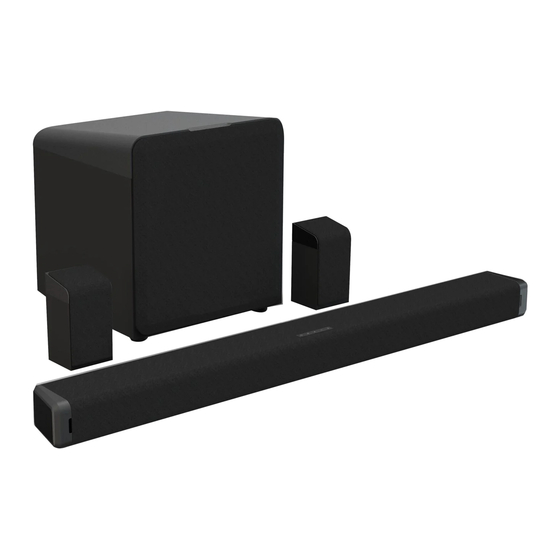
- Page 1 37" BLUETOOTH 5.1 SOUND BAR - WIRELESS SUBWOOFER AND 2 SATELLITE SPEAKERS MODEL: MSB3788W Please read this instruction manual carefully and keep it for future reference...
-
Page 2: Fcc Statement
CAUTION RISK OF ELECTRIC SHOCK DO NOT OPEN CAUTION: TO REDUCE THE ELECTRIC SHOCK, DO NOT REMOVE THE COVER (OR BACK). NO USER SERVICEABLE PART INSIDE, REFER SERVICING TO QUALIFIED SERVICE PERSONNEL. DANGEROUS VOLTAGE: The lighting flash with arrowhead symbol within an equilateral triangle is intended to alert the user to the presence of uninsulated “dangerous voltage”... -
Page 3: Fcc Notice
FCC NOTICE: This equipment has been tested and found to comply with the limits for a Class B digital device, pursuant to Part 15 of the FCC Rules. These limits are designed to provide reasonable protection against harmful interference in a residential installation. - Page 4 6. Clean only with dry cloth The appliance should be cleaned only as recommended by the manufacturer. 7. Do not block any ventilation openings. Install in accordance with the manufacturer’s instructions. Slots and openings in the cabinet and in the back or bottom are provided for ventilation, to ensure reliable operation of the product and to protect it from overheating.
- Page 5 15. Power source This product should be operated only from the type of power source indicated on the marking label. If you are not sure of the type of power supply to your home, consult your appliance dealer or local power company. For products intended to operate from battery power, or other source, refer to the operation instructions.
- Page 6 20. Service Do not attempt to service this product yourself as opening or removing covers may expose you to dangerous voltage or other hazards. Refer all servicing to qualified service personnel. 21. Replacement parts When replacement parts are required, be sure the service technician uses replacement parts specified by the manufacturer or those that have the same characteristics as the original parts.
-
Page 7: Product Overview
PRODUCT OVERVIEW FRONT VIEW CONTROL PANEL REAR PANEL 2 3 4 5 6 5.1 CH 13 14 15 16 17 18 1. Remote Sensor 10. USB In Port 2. Standby/Bluetooth Indicator 11. AUX In Jack 3. LINE In Indicator 12. 5.1 CH Input Jacks 4. - Page 8 SUBWOOFER REAR PANEL 19. Speaker 20. DC In Jack 21. Standby Bu�on SATELLITE SPEAKERS REAR PANEL 22. Speaker 23. DC In Jack 24. Standby Bu�on...
-
Page 9: Battery Installation Of Remote Control
REMOTE CONTROL 8 9 10 1. Power Bu�on 11. Mute Bu�on 2. REC Bu�on 12. 2.1/5.1 Reset Bu�on 3. Previous Bu�on 13. Next Bu�on 4. MUSIC Bu�on 14. TALK Bu�on 5. Center Volume+ Bu�on 15. Surround Volume+ 6. Center Volume- Bu�on Bu�on 7. -
Page 10: Placement And Mounting
3. Do not mix different types of batteries together (e.g.: Alkaline and Carbon-zinc) or old batteries with fresh ones. 4. If the batteries in the device are consumed or the device is not to be used for a long period of time, remove the batteries to prevent damage or injury from possible leakage. - Page 11 2.1 Mounting to a wooden wall (screws not included) A. Mark the position of the mounting screws on the wall using a pencil. B. Drill the screws directly into the marks that you have made on the wall and leave approx. 0.3 inches length to hook the sound bar.
-
Page 12: General Operation
GENERAL OPERATION 1. Connect the DC 15V, 2.4A Adapter to the DC IN jack on the Unit. Plug the Adapter into the AC outlet with AC110~240V; 50/60Hz. The mode indicator on the Unit will light up and turn RED. 2. Connect the DC 15V, 2.4A Adapter to the DC IN jack on the subwoofer. Plug the Adapter into the AC outlet with AC110~240V;... -
Page 13: Bluetooth Operation
3. Power on the external Bluetooth enable device and enter Bluetooth mode and try searching the unit. 4. When MONSTER SB3 appears, select it and make connection. 5. After successful paired, the indicator will stop blinking and beep sound can be heard. -
Page 14: Line In Operation
AUX IN/5.1 CH INPUT OPERATION An external audio/video player (such as TV, DVD player, etc.) can be connected to this unit and listen through the unit's speakers. 1. Plug one end of the AUX IN L&R or 5.1 CH RCA cable (not included) into the AUX IN jack or 5.1 CH input jacks on the rear of the unit. -
Page 15: Usb Playback
OPTICAL IN OPERATION 1. Connect the Optical out jack from the external audio player (such as TV, DVD player, etc.) to the OPTICAL IN jack on the rear of the unit with the optical connection cable (For PCM format only). Power on the unit and subwoofer/speakers and pair as previously explained. -
Page 16: Troubleshooting
TROUBLESHOOTING POSSIBLE CAUSE SYMPTOM POSSIBLE SOLUTION The adapter is not connected No power Connect the adapter to the unit and wall outlet The unit is in power off mode Press and hold the power/source button on the unit or press the button on remote control to power on the unit Raise the volume level by pressing... -
Page 17: Specifications
SIG Inc. All other trademarks and trade names are those of their respective owners. Monster, the Monster logo and the M design are registered trademarks of Monster, Inc. and its subsidiaries in the U.S. and other countries and are used under license. - Page 18 To make a warranty claim, do not return this product to the store. Please email support@curtiscs.com or call 1-800-968-9853. 90 day Warranty This product is warranted to be free from defects in material and workmanship for a period of ninety (90) days from the date of original purchase. During this period, your exclusive remedy is repair or replacement of this product or component found to be defective, at our option;...
Need help?
Do you have a question about the MSB3788W and is the answer not in the manual?
Questions and answers