
Related Manuals for DYNABREEZE FA-23105


Summary of Contents for DYNABREEZE FA-23105
- Page 1 TRADE QUALITY SINCE 1995 INDUSTRIAL 750MM PEDESTAL FAN MODEL FA-23105 Instruction User Manual & Warranty CAUTION: Read the Assembly & Safety Instructions before operating and retain for future reference...
- Page 2 Thank you & Congratulations on the purchase of your Dynabreeze Industrial 750mm Pedestal Fan To find out more information on this product, please visit www.dynabreeze.com.au or contact: Tradeware Address 45 Birralee Rd, Regency Park SA 5010 Phone 1300 658 494...
- Page 3 OPERATION CONDITIONS & SAFETY PRECAUTIONS When using electrical appliances, basic safety precautions should be WARNING: followed to reduce the risk of fire, electric shock and injury to persons or property. • To avoid a hazard due to instability of the •...
-
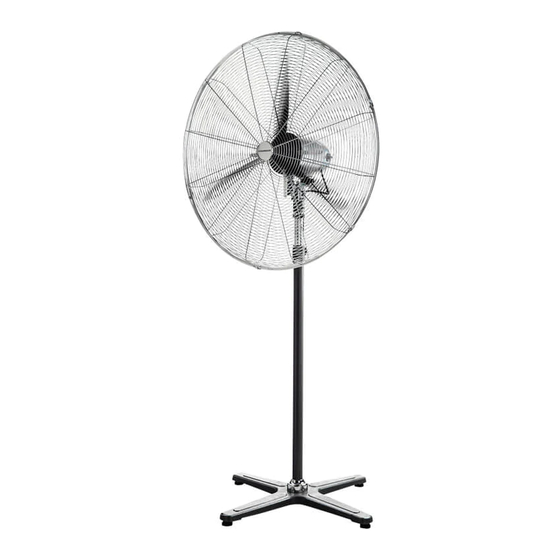
Page 4: Parts Identification
PARTS IDENTIFICATION A Front Grille K Motor Head B Fan Blade L Motor Neck C Blade Screw M Hex Bolt, Washer and Nut D Grille Locking Screw (& Nut) N Height Adjustment Knob E Rear Grille O Inner Tube F Rear Grille Locking Screws x 4 P Outer Tube G On/Off/Speed Control Dial Q Base Decoration Cap... -
Page 5: Assembly And Operation
SCAN QR CODE TO REFER TO THE ASSEMBLY & OPERATION ASSEMBLY & OPERATION VIDEO Tools Required Adjustable Shifter Phillips Screwdriver Multigrips Assembling the fan Fan Body & Motor 4. From underneath the base, place back the plate and re-insert the washer and hex 1. - Page 6 Assembling the fan cont. 6. Remove the centre hex bolt, washer and 8. Insert the hex bolt back in, ensuring the nut from the top of the inner tube and head is inserted on the side of the hex bolt loosen the smaller screw underneath the cut out hole.
- Page 7 Assembling the fan cont. Blade & Grilles 3. Remove the plastic cover from the motor shaft to insert the fan blade. Align the 1. Use the shifter to unscrew the 4 rear blade screw on the fan blade, to the flat grille locking screws, spring washers and area on the motor shaft.
- Page 8 Operating the Fan Adjustments: Vertical Tilt Adjustment Turn on the fan by turning the speed control dial from 0 to 1, 2 or 3. Grip the top and bottom of the grille firmly and tilt to the desired position. Oscillate The fan is set to oscillate by default.
- Page 9 INSTRUCTION USER MANUAL & WARRANTY 9...
-
Page 10: Warranty
Tradeware offers a 3 Year Warranty. The additional warranties, terms and conditions are outlined on the website www.dynabreeze.com.au under the Support tab. Under Support you can also Register your product upon purchase and enjoy the peace of mind of knowing your product is registered should anything happen. - Page 11 Notes INSTRUCTION USER MANUAL & WARRANTY 11...
- Page 12 Tradeware 45 Birralee Road, Regency Park South Australia 5010 info@tradeware.com.au 1300 658 494 www.tradeware.com.au Due to continual product development, please note the information and content Please provided may not be final and may be subject to changes. Recycle...
Need help?
Do you have a question about the FA-23105 and is the answer not in the manual?
Questions and answers