Advertisement
Quick Links
Advertisement

Related Manuals for wattwatchers Auditor 6W


Summary of Contents for wattwatchers Auditor 6W
- Page 1 Quick Start Guide Auditor 6W (WiFi, monitoring-only) Version 1.0_July 2018...
- Page 3 Auditor 6W Complete these five easy steps, then start monitoring your site. 1. Before you begin 2. Connect your Auditor 3. Configure your WiFi settings 4. Use the onboarding tool 5. Validate that your installation is correct ATTENTION: Must be installed by a licensed electrician in accordance with standard electrical...
-
Page 4: Before You Begin
1. Before you begin Ensure you have the equipment - See Auditor 6W checklist below. You’ll need an internet-connected smart device (e.g. smartphone, tablet, laptop) to configure the Auditor and capture information about the installation. A marker is useful for numbering Current Transformers and cables during installation. - Page 5 2. Connect your Auditor 2. Connect your Auditor Three-Phase Voltage Connections Use this configuration when there are multiple phases present. The voltage connections are labelled P1, P2, P3, N. Connect voltage phases to P1, P2, and P3. Connect neutral to N. Use three-phase wiring tails if they were provided with your Auditor.
- Page 6 • For load monitoring: arrow is towards the load. About the split-core CTs: • Only Wattwatchers-supplied CTs are supported • All CTs can be interchanged in the field (in sets of 3) • Different-sized CTs can be used on one device, in sets of three eg.
- Page 7 2. Connect your Auditor continued CT Connections (6M) ≡ ≡ The CT connections are labelled: , 6+, 5+, 4+, , 3+, 2+, 1+ ≡ The white wires connect to terminals labelled “ ” - three wires in each terminal The pink wires connect to the terminals labelled “+” The CTs and Voltage phases must match as stated below.
- Page 8 To communicate over the internet using the household WiFi, the network lights flashing. name and password is required. This allows the Wattwatchers energy device to send and receive data over the homeowner’s internet link. 3) Using your smart device’s WiFi connection Any smartphone, tablet or computer can be used for this process.
- Page 9 Wattwatchers WiFi Setup auditorsetup.com Whilst connected to the Wattwatchers device’s 6) The screen will then display the available site network, open a web browser and navigate to networks. Select the site network and connect.
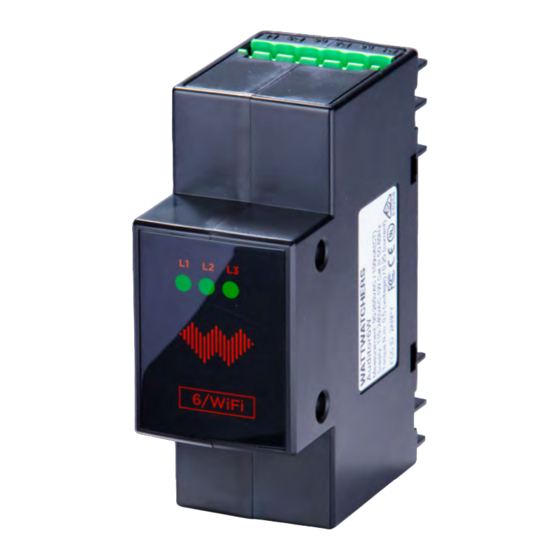
- Page 10 Check the lights When installation is completed successfully, all three green lights on the front of the Auditor should be lit solid. The table below shows the meaning of the lights. Auditor 6W Indicators L1 (Mode) L2 (Network) L3 (Internet)
- Page 11 4. Validate installation continued Validating that your installation is correct If... Then... Otherwise... Circuit current rating is less The correct size CTs are Use a larger CT. than the CT rating. installed. Install data shows three The voltage connections Check the voltage voltages around 240V, less are good.
- Page 13 + – L←K + – Inverter Auditor 3 2 1 Find diagrams for more configurations at www.wattwatchers.com.au/support Place CT connected to ... On cables connected to ... Auditor 6 Wiring Diagram 1+ and 4+ Supply 3 phases 2+ and 5+...
- Page 14 Our team is available from 0900 to 1700, Monday to Friday, Sydney time. Support phone: 02 8316 7540 (+61 2 8316 7540 from overseas) Support: To lodge a Support ticket, please visit our Support Portal at www.wattwatchers.com.au/support WW 018020 Quick Start Guide - A6W S018019 Quick Start Guide - A6M...
Need help?
Do you have a question about the Auditor 6W and is the answer not in the manual?
Questions and answers