Table of Contents
Advertisement
Quick Links
A
9970
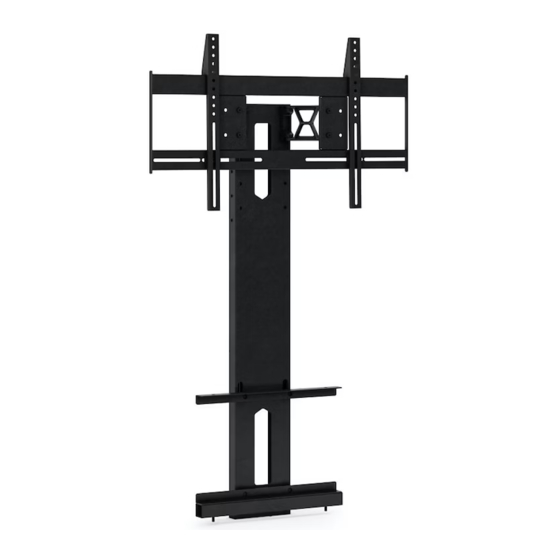
Component List
A - 5mm Allen Wrench
B - Cabinet Mount
C - 5 / 16 x 5 / 8 in
D - Spine x 1
E - Swiveling Bracket
F - 5 / 16 x 1- 3 / 4 in
G - Horizontal Mounting
H - 5 / 16 x 3 / 8 in
I - Washer x 4
J - Vertical Mounting
K - TV Mounting Kit
M - Leveling Disc x 2
N - Jam Nut x 2
Designed by BDI Design Studio.
These distinctive product configurations are protected by US and
international patents, trade dress, and/or copyright laws.
BDI is a trademark of Becker Designed, Inc. All Rights reserved.
©2009, BDI
Made in Taiwan. 062309v2
R E N A
Your Arena Flat Panel Mount is engineered for easy
assembly. Carefully follow this procedure to prevent any
damage.
x 1
Placement and Maintenance
Arena Flat Panel Mount is designed for indoor use on level
Brackets
floors. Clean steel parts with a moist cloth.
x 2
Step 1
Screws
Unpack and identify the components at left. The assembly
x 10
workspace should be a non-marring surface such as carpet.
For missing hardware pieces, please contact BDI Customer
Service at customerservice@bdiusa.com. For all other
concerns, please contact your BDI Retailer.
Step 2
Attach two Cabinet Mount Brackets (B) to rear-center
edge of cabinet's Top and Bottom Panels using six (6) 5 / 16
x 5 / 8 in Screws (C) and provided Allen Wrench (A).
Assembly
x 2
Screws
x 4
Bracket
x 1
Screws
x 4
Bracket
x 2
x 1
A S S E M B L Y I N S T R U C T I O N S
.
BDIUSA
COM
B
1
@
CUSTOMERSERVICE
BDIUSA
C x 6
.
COM
Advertisement
Table of Contents

Related Manuals for BDI ARENA 9970


Summary of Contents for BDI ARENA 9970
- Page 1 N - Jam Nut x 2 Designed by BDI Design Studio. These distinctive product configurations are protected by US and international patents, trade dress, and/or copyright laws. BDI is a trademark of Becker Designed, Inc. All Rights reserved. ©2009, BDI Made in Taiwan. 062309v2...
- Page 2 Step 3 Attach Spine (D) onto Cabinet Mount Brackets (B) then fasten securely into place using four (4) 5 / 16 x 5 / 8 in Screws (C) and provided Allen Wrench (A). NOTE: Mounting hole pattern can vary depending on cabinet model.
- Page 3 NOTE: Selecting the ‘side-mount’ Spine location for the Swiveling Brackets will position television close to rear of cabinet, but can limit left-to-right swiveling. Selecting the ‘front-mount’ Spine location will position television approx 1.5” closer to cabinet front and will enable maximum left-to-right swiveling range. Front Mount Side Mount Step 5...
- Page 4 NOTE: Various mounting screws are provided in TV Mounting Kit (K), but some TVs may require specific hardware not provided by BDI. In such cases, please contact your TV manufacturer to identify and source your hardware. Install Leveling Disc (M) onto threaded posts of Vertical Mounting Bracket (J).
- Page 5 Step 7 (continue) Level the TV using the Leveling Discs (M) near the slots in the lower Horizontal Mounting Bracket (G). Then secure into place using provided Jam Nut (N) on exposed mounting stud until finger-tight. Step 8 Use the open channel inside Spine (D) to organize and route cabling to and from the TV.
Need help?
Do you have a question about the ARENA 9970 and is the answer not in the manual?
Questions and answers