
Related Manuals for Nasco Lifeform LF01087U


Summary of Contents for Nasco Lifeform LF01087U
- Page 1 Central Venous Cannulation Simulator LF01087U Instruction Manual WARNING: Products may contain dry natural rubber. Products by Nasco NP155_86_LF01087_CentVenoCannulation.indd 1 9/14/15 9:02 AM...
- Page 2 NP155_86_LF01087_CentVenoCannulation.indd 2 9/14/15 9:02 AM...
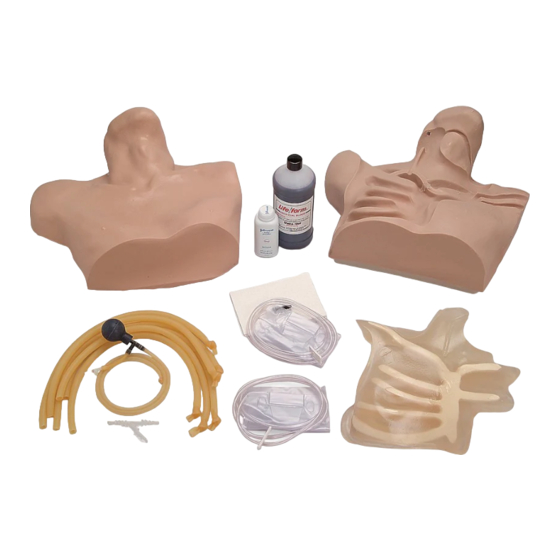
- Page 3 Project Consultant List of Components Torso Base The design and assembly of this simulator would not have been possible without the cooperation Muscle Bone Insert and expertise furnished to us by: Skin Overlay • Forrest M. Gridley, M.A., P .A.-C. 2 Fluid Bags, 1,500 ml •...
- Page 4 General Information About the Simulator External Jugular Approach The external jugular vein portion of the simu- Procedures Which May Be Performed lator can be set up alone in the simulator or in conjunction with the other vein systems if Subclavian Vein Approaches desired.
- Page 5 With the muscle bone insert lying upside down (ster- num touching table), locate the subclavian vein tubing (letter H in list of components and components image). Figure 3 This is the largest diameter tube supplied. It is knotted at the end. Place into the simulator with the knotted end inside the muscle bone insert.
- Page 6 Figure 6 Making sure all tubes are properly positioned and held in place, “invert” the muscle bone insert and position in the torso base. Place the open end of the external jugular vein through the hole in the jaw of the torso base. (See figure 6.) Position the carotid pulse Figure 7...
- Page 7 Figure 8 Apply the skin overlay to the torso, beginning at the neck. At this point, feed the external jugular vein through the hole in the top of the skin overlay. Disconnect the pulse bulb on the carotid pulse tubing. Pull the ends of all three tubes through the open- ing in the skin located...
- Page 8 Figure 10 Now attach the subclavian and internal jugular veins from the shoulder to the top of the “Y” connector. After attaching the subclavian and the internal jugular to the “Y” connector, apply the strap- ping ties to ensure a tight seal of the tubing to the connector.
- Page 9 Figure 12 The simulator is almost ready to use. All that remains is to charge the veins with blood. To do this, remove the skin from the right shoulder areas — enough to reveal the “knotted ends” of the subclavian and inter- nal jugular.
- Page 10 Jugular Vein, 12 Strapping Ties, and “Y” Connector LF09919U Nasco Cleaner *Not for sale outside the U.S.A. Actual product may vary slightly from photo. Nasco reserves the right to change product color, materials, supplies, or function as needed. NP155_86_LF01087_CentVenoCannulation.indd 10 9/14/15 9:03 AM...
- Page 11 NP155_86_LF01087_CentVenoCannulation.indd 11 9/14/15 9:03 AM...
- Page 12 Access Leg on a Stand LF01012U LF00995U Fort Atkinson 901 Janesville Avenue, P .O. Box 901 Fort Atkinson, Wisconsin 53538-0901 1.800.558.9595 eNasco.com • E-mail: lifeform@eNasco.com COPYRIGHT © NASCO 2015 PRINTED IN U.S.A. NP 115-86/RV 9-15 NP155_86_LF01087_CentVenoCannulation.indd 12 9/14/15 9:03 AM...
Need help?
Do you have a question about the Lifeform LF01087U and is the answer not in the manual?
Questions and answers