idiag P100 User Manual
Hide thumbs
Also See for P100:
- Quick reference manual (13 pages) ,
- Manual to getting started (8 pages) ,
- Manual (10 pages)
Table of Contents
Advertisement
Quick Links
Advertisement
Table of Contents

Related Manuals for idiag P100


Summary of Contents for idiag P100
- Page 1 IDIAG P100 User manual Version 1.0...
-
Page 2: Table Of Contents
Copyright 2020, Idiag AG. All rights reserved. No part of this publication may be reproduced or stored in a data retrieval system or be disseminated in any other form or © using any other procedure without prior written permission from Idiag AG. Idiag and the Idiag logo are registered trademarks of Idiag AG. - Page 3 12.3 Transport conditions ............................27 12.4 Storage conditions ............................27 Technical specifications ..........................28 Troubleshooting (problem/possible cause/solution) ................. 29 Disposal ................................29 Warranty ................................30 16.1 Warranty conditions ............................30 16.2 Warranty coverage ............................30 16.3 Legal provisions ..............................30 16.4 Limitation of liability ............................
-
Page 4: Notes On The Idiag P100 User Manual
1.2 Users It is recommended that the Idiag P100 is only used by persons who have made themselves familiar with the Idiag P100 hardware in advance by reading the user manual. -
Page 5: Important Safety Advice
2 Important safety advice Warning! • Read the quick reference guide or this user manual before using the Idiag P100. • Avoid hazardous situations that are marked “WARNING”. • Any repair or servicing work may only be carried out by authorised personnel. - Page 6 • The user carries full responsibility for all types of training application. Idiag assumes no responsibility for the training application. • Idiag shall not be liable for any side effects whatsoever that occur following training with the Idiag P100. • Observe the hygiene requirements set out in Chapter 11 “Maintenance” (see page 24).
-
Page 7: Description The Idiag P100
3.2 Additional parts The Idiag P100sport App can be downloaded for iOS and Android from the respective App Stores. Links to the current version of the App can be found on our website at https://www.idiag.ch/p100app/. The app is needed to activate all available training modules. -
Page 8: Introduction
Swiss Federal Institute for Technology Zurich (ETH) the Berne University of Applied Sciences (BFH) and the University of Zurich (UZH). The consistent usage of the Idiag P100 promises a significant improvement in respiratory muscle strength and overall physical performance capacity in people at various levels of performance. -
Page 9: Before Operating The Idiag P100
• The Idiag P100 will display the low-battery icon. Procedure Open the Idiag P100 by pulling the opening aid on the detachable module and install the battery as shown. Before closing, carefully check that the battery is correctly positioned. Installing the battery... -
Page 10: Assembling The P100
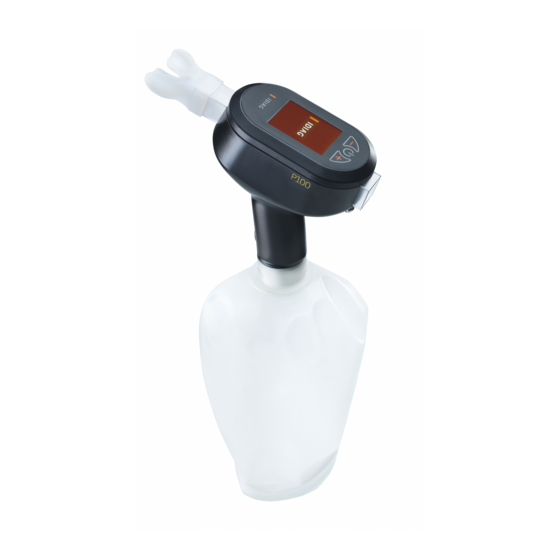
4 Base 2 Detachable module 7 Hand loop 6 Mouthpiece 5 Breathing bag Prepare your Idiag P100 before first use in accordance with Chapter 11 CAUTION “Maintenance”. Attaching the breathing components 1. Place all parts on a table as illustrated above. -
Page 11: General Commands
>200 >200 9.3 General commands Press the On/Off button for at least one second to turn the Idiag P100 on and On/Off button off. When turning the device on hold it as still as possible or place it on a firm surface. -
Page 12: Starting A Strength Training Session
FREE TRAINING: This allows you to immediately commence free training. This mode offers free respiratory training with CO regulation, but without individual training settings. STRENGTH TRAINING: In “Strength” mode you train your respiratory muscle strength with short, intensive bouts of exercise. Before training for the first time, or as necessary, you can take the assessment test to automatically determine your training settings. - Page 13 On the next screen, follow the instructions on the device (e.g. the inspiration strength test, as shown here). Breathe calmly and slowly. If you become dizzy or unwell stop the test and only CAUTION continue once you are able to breathe calmly and slowly again. After you have successfully completed the respiratory muscle strength test, the training settings are configured in accordance with the test results (30 breaths, pressure threshold at 50% of the maximum measured strength).
- Page 14 Breathe calmly and slowly. If you become dizzy or unwell stop the test and continue only once you are able to breathe calmly and slowly again. CAUTION To set the training duration, tap NUMBER OF BREATHS (step 8a). To set the training intensity, tap THRESHOLD (step 8b).
-
Page 15: Starting Endurance Training
10a. Tap CONTINUE to continue training without any changes. Tap STOP to stop training and go to the currently selected training mode (step 6). Select TRAINING SETTINGS change current training settings (step 7). 10b. Training completed successfully. Tap RESTART to start training again with the same settings (step 6). - Page 16 If no endurance test results are saved on the device or if the last test took place more than two weeks ago, a breathing depth test is recommended in the next step. Tap START to begin the test or SKIP to skip the test (go directly to step 6b).
- Page 17 Read the training guide on the device carefully and then tap START to begin training. Go to step 8. To change the training settings, tap TRAINING SETTINGS ( ) at the lower edge of the screen. Tap the arrow to return to step 1.
- Page 18 Change the breathing depth by tapping +/-. Tap RESET to return to the original values. Tap START to begin training (step 8). Tap the arrow to return to step 6. Perform training as specified by the device (see Chapter 10, Respiratory feedback).
- Page 19 The duration shows you for how long you trained in minutes and seconds. The power of breathing shows you an average value of the energy expended during the training session. Note For additional results, result history and calendar function, please download the Idiag P100sport App and follow the instructions in the app.
-
Page 20: Respiratory Feedback
Breathing depth OK Breathe shallower Breathe deeper Breathing frequency End of expiration Middle of inspiration End of inspiration Middle of expiration End of expiration Note For additional respiratory feedback, please download the Idiag P100sport App and follow the instructions in the app. -
Page 21: Acoustic Feedback During Endurance Training
10.2 Acoustic feedback during endurance training The Idiag P100 signals each change between inspiration and expiration and vice-versa with a short beep during visual feedback. The short beep is replaced with a motivating tone if the depth of respiration is too shallow or a calming tone if the depth of respiration is too deep. -
Page 22: Maintenance
11.1 Inspection by the user Check the Idiag P100 before each training session. If it does not work perfectly, send it to a local point of sale so it can be checked and/or repaired. Repairs may only be carried out by Idiag or an authorised competence centre. -
Page 23: Hygiene Overview
See table in the preceding Chapter. • Clean the Idiag P100 parts as required. Preparation • Remove the battery before cleaning the Idiag P100. • Dismantle the air-guiding parts (see Chapter 9.2). Methods • Air-guiding parts: wash by hand with water •... -
Page 24: Disinfection
Disinfect the Idiag P100 parts as required. Methods • Chemical methods (see below) Preparation • Remove the battery before disinfecting the Idiag P100 • Dismantle the air-guiding parts (see Chapter 9.2) • Clean all parts before disinfecting them (see Chapter 11.4 “Cleaning”). - Page 25 • Never immerse the base module or detachable module in disinfectant. • The use of a spray is not recommended because the disinfectant could penetrate the mechanical parts of the Idiag P100. If a disinfectant has been used which produces explosive gas mixtures, these must have evaporated before you switch on the device.
-
Page 26: Operating, Storage And Transport Conditions
Do not place heavy objects onto any part of the Idiag P100. • Remove the battery from the Idiag P100 if you are not going to use the device for a period of several days or longer. 12.2 Operating conditions •... -
Page 27: Technical Specifications
If you wear a heart pacemaker or other implanted device, keep at least 20 centimetres away from the Idiag P100. However, there is no guarantee that interference will not occur, even if the device is used in accordance with the instructions. If... -
Page 28: Troubleshooting (Problem/Possible Cause/Solution)
14 Troubleshooting (problem/possible cause/solution) Send any questions about the Idiag P100 and its accessories or equipment to the address on the last page of this user manual. To allow immediate processing and a faster response, please provide a complete return address and the serial number of the Idiag P100 in question. -
Page 29: Warranty
16 Warranty Dear Customer, Congratulations on your purchase of the Idiag P100 and thank you very much for placing your trust in us. The Idiag P100 was developed according to the latest scientific findings and manufactured using cutting edge production methods. The selected materials ensure reliable function and a long service life. Should the Idiag P100 still require service under warranty, please contact the address listed on the last page. - Page 30 GERMANY SWITZERLAND Idiag GmbH Idiag AG Romanstrasse 72 Mülistrasse 18 D-80639 Munich CH-8320 Fehraltorf +49 89 2000 297 20 +41 (0)44 908 58 58 info@Idiag.de +41 (0)44 908 58 59 idiag.de info@Idiag.ch idiag.ch...
Need help?
Do you have a question about the P100 and is the answer not in the manual?
Questions and answers