Table of Contents
Advertisement
DVD STEREO SYSTEM
SISTEMA ESTEREO DVD
CHAINE STEREO AVEC LECTEUR DE DVD
HT-DV90
8B-AX2-903-11
011201BCK-U-AN
For assistance and information
call toll free 1-800-BUY-AIWA
(United States and Puerto Rico)
U
OPERATING INSTRUCTIONS
MANUAL DE INSTRUCCIONES
MODE D'EMPLOI
En
(English)
E
(Español)
F
(Français)
Advertisement
Table of Contents

Related Manuals for Aiwa HT-DV90


Summary of Contents for Aiwa HT-DV90
- Page 1 DVD STEREO SYSTEM SISTEMA ESTEREO DVD CHAINE STEREO AVEC LECTEUR DE DVD HT-DV90 For assistance and information 8B-AX2-903-11 011201BCK-U-AN OPERATING INSTRUCTIONS MANUAL DE INSTRUCCIONES call toll free 1-800-BUY-AIWA (United States and Puerto Rico) MODE D’EMPLOI (English) (Español) (Français)
- Page 2 (you will find them on the rear of your set) in the space provided below . Please refer to them when you contact your dealer in case of dif ficulty . Model No. Serial No. (Lot No.) HT-DV90 SX-F90 SX-R90 SX-C90 TS-W90...
- Page 3 Electric Power Power Sources - This unit should be operated only from the type of power source indicated on the marking label. If you are not sure of the type of power supply to your home, consult your appliance dealer or local power company battery power , or other sources, refer to the operating instructions.
-
Page 4: Table Of Contents
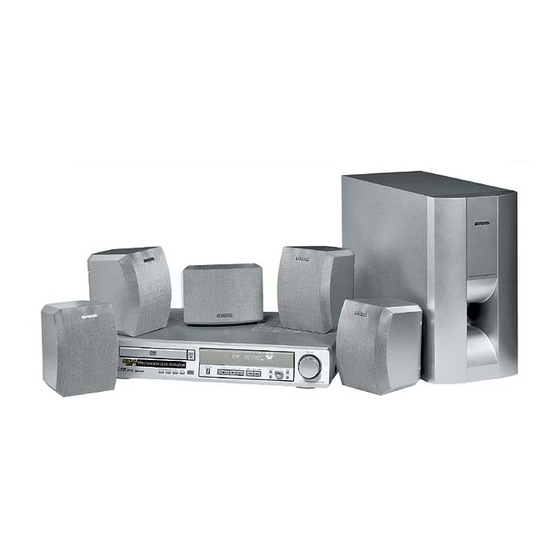
CARE AND MAINTENANCE ... 32 TROUBLESHOOTING GUIDE ... 33 SPECIFICATIONS ... 34 ENGLISH Check your system and accessories HT-DV90 HT-DV90 DVD stereo receiver SX-F90 Front speakers SX-R90 Surround speakers SX-C90 Center speaker TS-W90 Subwoofer Front speaker cord (approx. 4m/13 ft.) x 2 Surround speaker cord (approx. -
Page 5: Preparations
PREPARATIONS CONNECTIONS IMPORTANT Connect the speakers, antennas, and all optional equipment first. Subwoofer Surround speaker Front speaker Connect your television set to this unit. If your TV has an S-video input jack; Connect the S-VIDEO OUT jack of this unit to the S-video input jack of your TV with an optional S-video connecting cord. - Page 6 • Do not bring the FM antenna near metal objects or curtain rails. the speaker • Do not bring the AM antenna near other optional equipment, cord to the the stereo system itself, the terminals noise will be picked up. • Do not unwind the AM antenna wire.
-
Page 7: Connecting Other Equipment
CONNECTING OTHER EQUIPMENT Besides the basic connections described earlier Before making additional connections, be sure to turn of Wall mounting of the speakers is also described here. MD recorder, etc. to OPTICAL OUT jack to OPTICAL IN jack to OPTICAL OUT jack MD player, etc. -
Page 8: Phones Jack
5 supplies screws. Refer to the instructions of the pedestal for further information. AIWA disclaims any responsibility for injury to persons or other accidents caused by not fitting the front and/or surround speakers properly or if the place of the installation is not suitable. -
Page 9: Remote Control
REMOTE CONTROL INSERTING BATTERIES Open the battery cover on the rear and insert two R03 (size batteries. When to replace the batteries The maximum operational distance between the remote control and the sensor on the main unit should be approximately 5 meters (16 ft.). - Page 10 7 TOP MENU Displays the title menu. RETURN Returns to the previous menu screen. ikjl ENTER Selects the menu item and enters the selected item. MENU Displays the menu for DVDs. SETUP Enters the setup menu for DVDs. 8 VOLUME Adjusts the volume.
-
Page 11: Display Window
ANGLE Selects the angle to view the scene (DVDs only). AUDIO Changes audio tracks (DVDs only). SUBTITLE Changes the subtitle language (DVDs only). ON SCREEN Displays the disc playback status on the TV/VIDEO Switches between TV or VIDEO. DIGITAL/ANALOG When the function is VIDEO 1 or VIDEO 2, selects digital or analog input. -
Page 12: Before Operation
BEFORE OPERATION TURNING THE POWER ON Press POWER 6 STANDBY/ON (POWER on the remote control) to turn the unit on and off. ADJUSTING VOLUME Turn VOLUME, or press VOLUME + or - on the remote control. The volume level is displayed as a number from MIN(0) to MAX (80). -
Page 13: Playing Dvds And Audio Cds
PLAYING DVDS AND AUDIO CDS This unit can play DVD and audio CDs. The descriptions in this section apply to all types of discs that can be played on this unit unless otherwise noted. BEFORE USE SUPPORTED DISC FORMATS This unit can play discs with the following logos. DVDs (8 cm disc/12 cm disc) Audio CDs (CDDA) - Page 14 COPYRIGHT PROTECTION It is forbidden by law to copy , broadcast, show , broadcast via cable, play in public, or rent copyright material without permission. This unit features the copy protection function developed by Macrovision. Copy protection signals are included in some DVD discs.
-
Page 15: Basic Operations
• File extension A 3-character string added to a file name under W DOS environment is called “file extension”. used mainly to identify types of files. File extension for MP3 files is “.mp3”. Notes on creating MP3 discs • When converting audio data to MP3 To enjoy high sound quality , we recommend storing MP3 files with a sampling frequency of 44.1 kHz and a fixed bit rate of 128 kbps. -
Page 16: Using The Menu
DVDs: Playback starts automatically . If the menu is displayed, see “USING Elapsed time of current title Title number To switch the number between title and chapter SHIFT+TITLE/CHP. With each press, title or chapter is displayed alternately . Audio CDs function: Total number of tracks Total playing time 6 If playback does not start automatically, press c... -
Page 17: Selecting A Track
SELECTING A TRACK Besides the methods described here, discs can also be searched by title/chapter (DVDs), track (CDs) or time. See “ON SCREEN DISPLAY INFORMATION”, page 23. DIRECTLY SELECTING A TRACK WITH THE REMOTE CONTROL (CD ONLY) A track can be selected directly by entering the track number on the remote control, either during playback or stop. -
Page 18: Frame Advance And Slow Playback
FRAME ADVANCE AND SLOW PLAYBACK FRAME ADVANCE (DVD ONLY) 1 Press a to pause the disc. 2 Press a repeatedly to advance frames. With each press, playback advances one frame. To return to normal playback Press c. NOTE There is no audio during Frame Advance. -
Page 19: Programed Playback
REPEAT PLAYBACK (CDs) Press SHIFT+REPEAT repeatedly on the remote control during playback. With each press, the Repeat playback mode changes: ONE: Repeats the current track. TV screen: REPEAT ONE ALL: Repeats all tracks on the disc. REPEAT ALL OFF: Cancels repeat mode. (Normal playback) REPEAT OFF To repeat playback of selected track(s) Program the track(s) with the programed playback function, and... -
Page 20: Random Playback
To check the program Press i or k repeatedly during stop in programed playback mode. With each press, the track numbers appear in the order programed on the unit’ s display . To clear the program Press C during stop in the programed playback mode. •... -
Page 21: Special Dvd Features
SPECIAL DVD FEATURES Operations for special features characteristic to DVDs are described here. ZOOM FUNCTION (DVD ONLY) Press SHIFT+ZOOM on the remote control during playback. The picture around the center of the screen is enlarged. With each press: Normal playback To move the enlarged picture Press i, k, j, or l. - Page 22 CHANGING AUDIO TRACKS (DVD ONLY) Some DVDs have more than one audio tracks, such as soundtracks in dif ferent languages. You can change the audio track when playing such discs. Press AUDIO on the remote control during playback. With each press, the audio track will change. 1 ENG PCM 2 FRE PCM For signal type information, see “ON SCREEN DISPLA...
-
Page 23: On Screen Display Information
ON SCREEN DISPLAY INFORMATION The information of current disc is displayed on the and you can select title, chapter or audio language etc. Press ON SCREEN on the remote control during playback. On screen display information is displayed on the When the menu screen is displayed, on screen display information is not displayed. -
Page 24: Surround Playback
SURROUND PLAYBACK This unit comes equipped with a built-in Dolby Digital decoder, Dolby Pro Logic decoder and a DTS decoder. With this unit’ s built-in Dolby Digital decoder decoder , DTS decoder and the speaker system (the center surround speaker units and the subwoofer supplied in addition to the left and right front speakers), Dolby Digital, Dolby Pro Logic, or DTS sources can be played back in full scale home theater sound. -
Page 25: Speaker Setting
SURROUND PLAYBACK MODE INDICATION The “ h DIGITAL”, “dts” and “ h PRO LOGIC” indicators show your present playback condition as follows; “h DIGITAL” indicator lights up... when a Dolby Digital source is played back. “dts” indicator lights up... when a DTS source is played back. “h PRO LOGIC”... - Page 26 8 Press SHIFT+SP SETUP. The setting is completed. NOTE • When “F-SMALL” is selected, “SW and cannot be changed. • “CENTER” and “SURROUND” cannot be set when STEREO mode is selected. (See “PLA YING WITH SURROUND SOUND”, page 24) ADJUSTING THE SPEAKER DISTANCE Adjusts the speaker distance so that sounds from each speaker can reach the listening position at the same time.
-
Page 27: Radio Reception
RADIO RECEPTION Your receiver can receive FM and AM radio broadcast. RADIO RECEPTION MANUAL TUNING 1 Press FUNCTION repeatedly to select TUNER function. On the remote control, press TUNER/BAND. 2 Press BAND to select a band. On the remote control, press TUNER/BAND. -
Page 28: Sound And Timer Adjustments
ADJUSTMENTS ADJUSTING THE ANTENNAS FM antenna: Extend fully and position for the best possible reception. An outdoor antenna is recommended for better reception. See “CONNECTING AN OUTDOOR ANTENNA”, page 8. AM antenna: Position and rotate the antenna to find the best reception. Changing FM reception to monaural Press SHIFT+MONO TU on the remote control. -
Page 29: Sleep Timer
ADJUSTING DYNAMIC RANGE (DOLBY DIGITAL) In Dolby Digital, dynamic range between soft and loud sounds can be adjusted to suit your desired playback volume. 1 Play the Dolby Digital sound. See “PLA YING WITH SURROUND SOUND”, page 24. 2 Press SHIFT+MIDNIGHT repeatedly to select desired mode. -
Page 30: Basic Menu Operations
BASIC MENU OPERATIONS Basic operation of the SETUP MENU is described here. 1 Select DVD/CD function. Press FUNCTION repeatedly on the main unit or press DVD/ CD on the remote control. 2 Press SETUP. The “SETUP MENU” screen is displayed. SETUP MENU RATING UNLOCK... -
Page 31: Tv Display
TV DISPLAY Sets the aspect ratio of the video signal sent to your connected TV set. SETUP MENU RATING UNLOCK PASSWORD CHANGE TV DISPLAY 4:3 /LB TV TYPE NTSC SET TV DISPLAY MODE The default setting is “4:3 /LB (letterbox)”. If you are connecting to a 16:9 (wide) ratio setting to “16:9 WIDE”. -
Page 32: General
Regular inspection and maintenance are recommended after every 1,000 hours of use. (This depends on the operating environment.) For details, please contact your Aiwa dealer . CLEANING DISCS ENGLISH Fingerprints and dust on the disc can cause poor picture quality and sound distortion. -
Page 33: Troubleshooting Guide
TROUBLESHOOTING GUIDE If the unit fails to perform as described in these Operating Instructions, check the following guide. RECEIVER GENERAL There is no sound. • Is the AC cord connected properly? • Is there a bad connection? ( pages 5 and 6) •... -
Page 34: Specifications
SPECIFICATIONS Main unit HT-DV90 FM tuner section Tuning range 87.5 MHz to 108 MHz Usable sensitivity (IHF) 16.2 dBf Antenna jack 75 ohms (unbalanced) AM tuner section Tuning range 520 kHz to 1720 kHz (10 kHz step) 531 kHz to 1629 kHz (9 kHz step) Usable sensitivity 700 µV/m... - Page 35 APPENDIX/APÉNDICE/APPENDICE BRAND CODES/CÓDIGOS DE MARCAS/CODES DE MARQUE TV brand code/Código de marca de televisior/Codes de marque de televiseur Brand Code Marca Código Marque Code ABEX DAEWOO ADMIRAL AIWA AKAI ALLERON AMTRON ANAM DAYTRON DIMENSIA ANAM NATIONAL DUMONT ELECTROBAND ELECTROHOME AUDIOVOX...
- Page 36 MIDLAND LOEWE LUXMAN MINUTZ MITSUBISHI MAGNAVOX MOTOROLA MULTITECH MULTIVISION NIKKO MARANTS ONWA MARANTZ ORION PANASONIC MEGATRON MEMOREX PHILCO PHILIPS PILOT PIONEER PORTLAND PRICE CLUB PRISM PROSCAN PROTON PULSER QUASAR RADIO SHACK/ REALISTIC APPENDIX/APÉNDICE/APPENDICE SAMPO SAMSUNG SAMSUX SANYO SCOTCH SCOTT...
- Page 37 TV brand code/Código de marca de televisior/Codes de marque de televiseur SEARS SYMPHONIC TECHNICS TECHWOOD SHARP TELECAPTION TOTEVISION SHOGUN SIGNATURE SIMPSON SONY SOUNDESIGN UNIVERSAL STARLITE SUPREME SYLVANIA APPENDIX/APÉNDICE/APPENDICE TATUNG TEKNIKA YAMAHA ZENITH TOSHIBA VICTOR VIDTECH WARDS...
- Page 38 VCR brand code/Código de marca de videograbadora/Codes de marque de magnétoscope Brand Code DAEWOO Marca Código Marque Code ADMIRAL ADVENTURA AIWA DIMENSIA AKAI DYNATECH ELECTROHOME ELECTROPHONIC AMERICAN HIGH EMERSON ANAM ASHA AUDIO DYNAMICS AUDIOVOX BEAUMARK BELL & HOWELL CALIX CANDLE...
- Page 39 VCR brand code/Código de marca de videograbadora/Codes de marque de magnétoscope PENTEX RESEARCH MONTGOMERY WARD MOTOROLA PORTLAND MULTITECH PROSCAN QUARTER RADIOSHACK/ REALISTIC NIKKO NOBLEX OLYMPUS OPTIMUS OPTONICA ORION PANASONIC APPENDIX/APÉNDICE/APPENDICE PENTAX PHILCO PHILIPS PILOT PIONEER RICHO RUNCO SAMSUNG PROTEC PULSAR QUARTZ SANKY QUASAR...
- Page 40 WARDS XR-1000 YAMAHA CABLE brand code/Código de marca de TV por cable/Code de marque de décodeur de télévision par câble Brand Code Marca Código Marque Code AIWA ANAM ANTRONIX ARCHER CABLETENNA CABLEVIEW CENTURY CITIZEN COLOUR VOICE COMTRONICS CONTEC EASTERN GARRARD...
- Page 41 CABLE brand code/Código de marca de TV por cable/Code de marque de décodeur de télévision par câble REGAL REGENCY REMBRANDT RUNCO SAMSUNG SCIENTIFIC ATLANTA SIGNAL SIGNATURE SL MARX SPRUCER STARCOM STARGATE STARQUEST TANDY TELEVIEW TOCOM TOSHIBA TUSA TV86 UNIKA UNITED ARTISTS UNITED CABLE UNIVERSAL VIDEOWAY...
- Page 42 NOTE This equipment has been tested and found to comply with the limits for a Class B digital device, pursuant to Part 15 of the FCC Rules. These limits are designed to provide reasonable protection against harmful interference in a residential installation. This equipment generates, uses, and can radiate radio frequency energy and, if not installed and used in accordance with the instructions, may cause harmful interference to radio...
Need help?
Do you have a question about the HT-DV90 and is the answer not in the manual?
Questions and answers