Advertisement
NEXSAN
Unity Storage U2G460 Expansion
Quick Start Guide
This document provides installation steps for racking and cabling the Unity Storage U2G460 Expansion,
and for connecting to a Unity Storage System. Instructions are also provided for powering on and
monitoring. For the latest updates, please visit
Taking delivery
Check to ensure that no damage has been sustained
to the packaging in transit. If any of the Unity storage
components appear damaged, you should file a
damage claim with your reseller.
Power supply units and fan assemblies
1
Primary fan assemblies
2
LEDs. See
Monitor the Unity Storage
3
Expansion
on
page 7
I/O module (IOM) ports: 6 HD Mini-SAS ports. See
4
Connect to a Unity Storage System
Management ports
5
https://helper.nexsansupport.com/unt_support
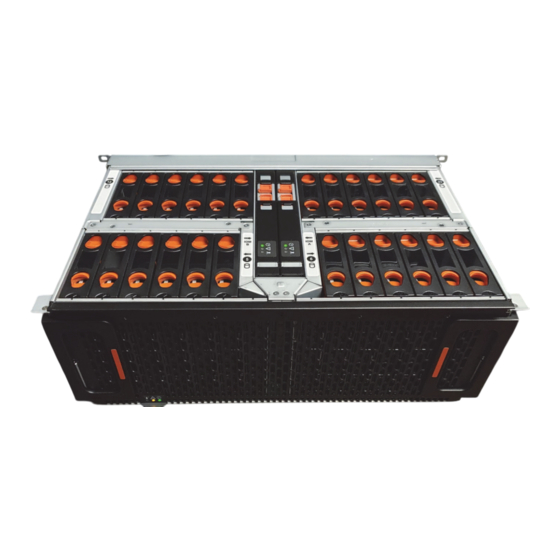
Hardware overview
The front, top, and rear views of the U2G460 are
shown in these diagrams.
Carefully read safety notices on
A
B
Ensure ahead of time that you have a suitable
rack; see
on
page 6
page
Ensure that you have a Phillips screwdriver.
C
Arrange for assistance to unpack and move the
D
U2G460 Storage Expansion into position. The unit
weighs 84 lbs without drives and 175 lbs fully
populated (see
1 — U2G 460 Quick Start Guide
Prepare for installation
Rack and enclosure specifications
8.
page
8).
CAUTION:
Acclimate new disk drives to
room temperature for two hours before you
install them.
Firmware Version 6.0
page
8.
on
Advertisement
Table of Contents

Related Manuals for Nexsan U2G460


Summary of Contents for Nexsan U2G460
- Page 1 Quick Start Guide Firmware Version 6.0 This document provides installation steps for racking and cabling the Unity Storage U2G460 Expansion, and for connecting to a Unity Storage System. Instructions are also provided for powering on and monitoring. For the latest updates, please visit https://helper.nexsansupport.com/unt_support...
- Page 2 19 DATA HDDs. Up to 3 drive packs can be image. used in a U2G460. Check that the drives included in your shipment correspond to your order and packing slip.
- Page 3 Install one cage nut at the uppermost mounting hole of the 4U space that the enclosure will occupy. If the U2G460 will be installed in a rack for shipping purposes, install four more cage nuts in holes 3-6 of the 4U space. These will receive the M5 x 10mm T15 Torx screws that secure the enclosure to the rack with the shipping bracket.
- Page 4 Test for binding in the extension of the CMAs by Team lift the U2G460 chassis from the sides—not gently pulling the enclosure out of the rack to from the front and back. ensure the cables extend properly and that the Line up the inner-chassis rails with the extended system doesn’t bind.
- Page 5 Install the drives closest to the power supplies at the rear of the enclosure, moving forward one row at a time. CAUTION: If the U2G460 is not fully populated, to maintain proper air flow you MUST install drive blanks to complete the last incomplete row of drives. To install the drives:...
- Page 6 Storage System. Active SAS cables are required to daisy chain between U2G460s. The Unity Storage System is hot pluggable: Once in service, powering down is not normally required to add a Unity Storage Expansion. It is recommended to plug in the power cables to power on the new U2G460 last.
-
Page 7: Power On Unity Components
Monitor the Unity Storage Expansion This section describes the front and back panel LEDs that help you monitor the Nexsan Unity U2G460 Storage Expansion. Rear I/O LEDs Number Color... -
Page 8: Safety Notices
Copyright © 2010-2019 Nexsan Technologies, Inc. All Rights Reserved. Nexsan®, Unity™, Unity 2200™, Unity 4400™, Unity 6900™, Unity 2200X™, US 224™, US 316™, US 424™, US 460™, U2G460™, FASTier™, and the Nexsan logo are trademarks or registered trademarks of Nexsan Technologies, Inc.
Need help?
Do you have a question about the U2G460 and is the answer not in the manual?
Questions and answers