Advertisement
Quick Links
33
Insertar pivote y
Bisagra vidrio superior
Insert pivot and upper
glass door hinge
B
Deslice los cajones
dentro del mueble.
Slide the drawers
inside the cabinet.
L
P
O
P
O
Después de ajustar todas
las cajas minifix, cúbralas
con las tapas adhesivas.
After you finish the
adjustment of the cams,
cover them with the
cover caps.
Pág. 24
www.rta.com.co
Insertar pivote y
Insertar puerta de
Bisagra vidrio inferior
vidrio y apretar
Insert pivot and
Insert glass door
lower glass door hinge
and tighten
D
E
T
Pegar cinta
Stick Tape
F
C
M
J
Introducir a presión
la manija
S
Insert Handle
S
Al terminar de armar,
desprenda las letras
A
adhesivas.
After you finish
assembling the cabinet,
take off the adhesive
letters.
INSTRUCCIONES DE ENSAMBLE
ASSEMBLY INSTRUCTIONS
Height: 70,14 in
Alto: 178,15 cm
Width: 18,31 in
Ancho: 46,5 cm
Depth: 15,98 in
Fondo: 40,6 cm
LOT N°
Tel - (572) 691 17 00
PBX - (572) 695 91 81
Yumbo - Valle del Cauca - Colombia
www.rta.com.co
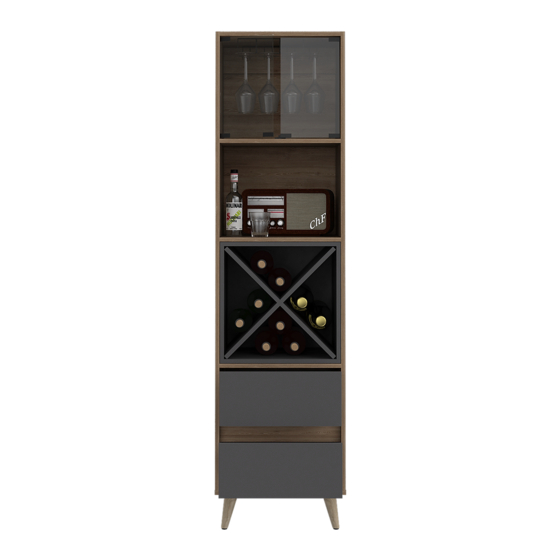
REF./SKU. BMP4458
BAR ALTO SALEM
Salem High Bar Cabinet
Advertisement

Subscribe to Our Youtube Channel
Related Manuals for RTA BMP4458


Summary of Contents for RTA BMP4458
- Page 1 Height: 70,14 in Alto: 178,15 cm Width: 18,31 in Ancho: 46,5 cm Depth: 15,98 in Fondo: 40,6 cm REF./SKU. BMP4458 Después de ajustar todas Al terminar de armar, LOT N° las cajas minifix, cúbralas desprenda las letras con las tapas adhesivas.
-
Page 2: Important Recommendations
Nunca permita que los niños manipulate the cabinet, furniture escalen o manipulen el mueble, la caída de este puede provocar tip over can cause serious lesiones graves o la muerte. injuries or death. 19,95 7,85 Pág. 2 www.rta.com.co Pág. 23... - Page 3 Assembly recommendations Pasos de armado Assembly steps 8-24 Gire para apretar. HERRAMIENTAS NECESARIAS* Rotate to tighten. REQUIRED TOOLS* 5/16" *No incluidas y no se muestran en tamaño real. *Not included, and not shown actual size. www.rta.com.co Pág. 22 www.rta.com.co Pág. 3...
-
Page 4: Assembly Hardware
Pata de Madera Glass door Minifix Color 2 Glue Wooden Leg Color 2 Cover Caps Tornillo de Ensamble Riel Ext.Total Colgador de Copas 3/4" Wine Glass Rack Full Extension 3/4" Drywall Screw Drawer Slides Pág. 4 www.rta.com.co www.rta.com.co Pág. 21... - Page 5 Glass Door Hinge Magnetic Touch (Screws Included) Deslice dentro del modulo. Slide inside the module. Tornillo de Ensamble Chazo Mariposa + Puntillas 2" Tornillo Ensamble Nails 2" Drywall Screw Wall Anchor + Drywall Screw Pág. 20 www.rta.com.co www.rta.com.co Pág. 5...
-
Page 6: Assembly Parts
C - x1 H - x2 M - x2 R - x2 D - x1 I - x1 N - x1 S - x2 E - x1 J - x1 O - x2 T - x1 Pág. 6 www.rta.com.co www.rta.com.co Pág. 19... -
Page 7: Assembly Recommendations
Lea cuidadosamente las Carefully read all the steps and instrucciones e identifique todas identify all the wood parts and las piezas y herrajes antes de hardware before assembling empezar a armar el mueble. the cabinet. Pág. 18 www.rta.com.co www.rta.com.co Pág. 7... - Page 8 Gire para apretar. Rotate to tighten. Pág. 8 www.rta.com.co www.rta.com.co Pág. 17...
- Page 9 Pág. 16 www.rta.com.co www.rta.com.co Pág. 9...
- Page 10 Gire para apretar. Rotate to tighten. Voltear Rotate Voltear el mueble cuidadosamente Carefully flip the furniture Pág. 10 www.rta.com.co www.rta.com.co Pág. 15...
- Page 11 3/4'' Voltear Rotate Gire para apretar. Rotate to tighten. Pág. 14 www.rta.com.co www.rta.com.co Pág. 11...
- Page 12 Voltear Rotate Gire para apretar. Rotate to tighten. Gire para apretar. Rotate to tighten. Pág. 12 www.rta.com.co www.rta.com.co Pág. 13...
Need help?
Do you have a question about the BMP4458 and is the answer not in the manual?
Questions and answers