
Related Manuals for Samsung SGH-T379


Summary of Contents for Samsung SGH-T379
- Page 1 P O R T A B L E Q U A D - B A N D M O B I L E P H O N E User Manual Please read this manual before operating your phone, and keep it for future reference.
-
Page 2: Intellectual Property
Intellectual Property All Intellectual Property, as defined below, owned by or which is otherwise the property of Samsung or its respective suppliers relating to the SAMSUNG Phone, including but not limited to, accessories, parts, or software relating there to (the “Phone System”), is proprietary to Samsung and protected under federal laws, state laws, and international treaty provisions. - Page 3 Some software components of this product incorporate source code covered under GNU General Public License (GPL), GNU Lesser General Public License (LGPL), OpenSSL License, BSD License and other open source licenses. To obtain the source code covered under the open source licenses, please visit: http://opensource.samsung.com.
- Page 4 Your phone is equipped with an advanced voice processing chip that delivers clear mobile calls by suppressing background noise, intermittent sounds (like a siren or nearby conversation), and echoes, allowing you to hear and be heard nearly anywhere. How Does It Work? Based on the intelligence of the human hearing system, the technology: Captures, evaluates and distinguishes all the sound signals surrounding your phone, and the person you're speaking with.
- Page 5 MANUAL SHALL BE CONSTRUED TO CREATE AN EXPRESS OR IMPLIED WARRANTY OF ANY KIND WHATSOEVER WITH RESPECT TO THE PRODUCT. IN ADDITION, SAMSUNG SHALL NOT BE LIABLE FOR ANY DAMAGES OF ANY KIND RESULTING FROM THE PURCHASE OR USE OF THE PRODUCT OR ARISING FROM THE BREACH OF THE EXPRESS WARRANTY, INCLUDING INCIDENTAL, SPECIAL OR CONSEQUENTIAL DAMAGES, OR LOSS OF ANTICIPATED PROFITS OR BENEFITS.
-
Page 7: Table Of Contents
Table of Contents Section 1: Getting Started ... 4 Understanding this User Manual ......4 Battery Cover ........5 Activating Your Phone . - Page 8 Email ......... . . 54 Exchange Email .
- Page 9 Battery Use and Safety ......140 Samsung Mobile Products and Recycling ....141 UL Certified Travel Charger .
-
Page 10: Section 1: Getting Started
Section 1: Getting Started This section explains how to start using your phone. Start by configuring your hardware, activating your service, and then setting up your voice mail. Understanding this User Manual The sections of this manual generally follow the features of your phone. -
Page 11: Battery Cover
This manual provides condensed information about how to use your phone. To make this possible, the following text conventions are used to represent often-used steps: Arrows are used to represent the sequence of selecting successive options in longer, or repetitive, procedures. Left Softkey (indicates the feature is available by pressing the left softkey). -
Page 12: Activating Your Phone
To replace the battery cover: Position the battery cover over the battery compartment and press down until you hear a click. Press down along the edges of the cover to verify it is secured. Activating Your Phone When you subscribe to a cellular network, you are provided with a plug-in SIM card containing subscription details, such as your PIN, available optional services, and many other service features. -
Page 13: Installing The Microsd Memory Card
Carefully slide the SIM card into the SIM card socket until the card is secured into place. Make sure that the card’s gold contacts face down and that the upper-left angled corner of the card is positioned as shown. To remove the SIM card: If installed, remove the battery from its compartment (1 and 2). -
Page 14: Battery
Remove the battery cover. Firmly press the card into the slot and release it. The card should pop partially out of the slot. Remove the card from the slot. Battery Before its initial use, install the battery and charge it fully. Important!: Before removing or replacing the battery cover, make sure the phone is switched off. -
Page 15: Charging The Battery
Use only approved batteries and chargers. Ask your local Samsung dealer for further details. Before using your phone for the first time, you must fully charge the battery. A discharged battery recharges fully in approximately 4 hours. -
Page 16: Accessing The Qwerty Keyboard
When charging is finished, first unplug the charger’s power plug from the AC wall outlet, then disconnect the charger’s connector from the phone. Important!: If your handset has a touch screen display, please note that a touch screen responds best to a light touch from the pad of your finger or a non-metallic stylus. -
Page 17: Switching The Phone On Or Off
Press and hold until the phone switches on. If prompted to enter the phone password, use the keypad to enter your password and press Confirm (LSK) or – or – If prompted to unlock the keypad, use the keypad to press Unlock (LSK) OK (RSK). -
Page 18: Visual Voicemail
You can access your voice mail by either pressing and holding on the keypad or by using the phone’s menu. In Idle mode, press and hold the specified voicemail number. When connected, follow the voice prompts from the voicemail center. Visual Voicemail Visual Voicemail gives you a quick and easy way to access your voicemail. -
Page 19: Section 2: Understanding Your Phone
Section 2: Understanding Your Phone This section outlines some key features of your phone. It also displays the screen and the icons that are displayed when the phone is in use. Features of Your Phone Your phone is lightweight, easy-to-use and offers many significant features. -
Page 20: Keys
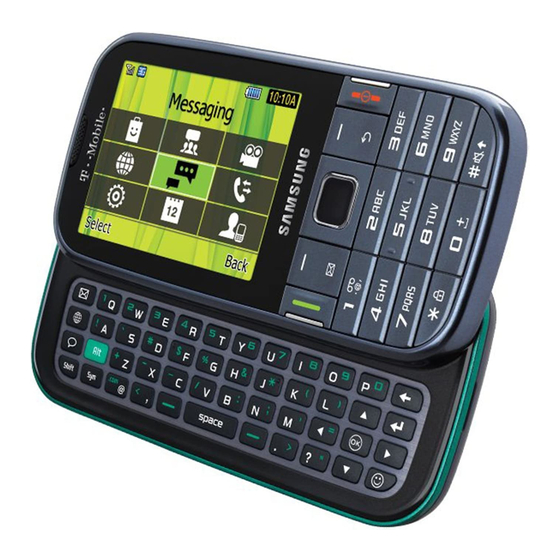
The following list correlates to the illustrations. Speaker allows you to hear the other caller and the different ring tones or sounds offered by your phone. OK key/Optical Joystick pressing down allows you to accept the choices offered when navigating through a menu. -
Page 21: Camera View Of Your Phone
Display shows all the information needed to operate your phone, such as the received signal strength, phone battery level, and time. This phone also offers the convenience of a slide out QWERTY keyboard. To access the keyboard, rotate the phone 90 degrees and slide the top section of the phone up. -
Page 22: Side Views Of Phone
The following illustrations show the side elements of your phone: Volume keys allow you to adjust the Ring volume in standby mode (with the phone open) or adjust the Speaker volume during a call. When receiving an incoming call, if you press the volume key, you can mute the ring tone. -
Page 23: Display Layout
Your phone’s display screen provides a wealth of information about your phone’s status and options. The display has 3 areas: When you receive new messages, icons display in two locations, on the phone’s screen, Missed Messages tab (shown below), and in the icon bar at the top of the screen. - Page 24 This list identifies the symbols you’ll see on your phone’s display screen: Shows the received signal strength. The greater the number of bars, the stronger the signal. Displays when connected to the GPRS network. Displays when your phone is communicating with the GPRS network.
- Page 25 Displays when Silent Mode is active. All incoming sounds are turned off. Displays when Vibration Mode is active. The ringer is set to vibrate only. Displays when sound profile is set to Driving. Displays when sound profile is set to Outdoor. Displays when you set an alarm to ring at a specified time.
-
Page 26: Menu Navigation
Select the On option. Choose from 5 seconds, 15 seconds, or 30 seconds and press Select the Dim option. Choose from Off, 5 seconds, 15 seconds, or 30 seconds and press Press Save (LSK) to retain your new settings. Menu Navigation Menus, sub-menus, and features are accessed by scrolling through the available on-screen menus. -
Page 27: Help
To enable feedback sound: From the Home screen, press Menu (LSK) Personalize Sound profiles Highlight Normal and then press Options (LSK) Use your Optical Joystick to scroll to the right and select the Phone sounds tab. Scroll down to Keypad tone and press Select either Beep or Lucid. -
Page 28: Section 3: Call Functions
Section 3: Call Functions This section describes how to make or answer a call. It also explains the features and functionality associated with making or answering a call. For more information on ringtones see “Sound profiles” on page 110. For more information, refer to “Call Forwarding”... -
Page 29: Adjusting The Call Volume
Use the optical joystick to scroll through the numbers and highlight the number you want. With the entry highlighted from the Call history screen press Options (LSK) to display the following options: • Call: Places a call back to the number. •... -
Page 30: Answering A Call
When somebody calls you, the phone rings and displays the incoming call image. The caller’s phone number, or name if stored in Contacts, is then displayed. Press or Accept (LSK) to answer the incoming call. • If the Any Key answer option is enabled within the Answer options menu (Menu Settings Call settings... - Page 31 Answered Call: Indicates any received calls that were answered. Missed Call: Indicates any missed calls. These are routed to your voicemail. Dialed Call: Indicates all outgoing calls made from your device. Voicemail: Indicates any received calls that were not answered and sent directly to your voicemail.
-
Page 32: Answered Calls
Press to call the displayed number. – or – Press View ( ) to display the call details. Press Options (LSK) to access the following options: • Call: Places a call back to the number. • Send message: Allows you to send a Message. •... -
Page 33: Vibration Profile
The Vibration audio profile is convenient when you wish to stop the phone from making any noise, in a theater for example. From the Home screen, press and hold “Vibration profile on” message and ( Vibration profile, instead of sounds, your phone vibrates. For more information, refer to “Sound profiles”... -
Page 34: In Call Options
Press the Up or Down Volume keys to view the next function or highlight the next option on a list. – or – Use the optical joystick to move back to the previous function or option on a list. Press to exit the menu structure without changing the settings. - Page 35 You can place the current call on hold whenever you want. If your network supports this service, you can also make another call while a call is in progress. To place a call on hold: Press Options (LSK) Hold. Press Resume (RSK) to reactivate the call whenever you want.
- Page 36 With the Contacts entries displayed, enter the name to locate in the field above the entries. If you enter the first few letters of the name, the Contact entries list starting with the first entry matching your input. – or – Use the optical joystick to highlight a contact.
- Page 37 To set up a multi-party call: From the Home screen, enter the desired number and press Wait for the caller to answer, then press Options (LSK) and select New call to place the current caller on hold and dial the second call. Enter the new phone number and press Call (LSK).
- Page 38 While in a multi-party call, press Options (LSK) Select participant. Highlight the desired participant to drop and press to place a checkmark alongside their entry. Press Drop (LSK) to drop the participant. Press to end the multi-party call.
-
Page 39: Section 4: Menu Navigation
Section 4: Menu Navigation This section explains the menu navigation for your phone. Menu Navigation You can tailor the phone’s range of functions to your needs using menus and sub-menus. Menus and sub-menus can be accessed by scrolling using the Optical joystick or by using shortcuts. Menu Design The main menu displays as a Grid menu with three rows and three columns. - Page 40 The menu items, such as sub-menus, and options, are numbered and can be accessed quickly by using their shortcut numbers. Within the main menu’s Grid view, you can access any one of menus or sub-menus by pressing the number keys (1 to 0) corresponding to their location on the screen.
-
Page 41: Section 5: Entering Text
Section 5: Entering Text This section outlines how to select the desired text input mode when entering characters. This section also describes how to use the T9 predictive text system to reduce the number of key strokes associated with entering text. Using the QWERTY Keyboard The following keys perform special functions when entering text: Using the QWERTY keyboard, you can type letters, numbers,... - Page 42 Shift key converts the alphabetic character into uppercase. Changes the text input mode to Upper/Lower case mode. Sym key allows you to enter symbols, such as punctuation marks. Left Softkey (LSK) allows you to select soft key actions or menu items corresponding to the bottom left line on the display screen.
-
Page 43: Changing The Text Input Mode
When using your phone, you often need to enter text, such as when storing a name in Contacts, creating your personal greeting or scheduling events on your calendar. You can enter alphanumeric characters by using your phone’s keypad. Your phone has the following text input modes accessible via the right softkey (RSK) on the keypad: ABC mode: this mode allows you to enter letters by pressing the key •... -
Page 44: Using T9 Mode
• Numeric • Symbol When the Text input mode indicator displays your selected mode, enter text within the text message. Using T9 Mode T9 is a predictive text input mode that allows you to enter any character using single keystrokes. This text input mode is based on a built-in dictionary. - Page 45 After pressing the keys corresponding to the word you want to add, press to display alternative words. If the last alternative word is not recognized by the dictionary, the screen displays Spell on the bottom left line. Press Spell (LSK). Enter the word you want to add using ABC mode.
-
Page 46: Using Abc Mode
To enter text in ABC mode: Press (RSK) to change the text input mode. Scroll to the ABC mode and press Select (LSK) or Use the 2 to 9 keys to enter your text. Press the key labeled with the letter you want. Once for the first letter, twice for the second letter, and so on. -
Page 47: Using The Numeric Mode
By default, the first letter of an entry is capitalized and all consecutive letters are kept in lowercase (unless the Shift key is used). After a character is entered, the cursor automatically advances to the next space after two seconds or when you enter a character on a different key. - Page 48 Press OK (LSK). The new symbol is inserted into your message. Each onscreen symbol set offers different symbols for each key. To clear the symbol(s), press is empty, this key returns the display to the previous mode. . When the input field...
-
Page 49: Section 6: Messaging
Section 6: Messaging This section describes how to send or receive different types of messages. It also explains the features and functionality associated with messaging. Types of Messages Your phone provides the following message types: Email Messages • • Text Messages Picture Messages •... -
Page 50: View Tab
The View Tab is an area that displays on the screen when a missed call, message, or voicemail is sent to the phone. The three View tabs that display icons are: New messages • Missed calls • • New Voice mail messages You can search through missed calls or unviewed messages by using the optical joystick (or Right and Left navigation keys) to select the associated message tab, then pressing the associated... - Page 51 • Recent recipients: allows you to select from recipients of your previous messages. • Contacts: allows you to enter the phone number you want from Contacts. • Groups: allows you to select a group. – Highlight an option and press Select (LSK) or –...
-
Page 52: Picture Messages
This menu allows you to use the Multimedia Message Service (MMS) to create a Picture messages. Picture Messaging is a messaging service that provides delivery of personal picture messages from phone to phone or from phone to email. The Picture messaging icon ( the icon area when you have received a new text message. - Page 53 Note: Your recipient must reside in Contacts before you can add the recipient to this message. Highlight the text field and create your message. Note: For more information about entering characters, see “Using ABC Mode” on page 40. You can enter up to 2000 standard Alphabet characters per page in your message.
-
Page 54: Message Inbox
The Message inbox stores received messages. You can tell what kind of message it is by the icon displayed. If the open envelope icon displays then the message was read, otherwise the closed envelope icon displays. The following types of messages may display in your Message inbox: Text messages •... - Page 55 From the Home screen, press Menu (LSK) Conversations. Select a text message from the list and press View ( to view the contents. – or – From the message list, press Options (LSK) and select one of the following: • Create message: allows you to create a new message. •...
- Page 56 From the Home screen, press Menu (LSK) Conversations. Highlight a message from the list and press View ( to view the contents. Highlight the message bubble containing the grey multimedia icon and press Play/Pause ( pause the multimedia message. Press Stop (LSK) to stop the playback.
-
Page 57: Drafts
This message box stores messages you may want to edit or send at a later time. When you enter this menu, the list of draft messages is displayed. From the Home screen, press Menu (LSK) Drafts. Note: Press the Left or Right Navigation keys or scroll across the optical joystick to move between Conversations, Drafts, Templates (Text and Picture message templates), and My folders Highlight a message from the Drafts list and press Options... - Page 58 From the Home screen, press Menu (LSK) Templates Text templates. Select a template from the Templates list and press Send ) to send the message. Press Add ( ) and select from one of the following: • Recent recipients: allows you to select a number or an address from the last 10 destinations you entered.
-
Page 59: My Folders
From the Home screen, press Menu (LSK) Templates Picture message templates. Highlight a template from the Picture message templates list and press Options (LSK) Send. From the Create screen, highlight the To field, press Options (LSK) and select one of the following options: •... -
Page 60: Email
Press Options (LSK) to access the following application options: • Voicemail settings: allows you to record a greeting, change your PIN, or activate the voicemail feature. • Call voicemail: dials the voice mailbox. • Sync now: synchronizes with the voicemail inbox and displays recent voicemail messages. -
Page 61: Exchange Email
Use the following procedure to configure your phone to synchronize with a corporate email account. Before you begin synchronizing, record the server and URL address of the Exchange server, your Exchange account user name, and your Exchange account password. You also need to know the domain name for the Exchange server, and whether to use SSL encryption. -
Page 62: Instant Messaging (Im)
Press More (RSK) once you are signed in to refresh the screen, change settings, minimize the screen, exit, or view help. Press twice to exit the application. – or – Press Yes (LSK) when "Do you want to exit?" displays to exit this application. Instant Messaging (IM) Instant Messaging is a way of sending short, simple messages that are delivered real time to users online. - Page 63 Centers around Text sending options. The following Sending options are available: • Reply path: allows the recipient of your message to send you a reply message using your message center, if your network supports this service. • Request delivery report: allows you to activate or deactivate the report function.
-
Page 64: Delete By Folder
Send delivery report: when enabled, the phone informs the network • whether or not your message was received. Reject anonymous: automatically rejects messages with a category • of anonymous. Reject advertisement: automatically rejects messages with a • category of advertisement. Auto resize image No Resize •... -
Page 65: Memory Status
Press Delete (LSK) to delete the marked objects. Press Yes (LSK) after you receive the Delete? Locked messages confirmation. Memory status To view the memory status: From the Home screen, press Menu Settings Memory status and press Select (LSK) You can view the amount of the allocated memory and the memory available for picture messages. -
Page 66: Section 7: People
Section 7: People This section explains how to use and manage your Contacts list. You can save phone numbers to your phone’s memory or to your SIM card. Mobile Backup Your Contacts list is backed up by T-Mobile the first time you turn on your phone and each time you make a change to the address book. - Page 67 The following options are available: • Mobile: assigns the number entered to the Mobile entry. • Home: assigns the number entered to the Home entry. • Work: assigns the number entered to the Office entry. • Others: allows you to enter an additional phone number for this entry.
-
Page 68: Finding A Contact Entry
You can store phone numbers and their corresponding names onto either your SIM card or phone’s built-in memory. They are physically separate but are used as a single entity, called Contacts. Note: A Phone icon appears to the left of a Contact entry stored on the phone. A SIM card icon appears to the left of an entry stored on the SIM card. -
Page 69: Dialing A Number From Contacts
• Send: allows you to send a message to the selected number. You may choose between Message, Email, or Exchange email. • Copy to phone/SIM card: copies the selected or all of the contacts to the phone or SIM card. Depends on where the contact was previously saved. -
Page 70: Editing A Caller Group
Highlight the newly created group and press Press Options (LSK) Group settings. Highlight the Picture field and press Select (LSK) or to create a Picture ID for this new caller group. Select from an available location on either the phone or SIM card: •... -
Page 71: Speed Dialing
Highlight the Ringtone field and press Change ( alter the ringtone. The following options are available: • Sounds: displays a list of sounds from which to select as a ringtone. • Voice list: displays a list of voice messages from which to select as a ringtone. - Page 72 Note: The Phone and SIM card option from the Menu Management View contacts from option must be selected in order to access all Contacts. Save Contacts To This option allows you to assign the default storage location for new contacts. Choose from: Phone, SIM card, Ask on saving. Copy All To You can copy all Contact entries from their current location to either the Phone’s memory or the SIM card.
-
Page 73: My Profile
Important!: Once contact entries are deleted, they cannot be recovered. From the Home screen, press Menu (LSK) Management Delete contacts. Select Phone and when the Delete? confirmation message displays, press Yes (LSK) to delete or press No (RSK) to cancel. –... -
Page 74: My Number
This function is a memory aid, which you can use to edit or remove your own phone number. You can also edit the default name assigned to your phone number. From the Home screen, press Menu (LSK) My number. Press ( ) to change the information. -
Page 75: Section 8: Media And Web
Section 8: Media and Web This section outlines the media features available on your phone such as the web2go browser, Games and Apps, photos, music, images, sounds, videos, and other types of files. T-Mobile Mall This built-in application provides access to several phone features and tunes. - Page 76 From the Home screen, press Menu (LSK) web2go Home. – or – From the Home screen, press Menu (LSK) When you access the Browser, the web2go home page displays the following topics: Google Search: allows you to quickly search for online topics using •...
- Page 77 Entering Text in web2go When you are prompted to enter text, the currently active text input mode is indicated on the screen. The following modes are available: ABC mode: this mode allows you to enter letters by pressing the key •...
-
Page 78: Enter Url
• Page details: allows you to view details about the current page such as: Title, Address, Size, MIME type, and Last updated. • Browser settings: various settings are available, see “Browser Settings” on page 73. • Exit browser: exits the browser page you are viewing and returns to the Home page. -
Page 79: Games And Apps
Various settings are available when you are using the web2go browser to navigate the wireless web. From the Home screen, press Menu (LSK) Options (LSK) Browser settings. Choose from the following options: Clear cache You can clear the information stored in the cache, which is the phone’s temporary memory and stores the most recently accessed Web pages. -
Page 80: Photos
You can download more games from the T-Mobile website by using the Find Great Games option. From the Home screen, press Menu (LSK) Games and Apps Find Great Games. Note: When downloading games, charges may apply. MIDlet game options differ depending on the MIDlet selected. The Best Apps You can download the best T-mobile applications from the T-Mobile website using this feature. -
Page 81: Deleting A Photo
• Rename: allows you to rename the photo. • Edit image: allows you to take edit the current image by choosing from features such as: Effects, Adjustments, Transformations, Cropping, and Insertions. • Bluetooth visibility: allows you to configure the visibility of your device via Bluetooth. -
Page 82: Images
Use your phone’s Camera to take photos of people or events while on the move. Additionally, you can send these photos to other people in a Picture Messaging message or set a wallpaper or picture ID image. For more information about using the Camera and features, see “Using the Camera”... -
Page 83: Music
This menu allows you to access your downloaded images on your phone. With the image highlighted within the list, press the Options (LSK) to choose from the following options: • Send to My Album: sends the selected image to My Album. •... -
Page 84: Music Player
From the On card tab, select a music file and press Options (LSK) to choose from the following options: • Send via: allows you to send the selected music file via Message, Exchange email, or to a Bluetooth enabled device. •... - Page 85 Select a music file and press During playback, press Options (LSK) for playback options: • Transfer to Bluetooth stereo headset: sends audio via Bluetooth to a Bluetooth stereo headset. • Set as: allows you to set the music file as Ringtones, Individual ringtone, Alarm tone, Message tone, or as a Calendar reminder.
- Page 86 Press to change the Sound effects presets: NORM (Normal), AUTO, POP, ROCK, JAZZ, DAN (Dance), CLAS (Classical), LIVE, WIDE,CONH, CLAR, BASS, or EXTE. Press to adjust the song rating Press to toggle Player modes: • Normal: songs are played in the order they appear in the current list.
-
Page 87: Sounds
From the Home screen, press Menu (LSK) Music Music player. Highlight the playlist in which you want to add a music file and press Press Options (LSK) Tracks. Locate and highlight a music file then press a check mark next to the file(s) you want to add to this playlist. -
Page 88: Videos
• Sort by: allows you to sort sound files by: Date, Type, Name, or Size. • Properties: displays the sound name, format, size, forwarding, date created, location. Voice list The Voice list contains your recorded audio messages. Highlight an item and press Options (LSK). The following options are available: •... -
Page 89: Other Files
• Create folder: allows you to create a new folder to contain your videos. • Sort by: allows you to sort and view videos by Date, Type, Name, or Size. • Bluetooth visibility: allows you to enable Bluetooth to share the selected video or multiple videos with other Bluetooth devices. - Page 90 With Memory Status, you can check the amount of memory being used and memory remaining for Photos, Music, Images, Sounds, Videos, Other files, or Games and Apps. From the Home screen, press Menu (LSK) Memory status. Scroll across the optical joystick or press the Left or Right navigation keys to scroll between the memory status On phone or On memory card.
-
Page 91: Section 9: Organizer
Section 9: Organizer This section outlines the various applications that are available on your phone. Organizer The Organizer allows you to set alarms, schedule appointments, view the calendar, create tasks, perform simple math calculations, check world time, perform unit conversions, set a timer, and use a stopwatch. - Page 92 When you select this option, the calendar displays the selected week with today’s date and time highlighted. From the Home screen, press Menu (LSK) Calendar Options (LSK) In Week view, press Options (LSK) for choose any of these options: • View by: takes you to the Day view or Month view for the selected day.
- Page 93 • Missed alarm events: displays a list of missed alarm events. • Memory status: displays the number of calendar events you presently have and how many events you can create for each category. For example: 0/50 means you used zero of fifty available events for this category.
- Page 94 This option allows you to record holidays in your calendar. You can also set an alarm to remind you of important anniversaries. From the Home screen, press Menu (LSK) Calendar. Press Options (LSK) Event list Press Options (LSK) Create. Enter the occasion in the Title text box then press the Down Navigation key.
- Page 95 You can display all the events where an alarm was set, but was not turned off. From the Home screen, press Menu (LSK) Calendar. Press Options (LSK) Missed alarm events. To view event information, highlight an event and press . The missed alarm event information displays. To acknowledge and remove the event, press Confirm (LSK) or .
-
Page 96: Alarm
This feature allows you to: Set up to ten alarms to ring at specified times. • Set the phone to switch on automatically and ring the alarm even if the • phone is switched off. The following options are available: Alarm 1 - Alarm 10 : set the Name, Alarm activation, Alarm time, –... -
Page 97: Voice Recognition
• Press to place a checkmark (Mark) next to one of the following selections: Everyday, Once only, Sunday, Monday, Tuesday, Wednesday, Thursday, Friday, or Saturday. Press to place or remove a check mark (Unmark). • Press OK (LSK) to confirm your selections. Highlight the Snooze field and press the Right Navigation key to select one of the following times: Off, 1 min, 3 min, 5 min, 7 min, or 10 min. - Page 98 When the Voice Dialer says the “Say a command” prompt, say one of the following commands: • “Call Steve Smith” • “Call Steve Smith at home,...” • “Call (888) 555 5555” • “Send text to Steve Smith” • “Lookup Steve Smith” •...
- Page 99 From the Home screen, press Menu (LSK) Voice recognition. When the application says the “Say a command” prompt, say “Send Text to”. If you hear “Say the name or number,” say a name or phone number of the recipient. For example, say “Steve Smith” or “9725555555.”...
- Page 100 From the Home screen, press Menu (LSK) Voice recognition. When the application says the “Say a command” prompt, say “Look up”. If you hear “Say the name,” say a name of the recipient you would like to look up. – or – If you hear “Say the name,”...
- Page 101 From the Home screen, press Menu (LSK) Voice recognition Settings (RSK). Voice recognition settings consist of the following options: • Confirmation • Adaptation • Audio modes • Speakerphone • About Configuring Voice Recognition Options To change the confirmation: From the Home screen, press Menu (LSK) Voice recognition.
- Page 102 To reset the adaptation From the Home screen, press Menu (LSK) Voice recognition Settings (RSK) Reset Voice. (The phone displays a reset voice dialog). Press Yes to reset the voice recognition parameters or No to exit. To enable and disable Audio Modes: You can customize whether the voice recognition feature displays either a list of top voice recognition choices or automatically dials the first number without displaying a choice list.
-
Page 103: Tasks
This feature allows you to enter a task list. From the Home screen, press Menu (LSK) Tasks. Press Options (LSK) Create task to create a new task. Enter a short description of the task in the Title field then press the Down Navigation key. Enter a short description in the Details field and press the Down Navigation key. -
Page 104: Calculator
With this feature, you can use the phone as a calculator. The calculator provides the basic arithmetic functions; addition, subtraction, multiplication, and division. From the Home screen, press Menu (LSK) Calculator. Enter the first number using the numeric keys. Select the calculation method, according to the illustration on the display. -
Page 105: World Clock
This feature allows you to see the current time in another part of world. There are two time lines available. You can set the first setting to your home city and use the second setting to check other city times. From the Home screen, press Menu (LSK) World clock. -
Page 106: Timer
You can use this menu to set a timer. To enable the Timer, use the following options: From the Home screen, press Menu (LSK) Timer. Press Set (LSK), enter the length of time as HH:MM:SS and press OK (LSK). Press Start ( ) to start the timer. - Page 107 Enter a URL for the RSS feed, then press OK (LSK). The URL automatically retrieves. Press Subscribe (LSK), to add the current RSS to your list of stored RSS feeds, or Cancel (RSK) to exit the application. Configuring the RSS reader settings From the Home screen, press Menu (LSK) RSS reader.
-
Page 108: Section 10: Camera
Section 10: Camera This section explains how to use the camera on your phone. You can take photographs by using the built-in camera functionality. Using the Camera Using the camera module in your phone, you can take photos of people or events while on the move. Additionally, you can send these photos to other people in a Picture Messaging message or set a wallpaper or caller ID image. - Page 109 Press Yes (RSK) if you want to send the photo to your T-Mobile My Album Online service. The phone’s default destination is set to My Album Online. The photo is automatically saved to the Photos folder in the phone. Note: To change the default destination for your pictures, press Options (LSK) when Send to: My Online Album? displays on the screen.
- Page 110 Shortcut keys allow you to change some settings using the keypad, Navigation keys, and Volume key while in capture mode. Note: These button functions also apply to the camera feature if it is accessed via Menu (LSK) Media takes the photograph. Navigation Up and Down navigation keys adjust the image Keys...
-
Page 111: Photo Gallery Options
• Effects: choose how the image effects: None, Black and white, Sepia, Negative, and Watercolor. • Set default destination: allows you to Remove a current destination location or Change the current location by establishing a new folder in which to place the photo(s). Change the destination to one of the following options: Recent recipients, Contacts, Online album, New email, or New number. -
Page 112: Using The Camcorder
• Bluetooth visibility: allows you to configure the visibility of your device via Bluetooth. Note: The Bluetooth visibility option is available only if you are viewing an image stored on your phone and not within the default Memory card location. •... -
Page 113: Configuring The Camcorder Settings
Tip: You can use shortcuts to quickly change some camcorder settings. For more information, refer to “Camcorder Shortcuts” on page 108. Press to begin shooting video. Press Stop (RSK) or Camera key to stop the recording and save the video. Press to pause or resume recording. -
Page 114: Video Options
• Settings: – Video: set the Quality of the video (Economy, Fine, or Superfine), and set Audio recording (On or Off). – Setup: configure the Review screen, Default storage, or view camcorder Shortcuts. Camcorder Shortcuts Shortcut keys allow you to change some settings using the keypad, Navigation keys, and Volume key while in capture mode. -
Page 115: My Album
My album is a private online picture album that you can use to store and share pictures, videos, voice messages, and text. Use the following procedures to access My album. Note: When accessing My album, charges may apply. The feature is not activated until you send your first image to the remote My album location. -
Page 116: Section 11: Changing Your Settings
Section 11: Changing Your Settings This section explains the sound and phone settings for your phone. It includes such settings as: display, security, memory, and any other settings associated with your phone. My Account This option provides you with account specific information. From the Home screen, press Menu (LSK) Personalize your Phone You can customize various phone settings such as sounds, the... - Page 117 • Incoming call: highlight a setting and press selection. – Call alert type: select an alert type for incoming calls, from Melody, Increasing melody, Vibration then melody, Vibration and melody, or Vibration and increasing melody. – Ringtone: select a ringtone for incoming calls, from one of the listed folders, or from the optional memory card.
- Page 118 • New messages: highlight a setting and press change the selection. – Message alert repetition: choose an interval for repeating alerts for new messages, from Once, Every 1 minute, or Every 2 minutes. Note: There is only one setting available for customization within the Vibration profile.
- Page 119 – Power off type: choose a type of sound for the phone to play when powering off, from Melody, Vibration, Vibration and melody, or Mute. – Phone sound volume: choose a volume level between 0 and 7 for phone sounds. After making selections, press Options (LSK) press the Back soft key, then press the Yes soft key to confirm your settings.
-
Page 120: Display Settings
Use Display settings to change various settings for the display or backlight. Themes Select from an available menu “skin” such as Starry Night or Lime Green. From the Home screen, press Menu (LSK) Personalize Display settings Highlight an available on-screen theme and press Select (LSK) or Wallpaper Select a background image for display while in Home screen... -
Page 121: Backlight Time
Adjust the display brightness for better viewing in different lighting conditions. From the Home screen, press Menu (LSK) Personalize Display settings Choose a brightness level between 1 and 5 by scrolling across your optical joystick, then press Save (LSK) to save your changes. -
Page 122: Phone Settings
Use Phone settings to customize your phone’s operation to suit your needs. Airplane mode Airplane Mode allows you to use many of your phone’s features, such as Games, Voice Notes, etc., when you are in an airplane or in any other area where making or receiving calls or data is prohibited. - Page 123 Select Enable to have the phone prompt you for a user-defined code when you power on the phone. – or – Select Disable to have the phone power on with no code required. Press Confirm (LSK) to store your changes. Lock applications Using this menu, you can lock your applications which provide access to information such as All, Call history, Messaging,...
- Page 124 When the Check PIN code feature is enabled, you must enter your PIN each time you switch on the phone. This means that any person who does not know your PIN cannot use your phone without your approval. Note: You must enter the PIN code to enable or disable the Check PIN Code feature.
-
Page 125: Data Roaming
Phone settings Choose one of the following options: – Samsung PC studio: uses PC Studio to communicate with the phone. – Ask on connection: each time you connect the phone to a PC, the phone will prompt you to choose a USB mode. -
Page 126: Messaging Key
Also known as “OJ Sensitivity”, allows you to configure the sensitivity of your optical joystick. From the Home screen, press Menu (LSK) Personalize Phone settings Use your joystick to move the sensitivity level slider. Press Save (LSK) to store the new sensitivity level. Messaging Key This menu allows you to assign a shortcut to the Messaging key on both the keypad and QWERTY keyboard. -
Page 127: Keyboard Shortcuts
Select one of the on-screen shortcut navigation key directions to change the assigned application. Choose from: • Left: Messaging shortcut. Press the left key from the navigation area to launch a messaging shortcut. Applications include: Create message, Conversations, Voicemail, Email, Exchange email, Social Buzz, and IM. -
Page 128: Memory Settings
To change the assigned keyboard shortcuts: From the Home screen, press Menu (LSK) Personalize Keyboard shortcuts. Press Options (LSK), highlight an option and press Select (LSK). Choose from one of the following: Clear shortcut, Restore selected, or Restore all. Memory Settings Clear phone memory From this menu you can clear the memory for Media, Messaging, Phonebook, Calendar, Tasks, or Memo. -
Page 129: Language
You can also check how many names and numbers are stored on the Phone, on the SIM card, and the FDN list. From the Home screen, press Menu (LSK) Personalize Memory settings Select a category from the menu and press the memory status for that category. -
Page 130: Time And Date
This menu allows you to control how your phone determines and displays the current time and date. From the Home screen, press Menu (LSK) Personalize Time and Date. Select any of the following options: • Time zone updating: allows you to receive time information from T-Mobile’s network. - Page 131 This option allows you to search for new Bluetooth devices. Select My devices Search new device. The phone searches for available devices. My visibility When Bluetooth Visibility is turned on, your phone is wirelessly transmitting its phone name and status. This can be useful if you are attempting to connect to other Bluetooth devices.
-
Page 132: Manage Online Album
The Bluetooth specification describes how Bluetooth short-range wireless technology works, and service profiles, or features, describe the services supported by individual devices. Profiles improve the chances that different devices can communicate. Your phone supports these Bluetooth features: Headset : used to make incoming and outgoing calls via Bluetooth –... -
Page 133: Call Settings
Use Call settings to customize your phone’s call functions. Answering mode Answering Mode allows you to select how your phone answers incoming calls. From the Home screen, press Menu (LSK) Call settings Answering mode. Highlight an option, then press Save ( selection. -
Page 134: Call Forwarding
Add or edit the current block list: • Unknown blocks all incoming calls from unknown phone numbers. • Add additional numbers by select the Block list field and pressing Options (LSK) Add new. Press Save (LSK) or to save the new numbers. Call Forwarding This network service enables incoming calls to re-route to a secondary number that you specify. - Page 135 Call Barring allows you to restrict specific types of incoming and dialed calls on your phone. This is useful if you allow someone to use your phone for a short period of time. Call Waiting Call waiting is a network service which informs you when someone is trying to reach you during another call.
-
Page 136: Call History Management
Create a text message to be sent to the caller when you choose to Reject an incoming call. From the Home screen, press Menu (LSK) Call settings Auto reply. In the Activation field, scroll left or right to choose On or Off. Scroll to the Reply to send field, then enter the text of the reply message. -
Page 137: Advanced
This menu allows you to delete all of the call history, or you can delete missed calls, dialed calls, or answered calls. From the Home screen, press Menu (LSK) Call settings Call history management. Select Delete all history and press Select (LSK) or Highlight options, then press next to your selection(s). -
Page 138: Reset Settings
• Manual: search for available networks and make a selection. Software Update Use the Software Update setting to check for upgrades and upload them directly to your phone. From the Home screen, press Menu (LSK) Advanced Software update. Follow the on-screen instructions. Reset settings Use Reset settings to set phone settings to their default settings. -
Page 139: Section 12: Health And Safety Information
Section 12: Health and Safety Information This section outlines the safety precautions associated with using your phone. The terms “mobile device” or “cell phone” are used in this section to refer to your phone. Read this information before using your mobile device. Exposure to Radio Frequency (RF) Signals The U.S. - Page 140 While RF energy does not ionize particles, large amounts can increase body temperatures and cause tissue damage. Two areas of the body, the eyes and the testes, are particularly vulnerable to RF heating because there is relatively little blood flow in them to carry away excess heat. Research Results to Date: Is there a connection between RF and certain health problems? The results of most studies conducted to date say no.
- Page 141 in Childhood and Adolescence (MOBI-KIDS) MOBI-KIDS is an international study investigating the relationship between exposure to radio frequency energy from communication technologies including cell phones and brain cancer in young people. This is an international multi-center study involving 14 European and non-European countries. Additional information about MOBI-KIDS can be found at http://www.creal.cat/programes-recerca/en_projectes-creal/ view.php?ID=39..
- Page 142 Accessories Steps to Reduce Exposure to Radio Frequency Energy If there is a risk from being exposed to radio frequency energy (RF) from cell phones - and at this point we do not know that there is - it is probably very small. But, if you are concerned about avoiding even potential risks, you can take a few simple steps to minimize your RF exposure.
-
Page 143: Specific Absorption Rate (Sar) Certification Information
Use speaker mode or a headset to place more distance between the • head and the cell phone. Some groups sponsored by other national governments have advised that children be discouraged from using cell phones at all. For example, The Stewart Report from the United Kingdom made such a recommendation in December 2000. - Page 144 The exposure limit set by the FCC for wireless mobile phones employs a unit of measurement known as the Specific Absorption Rate (SAR). The SAR is a measure of the rate of absorption of RF energy by the human body expressed in units of watts per kilogram (W/kg).
-
Page 145: Smart Practices While Driving
Samsung is committed to promoting responsible driving and giving drivers the tools they need to understand and address distractions. -
Page 146: Battery Use And Safety
If the phone and/or battery get wet, have them checked by your service provider or contact Samsung, even if they appear to be working properly. Do not place your battery in or near a heat source. Excessive •... -
Page 147: Samsung Mobile Products And Recycling
Recycling programs for your mobile device, batteries, and accessories may not be available in your area. We've made it easy for you to recycle your old Samsung mobile device by working with respected take-back companies in every state in the country. -
Page 148: Ul Certified Travel Charger
Drop It Off You can drop off your Samsung-branded mobile device and batteries for recycling at one of our numerous Samsung Recycling Direct (SM) locations. A list of these locations may be found at: http://pages.samsung.com/us/recyclingdirect/ usactivities_environment_samsungrecyclingdirect_locations.jsp. Samsung-branded devices and batteries will be accepted at these locations for no fee. -
Page 149: Display / Touch-Screen
For more information, please refer to the “Standard Limited Warranty” on page 154. GPS & AGPS Certain Samsung mobile devices can use a Global Positioning System (GPS) signal for location-based applications. A GPS uses satellites controlled by the U.S. Government that are subject to changes implemented in accordance with the Department of Defense policy and the 2008 Federal Radio navigation Plan (FRP). - Page 150 Certain Samsung mobile devices can also use an Assisted Global Positioning System (AGPS), which obtains information from the cellular network to improve GPS performance. AGPS uses your wireless service provider's network and therefore airtime, data charges, and/or additional charges may apply in accordance with your service plan.
-
Page 151: Emergency Calls
The suggestions below will help you fulfill any warranty obligations and allow you to enjoy this product for many years: Keep your Samsung Mobile Device away from: Liquids of any kind Keep the mobile device dry. Precipitation, humidity, and liquids contain minerals that will corrode electronic circuits. -
Page 152: Responsible Listening
Extreme heat or cold Avoid temperatures below 0°C / 32°F or above 45°C / 113°F. Microwaves Do not try to dry your mobile device in a microwave oven. Doing so may cause a fire or explosion. Dust and dirt Do not expose your mobile device to dust, dirt, or sand. Cleaning solutions Do not use harsh chemicals, cleaning solvents, or strong detergents to clean the mobile device. - Page 153 You should follow some common sense recommendations when using any portable audio device: Always turn the volume down before plugging the earphones into an • audio source. Set the volume in a quiet environment and select the lowest volume at •...
-
Page 154: Operating Environment
National Institute for Occupational Safety and Health (NIOSH) 395 E Street, S.W. Suite 9200 Patriots Plaza Building Washington, DC 20201 Voice: 1-800-35-NIOSH (1-800-356-4674) 1-800-CDC-INFO (1-800-232-4636) Outside the U.S. 513-533-8328 Email: cdcinfo@cdc.gov Internet: http://www.cdc.gov/niosh/topics/noise/default.html 1-888-232-6348 TTY Operating Environment Remember to follow any special regulations in force in any area, and always switch your mobile device off whenever it is forbidden to use it, or when it may cause interference or danger. - Page 155 For more information see: http://www.fcc.gov/oet/rfsafety/rf- faqs.html#. Other Medical Devices If you use any other personal medical devices, consult the manufacturer of your device to determine if it is adequately shielded from external RF energy. Your physician may be able to assist you in obtaining this information.
-
Page 156: Fcc Hearing Aid Compatibility (Hac) Regulations For Wireless Devices
Regulations for Wireless Devices On July 10, 2003, the U.S. Federal Communications Commission (FCC) Report and Order in WT Docket 01-309 modified the exception of wireless mobile devices under the Hearing Aid Compatibility Act of 1988 (HAC Act) to require digital wireless mobile devices be compatible with hearing aids. -
Page 157: Restricting Children's Access To Your Mobile Device
usage” while using their hearing aid with the particular wireless mobile device. “Normal usage” in this context is defined as a signal quality that is acceptable for normal operation. The M mark is intended to be synonymous with the U mark. The T mark is intended to be synonymous with the UT mark. -
Page 158: Fcc Notice And Cautions
FCC Notice The mobile device may cause TV or radio interference if used in close proximity to receiving equipment. The FCC can require you to stop using the mobile device if such interference cannot be eliminated. Vehicles using liquefied petroleum gas (such as propane or butane) must comply with the National Fire Protection Standard (NFPA-58). - Page 159 Dispose of phones in accordance with local regulations. In some areas, • the disposal of phones in household or business trash may be prohibited. For safe disposal options for phones, contact your nearest Samsung authorized service center. Health and Safety Information...
-
Page 160: Section 13: Warranty Information
(i) the battery has been charged by a battery charger not specified or approved by SAMSUNG for charging the battery; (ii) any of the seals on the battery are broken or show evidence of tampering; or (iii) the battery has been used in equipment other than the SAMSUNG phone for which it is specified. - Page 161 During the applicable warranty period, provided the Product is returned in accordance with the terms of this Limited Warranty, SAMSUNG will repair or replace the Product, at SAMSUNG'S sole option, without charge. SAMSUNG may, at SAMSUNG's sole option, use rebuilt, reconditioned, or new parts or components when repairing any Product, or may replace the Product with a rebuilt, reconditioned or new Product.
- Page 162 Limited Warranty or to make binding representations or claims, whether in advertising, presentations or otherwise, on behalf of SAMSUNG regarding the Products or this Limited Warranty. This Limited Warranty gives you specific legal rights, and you may also have other rights that vary from state to state.
- Page 163 You may opt out of this dispute resolution procedure by providing notice to SAMSUNG no later than 30 calendar days from the date of the first consumer purchaser's purchase of the Product. To opt out, you must send notice by e-mail to optout@sta.samsung.com, with the subject line: "Arbitration Opt Out."...
-
Page 164: End User License Agreement For Software
Software. You may not rent, lease, lend, sublicense or provide commercial hosting services with the Software. 4. CONSENT TO USE OF DATA. You agree that Samsung and its affiliates may collect and use technical information gathered as part of the product support services related to the Software provided to you, if any, related to the Software. - Page 165 8. TERMINATION. This EULA is effective until terminated. Your rights under this License will terminate automatically without notice from Samsung if you fail to comply with any of the terms and conditions of this EULA. Upon termination of this EULA, you must cease all use of the Software and destroy all copies, full or partial, of the Software.
- Page 166 Purchaser agrees that SAMSUNG shall not be responsible or liable, directly or indirectly, for any damage or loss caused or alleged to caused by, or in...
- Page 167 SAMSUNG SHALL BE DEEMED TO ALTER THIS DISCLAIMER OF WARRANTY REGARDING THIRD-PARTY APPLICATIONS, OR TO CREATE ANY WARRANTY. 11. Limitation of Liability. SAMSUNG WILL NOT BE LIABLE FOR ANY DAMAGES OF ANY KIND ARISING OUT OF OR RELATING TO THE USE OR THE INABILITY TO USE ANY THIRD-PARTY...
- Page 168 To avoid unintended information leaks and other problems of this sort, it is recommended that the device be returned to Samsung’s Customer Care Center for an Extended File System (EFS) Clear which will eliminate all user memory and return all settings to default settings.
- Page 169 Important!: If you are using a handset other than a standard numeric keypad, dial the numbers listed in brackets. Phone: 1-888-987-HELP (4357) © 2011 Samsung Telecommunications America. All rights reserved. No reproduction in whole or in part allowed without prior written approval. Specifications and availability subject to change without notice.
-
Page 170: Index
Index Numerics 4-way Shortcuts ABC mode Accessing a Menu Function Auto Block Backlight Description Settings Battery Charging Installing Low Battery Indicator Removal Wall Charger Battery Cover Replace Battery Use & Safety Bluetooth About Features Searching for New Devices Turning Bluetooth On and Off Calendar Call History... - Page 171 Care and Maintenance Charging Battery Children and Cell Phones Contact Entries Deleting All Deleting from Phone Deleting from SIM Contacts Default Storage Settings Conversations Copying Contact Number Phone to SIM Default Destination Images Deleting Contacts Dialing With a SIM Without a SIM Dialing a Number Phonebook Dialing Display...
- Page 172 Low Battery Indicator Making a Call Phonebook Mass Storage Master Reset Memory Status Menu Navigation Message Inbox Viewing a Picture Message Viewing a Text Message Viewing an Incoming Picture Message Message Settings Receiving Options Sending Options Text Message Text Message Center Message settings Picture message Message Threads...
- Page 173 Hands-Free Kits and Other Accessories Reset Master Reset Settings Responsible Listening Restricting Children's Access to Your Mobile device Samsung PC Studio Samsung Products and Recycling SAR Certification Information Sending a Video Sensitivity Settings Bluetooth Display Phone Sound Time and Date...
- Page 174 Understanding Your Phonebook Finding a Contact Entry Upload pic USB Mode Mass Storage Vibration Mode Visual Voicemail Accessing Enabling Getting Started Setting Up Voice Mail Voice Recognition About Adaptation Audio Modes Checking Phone Status Configuring Settings Confirmation Looking Up Making a Voice Call Opening Menus Reset Adaptation Sending a Message...
Need help?
Do you have a question about the SGH-T379 and is the answer not in the manual?
Questions and answers