
Related Manuals for doble F6150


Summary of Contents for doble F6150
- Page 1 F6150 / F6150A Power System Simulators User Guide Doble Engineering Company 85 Walnut Street Watertown, Massachusetts 02472-4037 (USA) PN 500-0574 72A-2543-01 Rev. C 01/07...
- Page 2 ® This User Guide (the “User Guide”) is solely the property of the Doble Engineering Company (Doble and, along with the subject matter to which it applies, is provided for the exclusive use of Doble Users ® (the “User”) under contractual agreement for Doble test equipment and services.
- Page 3 INFORMATION WITH REASONABLE CARE, THE VERACITY AND RELIABILITY OF THE INFORMATION AND IT'S APPLICATION IS NOT ABSOLUTE. UNDER NO CIRCUMSTANCES WILL DOBLE BE LIABLE TO USER OR ANY PARTY WHO RELIES IN THE INFORMATION FOR ANY DAMAGES, INCLUDING WITHOUT LIMITATION, PERSONAL INJURY OR...
- Page 4 72A-2543-01 Rev. C 01/07...
-
Page 5: Preface
Chapter 6 Safety and Maintenance Chapter 6 lists rules for safe use of the F6150 / F6150A instruments, discusses routine maintenance of the equipment, and explains how to obtain service from Doble Engineering. - Page 6 The terms F6Control Panel V.2 and F6CP V.2 may be used interchangeably. The software application F6Control Panel V.2 was formerly referred to as the F6000 ProTesT Control Panel. Unless expressly stated otherwise, the F6150A instrument is also assumed whenever the F6150 instrument is designated. ARNING The WARNING icon signifies information that denotes a potentially hazardous situation, which, if not avoided, may result in death or serious injury.
-
Page 7: Table Of Contents
Software System for F6150 ............................1-3 F6Control Panel V.2 ............................1-3 Control Panel ................................1-5 Options..................................1-6 2. F6150 / F6150A Instrument Front Panel ............2-1 Source Outputs................................2-2 Instrument Display..............................2-2 Voltage and Current Sources ............................2-3 Battery Simulator ................................ 2-5 Auxiliary Functions .............................. - Page 8 Removing and Replacing Circuit Boards........................5-12 Removing and Replacing the Battery Simulator....................... 5-19 F6150 with Variable Output Battery Simulator....................5-19 F6150 with Fixed Output Battery Simulator ..................... 5-20 Removing and Replacing the Cooling Fans......................5-23 Changing the Initial Style Fan Assembly ......................5-23 Changing the New Style Fan Assembly ......................
- Page 9 F6150/F6150A Power System Simulators User Guide Appendix A. Firmware Maintenance ..............A-1 Flash Loader ................................A-1 About F6150 Firmware............................A-2 Downloading F6150 Firmware..........................A-2 Communications Parameters ..........................A-3 Appendix B. Configuring Windows for Ethernet Communications ....B-1 Configuring the Control PC ............................B-1 Set the F6000 IP Address............................B-5 Appendix C.
- Page 10 72A-2543-01 Rev. C 01/07...
-
Page 11: Introducing The F6150 / F1650A
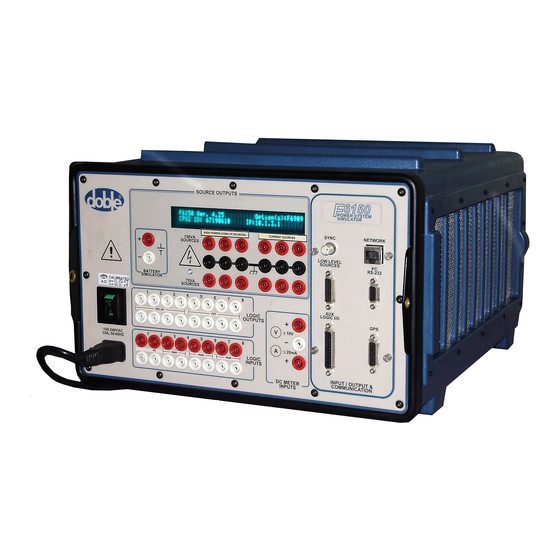
1. Introducing the F6150 / F1650A The F6150 or F6150A power system simulators (Figure 1.1) allow you to test any type of protection. Their current amplifiers have power to test high burden electro-mechanical relays. Concurrently, the F6150 provides up to 12 sources to test solid state and multifunction numerical protection. It can test: •... -
Page 12: Hardware Architecture
Hardware Architecture Hardware Architecture The components of the F6150 Instrument (Figure 1.2) are: Front Panel Logic I/O Board Analog Input Measurement Board (Option) CPU Board Analog I/O Board Three Current Amplifiers (F6150A is equipped with two current amplifiers) Three Voltage / Current Convertible Amplifiers (F6150A has two voltage amplifiers) -
Page 13: Software System For F6150
This application uses test templates called macros to automate tests on protection scheme relays. A related database also documents relay settings, test conditions, and test history. Figure 1.3 illustrates how the F6Control Panel V.2 software interacts with the F6150 and with the relay under test. - Page 14 EMTP or ATP. The DFR and system modeling tool data are typically stored in a COMTRADE file. The TRANS macro can work with COMTRADE files and *.PL4 files. To enhance the capabilities of the F6150 instrument, the F6Control Panel application: •...
-
Page 15: Control Panel
F6150 / F6150A Power System Simulators User Guide Control Panel The F6Control Panel V.2 (Figure 1.4) application directs the power system simulator from a computer connected to the instrument’s front panel. It configures and manages the instrument’s voltage sources, current sources, logic inputs, logic outputs, and timers. The F6Control Panel V.2 emulates front panel controls. -
Page 16: Options
Amplifiers F6020 6150A 2 I Amplifiers Firmware used in F6150A to turn off the unused slot. F6800 Enables the DC Meter Inputs on the F6150 Power System simulator Transducer Interface and includes the Meter Measurement Studio software. F6810 Provides high compliance voltage/low current ranges for overcurrent High Power Convertible relay testing. -
Page 17: F6150 / F6150A Instrument Front Panel
Ports for system communications • On/Off switch and AC power connection • Instrument display Control of all test functions is accomplished from a computer. Instrument Display (VFD Vacuum Fluorescent Display) Figure 2.1 F6150 Instrument Front Panel (CPU2 shown) 72A-2543-01 Rev. C 01/07... -
Page 18: Source Outputs
On bootup, the messages in the Instrument Display cycle in a predictable and recognizable pattern. This pattern is disrupted if the F6150 Instrument fails its internal diagnostic test. The F6150 performs a set of internal diagnostics to check the integrity of the system's memory, data, and communication paths. It also checks the integrity of all the system modules. -
Page 19: Voltage And Current Sources
Figure 2.2 shows the voltage (left bank) and current (right bank) sources on the instrument front panel. The F6150 provides three 150 VA voltage sources, which optionally may be converted into current sources to provide low range current testing. It also provides three 150 VA current sources, which can be combined to achieve more power. - Page 20 Voltage and Current Sources The F6150 supplies three convertible voltage/current and three current sources. Each source is rated at 150 VA of continuous power (Figure 2.3). The F6150A supplies two convertible voltage/current and two current sources. Vacuum Fluorescent Display (VFD)
-
Page 21: Battery Simulator
F6150 / F6150A Power System Simulators User Guide The source outputs on the F6150 Instrument front panel include terminals for 150 VA and 75 VA sources as well as terminals for return lines: • The six red terminals in the first row of outputs supply up to 150 VA of power. -
Page 22: Auxiliary Functions
To configure F6CP V.2 to communicate using either the serial port or an Ethernet connection, see Chapter 3 ”Setup and Configuration” for an outline. For detailed information see the Doble document, F6Control Panel User Guide. Table 2.2 summarizes the requirements for both serial and Ethernet connections for CPU1 and CPU2. - Page 23 F6150 / F6150A Power System Simulators User Guide Table 2.2 Serial and Ethernet Connections for CPU 1 and CPU2 Serial Connection Ethernet Connection CPU1 9 pin female connector BNC connector (labeled PC RS-232) (labeled NETWORK) Computer Serial port Network card with...
- Page 24 Connect DB9-DB9 Modem Serial Cable (401-0167) Example to/from the PC serial port or USB-Serial Adapter and the CPUx F6150 PC RS-232 connector. Figure 2.6 Serial Connection - Computer to CPU1 or CPU2 F6150 Ethernet Connect 10BaseT/10Base2 HUB (401-0244) Examples CAT5 or better Ethernet Cable (401-0243) the Ethernet Port on the PC and the HUB.
- Page 25 CAT5 or better Ethernet cable (401-0243) to/from the Ethernet port on the PC to the Crossover 10Base T Modular Adapter (401-0242) on the CPU2 F6150 NETWORK connector. CPU2 F6150 Figure 2.9 Ethernet Connection - Computer to CPU2 F6150 with a CAT5 Crossover Cable 72A-2543-01 Rev. C 01/07...
-
Page 26: Logic I/O Section - Front Panel
Logic I/O Section - Front Panel The F6150 is delivered with one of four modes for the front panel Logic I/O section. Each mode is defined by its I/O board selection. The four logic I/O section variations are shown below in Figure 2.10 through Figure 2.13. - Page 27 F6150 / F6150A Power System Simulators User Guide Figure 2.12 Logic I/O Section, Instrument with I/O 4 Board (Option 6844) For Option 6844, Input No. 2 provides the First Strike capability. Figure 2.13 Logic I/O Section, Instrument with I/O 5 Board (Option 6845) For Option 6845, all the Logic Outputs are FETs and all the Logic Inputs are Isolated.
-
Page 28: Logic Outputs
Logic Outputs Logic Outputs Logic outputs send logic signals from the F6150 Instrument to external devices. They act as logical relays located in the test equipment. The F6150 front panel includes four high-speed (FET) outputs and four relay outputs. Optionally all eight outputs can be factory specified as high-speed (FET) outputs. -
Page 29: Logic Inputs
Isolation: 0.1ms max pickup and dropout +500V Peak Optionally, the F6150 instrument can be supplied with all the logic inputs isolated. If this alternative is ordered, the front panel Logic Inputs section will have no PAIR labels. First Strike Options F6844 and F6845 provide First Strike capability on Input No. 2. This feature allows the F6150 to see an input pulse-width down to 10 microseconds. -
Page 30: Dc Meter Inputs
DC Meter Inputs DC Meter Inputs The DC Meter Inputs section of the F6150 front panel is shown in Figure 2.14. Figure 2.14 DC Meter Inputs Section of F6150 Front Panel 72A-2543-01 Rev. C 01/07 2-14... -
Page 31: Power
Figure 2.15 AC Power Input and On/Off Switch Section of F6150 Front Panel The F6150 is factory configured to use either 115 or 230 V 50/60 Hz power as specified by the user when ordering. Current instruments have a universal power supply (Type 2) that can accept line inputs from 105 to 264 VAC at 47 to 63 Hz. - Page 32 Power Table 2.5 describes the pin-out and parameter ranges of the low-level power sources connector. The parameter values are approximate. Table 2.5 Low Level Source Connector Pin Out and Parameter Range Description Parameter Range Voltage Mode Current Mode Transient Mode Chassis Ground Convertible Source 4 6.7 Vrms...
-
Page 33: Setup And Configuration
3. Setup and Configuration This chapter describes how to set up the F6150 / F6150A Instrument and summarizes how to establish communications between the instrument and the software used to control it. It also explains briefly how to configure the voltage and current sources on the front panel of the instrument. - Page 34 These messages track the sequence of steps in a successful bootup: Starting Power On Test Run the Doble Bootloader (Version Number) Loading Compressed Image . . . Done At the end of this series of messages, Figure 3.1 appears in the display.
- Page 35 • A color monitor with 800x600 VGA resolution minimum. Ensure that the power is off to the control PC and to the F6150 and Proceed to Step 5 to complete the initial setup process Connect one end of the RS-232 cable to the serial port on the computer, or connect the Ethernet cable to the network card on the computer.
- Page 36 Getting Started Figure 3.2 ProTest Menu Bar Click Setup to invoke the Setup window (Figure 3.3). The F6 Instrument frame is located on the right side of the Setup window. Key setup parameters entered in this frame. Figure 3.3 Setup Window Entering the setup parameters is required only on the initial entry into the application.
- Page 37 F6150 / F6150A Power System Simulators User Guide Figure 3.4 F6000 Control Panel from F6C P V.2 software The F6000 Control Panel contains all the functions and controls needed to conduct tests with the F6150 / F6150A instruments. If the computer is not connected to an instrument or if the instrument is switched off when the F6000 Control Panel is opened, an error message appears.
-
Page 38: Using The F6000 Configuration Window
Using the F6000 Configuration Window Using the F6000 Configuration Window The F6000 sources can be placed in a number of configurations to suit test requirements. Using the F6000 Configuration window these sources may be configured either manually (User Defined) or by choosing from 21 Predefined selections. -
Page 39: Convertible V/I Sources
The F6000 Configuration dialog box has a graphic window which represents the voltage and current source output terminals on the F6150 / F6150A front panel. When a preset configuration is selected, the source names and layout are windowed in this graphic. For user defined configurations, the required number of convertible V/I sources and current sources can be selected. - Page 40 To complete the User Defined or Preset Configuration for sources, click one of the three buttons at the bottom of the window: • Click OK to configure the sources on the F6150 instrument and close the F6000 Configuration window. •...
-
Page 41: Troubleshooting The F6150 / F6150A
If the solutions discussed in this guide do not resolve the problem, obtain further assistance by contacting Doble customer service. Web Site: www.doble.com/support/support.htm Email: customerservice@doble.com Telephone: 617-926-4900 Troubleshooting Flow Charts Figure 4.1 and Figure 4.2 are diagnostic flow charts to identify and isolate problems in F6150 / F6150A operations. 72A-2543-01 Rev. C 01/07... - Page 42 Troubleshooting Flow Charts Power Up PC and F6150 VFD = Vacuum Fluorescent Display Check RS/232 or Ethernet Cable Is PC (see ”Resolving Communications Communicating Problems” on page 4-12) with F6150? Cable FIXED Check the device setting in Control Panel / System Replace P/S Device Manager.
- Page 43 F6150 / F6150A Power System Simulators User Guide Replace Fan Plate Assembly Replace P/S PCB Perform P/S Checkout (P/S FAIL) Procedure (see ”Power Supply Checks” on page 4-10) (P/S OK) Call Doble Customer Service if error is not resolved Replace PCB with...
-
Page 44: General Troubleshooting Techniques
If the F6150 / F6150A experiences difficulties, perform the following external checks to isolate the problem before removing the cover. Many of the major problems encountered in the F6150 are corrected by replacing a board in the unit. Chapter 5 ”Field Replacement Procedures” explains how to remove a defective board and replace it. -
Page 45: Led Status Indicators
Amplifier Circuit Boards For the F6150, three current amplifier boards are installed in slots 5-7. Three voltage / current convertible amplifier boards are installed in slots 8-10. Each current and voltage / current convertible amplifier circuit board has two LEDs that are visible when looking at the front of the board. -
Page 46: Cpu Circuit Boards
CPU Circuit Boards CPU Circuit Boards CPU1 The CPU1 circuit board is installed in slot 3. It has twelve LEDs and one push button located at the top of the board (Figure 4.3) STX2 SRX2 STX1 SRX1 ERX CLSN LED3 LED2 LED1 LED0 LED3 LED2 LED1 LED0 LOCK RESET... - Page 47 F6150 / F6150A Power System Simulators User Guide CPU2 The CPU2 circuit board is installed in slot 3. It has 19 LEDs and one push button located in two rows at the top of the board (Figure 4.4) +2V SRX2 STX1 SRX1...
-
Page 48: Analog I/O Circuit Board
Analog I/O Circuit Board The analog I/O circuit board is installed in slot 4 and has four LEDs. When the F6150 is powered up, but idle, all LEDs should be OFF. Analog I/O board LEDs are defined in Table 4.4. -
Page 49: Power Supply Circuit Board
F6150 / F6150A Power System Simulators User Guide Power Supply Circuit Board Type 1 The power supply board [04S-0676-01(120V) or 04S-0676-02(220V)is installed in slot 11. The board has three LEDs, designated D1, D2 and D3. They are visible from the rear of the chassis. This board supports the high/low voltage requirements and the Fixed Output Battery Simulator functions (Table 4.5). -
Page 50: Component Checkout Procedures
To verify proper operation of the power supply board: Connect a multimeter to a ground point on the chassis, for example Test Point 8. Measure each of the following test points on the F6150 CPU circuit board, located in slot 3 of the backplane: CPU1 - 04S-0670-01 •... -
Page 51: Battery Simulator Checks
F6150 / F6150A Power System Simulators User Guide Battery Simulator Checks There are two styles of battery simulator functions, fixed or variable output. Fixed Older equipment can have a Fixed Output Battery Simulator capability. The Battery Simulator is mounted on the chassis rear. It is equipped with one non-standard fuse soldered on the circuit board. -
Page 52: Voltage Or Current Amplifier Board Checks
”Removing and Replacing Circuit Boards” on page 5-12. Cooling Fan Checks To verify cooling fan operation, power up the F6150 and listen for the audible sound of the fans spinning. This sound is the only indication that the fans are functioning. No LEDs or error messages appear to indicate a problem until an over-temperature condition occurs. -
Page 53: Error Types
If the communication cable is functioning and no conflicts are found, replace either the CPU circuit board, Analog I/O circuit board, or the Communications circuit board. Refer to Chapter 5 ”Field Replacement Procedures” when replacing these boards. Error Types Three types of errors can occur while using the F6150 Instrument: • ”Hardware Errors” •... - Page 54 Hardware Errors Table 4.7 Hardware Errors (Continued) Error Description Action Message (Refer to Chapter 5 ”Field Replacement Procedures” when replacing boards) Analog I/O +5V The instrument reads out Check the power supply with a voltmeter. out of range of range. •...
-
Page 55: Source Errors
F6150 / F6150A Power System Simulators User Guide Source Errors Source errors display in the Source Table of the F6 Control Panel. A Source error is typically due to problems with the load. For example: • Current is driven into an open circuit or high impedance. -
Page 56: System Errors
Voltage monitor Either the AC input line voltage is too high, Reduce the input line voltage or (Power supply or power is being fed back into the F6150 replace the power supply (old type). high volts) through the amplifier outputs. - Page 57 F6150 / F6150A Power System Simulators User Guide Table 4.9 System Errors (Continued) Open ground Hardware detects an open ground detector. This hardware problem must be detector addressed before it is safe to operate (Power supply) the F6150. When the F6150 clears the error, it occurs again if the hardware problem has not been fixed.
- Page 58 Check the communication cable. If board properly with the CPU. OK, replace the battery simulator board (04D-0598-01). Control Panel Option F6909 required. Call Doble Customer Service. Mode Macro Mode Option F6910 required. Call Doble Customer Service. No convertible Option F6810 required.
-
Page 59: Field Replacement Procedures
Cooling fans Preparatory Steps The replacement of any component in the F6150 requires removal of the cover first. If the cause of a problem is undetermined at the time the cover is removed, turn the instrument on and check the components visually. -
Page 60: Removing The Instrument Cover
Slot 2 - AIM Board (Option) Slot 1- Logic I/O Board Communications Front Panel Output Terminal Circuit Breaker Board Board Chassis Frame Front Panel Figure 5.1 Top View of the F6150 Instrument Component Orientation-CPU1 & CPU2) 72A-2543-01 Rev. C 01/07... - Page 61 F6150 / F6150A Power System Simulators User Guide Remove the instrument cover as follows: Turn the instrument off. Remove the power cord Use a flat head screwdriver to remove the top two rubber feet from the back of the instrument (Figure 5.2).
-
Page 62: Power Up And Perform A Visual Check
Power Up and Perform a Visual Check Remove the screws on the side of the capture rail with a Phillips head screwdriver. Remove the four screws on top of the capture rail with a flat head screwdriver; remove the capture rail. - Page 63 F6150 / F6150A Power System Simulators User Guide A High Current Interface connects the lower part of the Output Terminal board to the motherboard. Carefully work this connection loose as the front panel tilts away from the chassis frame Gently lift the front panel up and away from the bottom of the instrument.
- Page 64 Removing and Replacing the Instrument Front Panel Disconnect the blue and brown AC wires that lead from the circuit breaker back to the instrument (Figure 5.7). • Grasp the blue insulation. • Pull hard and work the connectors loose. Figure 5.7 Instrument Front Panel with Wires Disconnected (CPU1) 10.
- Page 65 F6150 / F6150A Power System Simulators User Guide Blue Brown AC wires Circuit Breaker Chassis Ground Wire Figure 5.8 Wire Connections at the Front Panel Circuit Breaker Figure 5.9 shows the circuit breaker after the blue AC lead, the brown AC lead, and the chassis ground wire have been disconnected.
-
Page 66: New Front Panel Installation
Secure the front panel with 12 hex-head screws Reconnect W2, W3, W4, W5, W6, and W7. Except for W16, all the wires in the F6150 (Table 5.1) connect to the communications board or the output terminal board on the instrument front panel. -
Page 67: Changing The Communications Board
F6150 / F6150A Power System Simulators User Guide Changing the Communications Board The communications board supports the input and output terminals on the right side of the front panel. To replace the communications board, first remove the instrument front panel, but do not disconnect the leads from the circuit breaker on the left side of the panel. -
Page 68: Removing The Communications Board
Removing the Communications Board CPU1 CPU2 Mounting Screws Figure 5.10 Communications Board(s) Ready for Removal Removing the Communications Board With the front panel removed (except for the leads from the circuit breaker), follow this procedure to remove the communications board: Remove the two Phillips head screws that secure the communications board to the front panel. -
Page 69: Installing The Communications Board
F6150 / F6150A Power System Simulators User Guide CPU1 CPU2 Figure 5.11 Right Side of the Instrument Front Panel (CPU1 AND CPU2) Tilt the front panel back down until it lies face down on the table. Lift the communications board off the front panel. -
Page 70: Removing And Replacing Circuit Boards
Removing and Replacing Circuit Boards Removing and Replacing Circuit Boards Doble Customer Service may recommend that a circuit board be replaced to remedy an operating problem. None of the solid-state circuit boards requires user calibration or adjustment. Figure 5.12 through Figure 5.23 note the slot number and circuit board type. - Page 71 F6150 / F6150A Power System Simulators User Guide Figure 5.14 Slot 1 - Logic I/O Board - Type 4 Figure 5.15 Slot 1 - Logic I/O Board - Type 5 72A-2543-01 Rev. C 01/07 5-13...
- Page 72 Removing and Replacing Circuit Boards Figure 5.16 Slot 2 - Analog Input Measurement (AIM) Board The AIM board is an option for CPU2-based instruments. Slot 2 is a spare (vacant) slot for CPU1-based instruments. Figure 5.17 Slot 3 - CPU1 Board 72A-2543-01 Rev.
- Page 73 F6150 / F6150A Power System Simulators User Guide Figure 5.18 Slot 3 - CPU2 Board Figure 5.19 Slot 4 - Analog I/O Board 72A-2543-01 Rev. C 01/07 5-15...
- Page 74 Removing and Replacing Circuit Boards Figure 5.20 Slots 5 - 6 - 7 - Current Amplifier Boards For F6150A instruments Slot 7 and 10 are vacant. Figure 5.21 Slots 8 - 9 - 10 - Voltage/Current Convertible Amplifier Boards 72A-2543-01 Rev. C 01/07 5-16...
- Page 75 F6150 / F6150A Power System Simulators User Guide Figure 5.22 Slot 11 - Power Supply Figure 5.23 Slot 11 - Power Supply with Variable Output Battery Simulator 72A-2543-01 Rev. C 01/07 5-17...
- Page 76 Remove or insert printed circuit assemblies carefully to avoid damage to their mating connectors. To ensure that new boards go into their correct locations, replace them individually. Contact Doble for a replacement circuit board, or obtain one from your company inventory of replacement parts, if available.
-
Page 77: Removing And Replacing The Battery Simulator
Removing and Replacing the Battery Simulator F6150 with Variable Output Battery Simulator F6150 instruments can use a Power Supply board (04S-0794-01) that has an integrated Variable Output Battery Simulator. This board is located in Slot 11 (Figure 5.24). Figure 5.24 Power Supply with integrated Variable Output Battery Simulator If the board is diagnosed to be defective, just remove it in the same manner as the other circuit boards. -
Page 78: F6150 With Fixed Output Battery Simulator
F6150 with Fixed Output Battery Simulator F6150 with Fixed Output Battery Simulator F6150 (CPU1) instruments have a Fixed Output Battery Simulator located at the rear of the enclosure. (Figure 5.25) Figure 5.25 Fixed Output Battery Simulator Mounted at the Back of the Instrument To remove the battery simulator: Turn the instrument off. - Page 79 F6150 / F6150A Power System Simulators User Guide Figure 5.26 Removal of the Power Supply and Voltage Amplifiers for Access to the Battery Simula- The power supply is easily identifiable, but each voltage amplifier looks the same. Label each voltage amplifier with its slot number when it is removed from the instrument, and return it to its own slot when the instrument is reassembled.
- Page 80 F6150 with Fixed Output Battery Simulator Disconnect the wire from connector J4 in the upper right-hand corner of the board. 10. Lift the circuit board up, then pull it out from the back panel. Three teflon pins hold the battery simulator to the rear panel of the instrument (Figure 5.27).
-
Page 81: Removing And Replacing The Cooling Fans
New style containing fans plus an integrated power supply Changing the Initial Style Fan Assembly Older units (usually F6150 - CPU1 or F6150A - CPU1 models) have the initial style fan assembly. They require using the removal and reinstallation procedure described below: Turn the instrument off. - Page 82 Figure 5.29 Retaining Bracket for Cooling Fans See: • ”Changing the Initial Style Fan Assembly” for specific instructions to remove the old F1650 / F6150A assembly. • ”Changing the New Style Fan Assembly” on page 5-26 for specific instructions to remove the new F1650 / F6150A assembly.
- Page 83 F6150 / F6150A Power System Simulators User Guide Figure 5.31 Cooling Fan Assembly Pull the defective fan off of its supporting plate. Install the replacement fan. Secure the fan with the four hex nuts. Reconnect the four wires, one to each fan.
-
Page 84: Changing The New Style Fan Assembly
Changing the New Style Fan Assembly Changing the New Style Fan Assembly The new style Fan Assembly has an integral power supply with two power modules; one provides - 12 Vdc and another provides +5 and +12 Vdc. They are located at the bottom of this unit (Figure 5.32). Power Module [-12 Vdc] Power Module [+12 +5 Vdc]... - Page 85 F6150 / F6150A Power System Simulators User Guide Loosen the Phillips head screws that secure each end of the assembly. These screws fit inside oblong shaped holes on the assembly rail/ (Figure 5.34). Oblong Screw Holes Figure 5.34 Screw Holes on Fan Assembly Rail Slide the board upward;...
-
Page 86: Verify The Replacement
Verify the Replacement Verify the Replacement To determine whether the replacement procedure is successful: Turn the instrument on. Monitor the messages on the front panel as the instrument goes through its startup sequence. Check the status indicator light on the left side of each amplifier board.If the replacement is successful, the status indicator lights are green and the error message on the front panel is cleared. -
Page 87: Replaceable Components And Cables
F6150 / F6150A Power System Simulators User Guide Replaceable Components and Cables Part numbers for field replaceable items are listed in Table 5.3. Table 5.3 Field Replaceable Parts Field Replaceable Part Part Number Part Number (Old - CPU1) (New - CPU2) - Page 88 Replaceable Components and Cables Table 5.4 lists all the cables used with the F6150. If a system failure is traced to a particular cable, ensure that the cable is properly seated and connected before replacing it. Contact Doble Customer Service to order replacement cables.
-
Page 89: Safety And Maintenance
6. Safety and Maintenance This chapter discusses rules for the safe operation of the F6150 / F6150A, and several topics related to maintenance of the unit. F6150 Rules for Safe Operation Safe operation of the system requires adherence to the following guidelines: •... -
Page 90: Customer Service
Engineering Customer Service at 617-926-4900 before shipping the instrument. To prepare the F6150 for shipping, disconnect all external cables and attach the cover that protects the front panel of the instrument. Use the original packing materials if they are available. If the original packing materials are not available, pack the instrument for shipment as for any fragile electronic equipment. - Page 91 85 Walnut Street Watertown, MA 02472-4037 Before returning the instrument to Doble Engineering, contact Customer Service to obtain a Return Material Authorization (RMA) number. The RMA number must be attached to the instrument, as it is used to track the instrument through the repair cycle.
- Page 92 72A-2543-01 Rev. C 01/07...
-
Page 93: Appendix A. Firmware Maintenance
The F6000 Flash Loader installs revised firmware. • The F6000 Key Code Update installs F6150 options Open both utilities from the Tools pull-down menu in the F6Control Panel V.2 menu bar. When the F6000 Instrument boots up, the current firmware revision number and the installed options appear in the display on the instrument front panel. -
Page 94: About F6150 Firmware
2.11 (or higher) for CPU1 instruments • 4.11 (or higher) for CPU2 instruments The F6150 requires a firmware package file, *.pkg. This file must contain F6150 in its name. Use the F6 Flash Load to load the correct firmware to the instruments. Downloading F6150 Firmware Use this procedure to download the F6150 firmware: Open F6CP V.2 and ensure that the communications are setup correctly. -
Page 95: Communications Parameters
If the revised firmware does not load successfully, check the setup for communication between the computer and the F6150 Instrument. To verify or change the communications settings: Click Change in the Flash Loader window and the Set Communications Parameters window appears (Figure A.4). - Page 96 Communications Parameters Click OK. To make the settings in the Set Communications Parameters window the default settings for future firmware updates, save them in the F6CP V.2 INI file: Click Save Settings and the FlashLoader dialog box appears (Figure A.5). Figure A.5 Flash Loader Save Settings Click Yes to save the settings in the INI file.
-
Page 97: Appendix B. Configuring Windows For Ethernet Communications
Appendix B. Configuring Windows for Ethernet Communications Configuring the Control PC To configure Windows for communication with the F6150 on a private network, use these steps: Right-click the Network icon on the desktop and select Properties. The Network display appears (Figure B.1). - Page 98 In the IP Address field, enter an IP address close to, but different from the IP address that is displayed on the F6150 after it is turned on. Enter the subnet mask in the Subnet Mask field (Figure B.3).
- Page 99 10. When the computer has rebooted, double-click the MS-DOS icon on the desktop to open an MS-DOS window. 11. Type ping after the prompt, followed by a space and the IP address of the F6150. • If the Ethernet connection is working, four replies from the F6150 appear (Figure B.4).
- Page 100 Configuring the Control PC • If the connection is not good, four time outs appear (Figure B.5). Figure B.5 Unsuccessful Ping • If the ping is unsuccessful, check the network connections, terminators, connecting cable, and network properties. Then try again. 12.
-
Page 101: Set The F6000 Ip Address
F6150/F6150A Power System Simulators User Guide 16. Click OK to apply the new settings. 17. Select Tools>Control Panel in the top menu bar of F6CP V.2.The Control Panel opens and provides manual control of the instrument. If the control PC is subsequently connected to any kind of local-area or wide-area network, return to the Network TCP/IP Properties display and select Obtain IP address automatically. - Page 102 72A-2543-01 Rev. C 01/07...
-
Page 103: Appendix C. Source Configurations
Current Sources The F6150 has three current sources, each rated at 150 VA. Each 150 VA current source can be split in two to yield six 75 VA sources. The current ranges for the 150 VA sources are 7.5, 15, and 30 A. The current ranges for the 75 VA sources are 7.5 and 15 A. -
Page 104: Rules For Source Selection
• For example, if all three F6150 convertible sources in low current mode are named IA, the three sources in parallel yield 450 VA of power. If the current range for the paralleled low current source is 3.0 A, the compliance voltage is 150 V. See Table C.1. -
Page 105: Compliance Voltage And Current Range
F6150/F6150A Power System Simulators User Guide Compliance Voltage and Current Range The compliance voltage of a current source is the highest voltage into which the current source can inject current. The formula for calculating the compliance voltage of a current source is: ÷... - Page 106 Compliance Voltage and Current Range Table C.3 Maximum Compliance Voltage for Current Source Combinations Current 75 VA 150 VA 300 VA 450 VA Range Source Source Source Source 7.5 A 10 V 20 V 40 V 60 V 15 A 10 V 20 V 30 V...
-
Page 107: Predefined Configurations
F6150/F6150A Power System Simulators User Guide Predefined Configurations ”Using the F6000 Configuration Window” on page 3-6 discusses both User Defined and the 21 selections of Predefined Configurations: • 4 Voltages and 4 Currents • 4 Voltages and 4 Transient Currents •... - Page 108 Predefined Configurations Figure C.1 4 Voltages and 4 Currents Figure C.2 4 Voltages and 4 Transient Currents 72A-2543-01 Rev. C 01/07...
- Page 109 F6150/F6150A Power System Simulators User Guide Figure C.3 3 Voltages and 3 Currents Figure C.4 3 Voltages and 3 Transient Currents 72A-2543-01 Rev. C 01/07...
- Page 110 Predefined Configurations Figure C.5 3 Voltages and 1 450 VA Current Figure C.6 3 Voltages and 1 675 VA Transient Current 72A-2543-01 Rev. C 01/07...
- Page 111 F6150/F6150A Power System Simulators User Guide Figure C.7 3 Voltages and 3 450 VA Currents - F6300 Required Figure C.8 3 Voltages and 3 675 VA Transient Currents - F6300 Required 72A-2543-01 Rev. C 01/07...
- Page 112 Predefined Configurations Figure C.9 3 Voltages and 9 150 VA Currents - F6300 Required Figure C.10 3 Voltages and 9 225 VA Transient Currents - F6300 Required 72A-2543-01 Rev. C 01/07 C-10...
- Page 113 F6150/F6150A Power System Simulators User Guide Figure C.11 6 Voltages and 6 Currents Figure C.12 6 Voltages and 6 Transient Currents 72A-2543-01 Rev. C 01/07 C-11...
- Page 114 Predefined Configurations Figure C.13 6 Voltages and 1 450 VA Current Figure C.14 6 Voltages and 1 675 VA Transient Current 72A-2543-01 Rev. C 01/07 C-12...
- Page 115 F6150/F6150A Power System Simulators User Guide Figure C.15 6 Currents (Right Bank) Figure C.16 6 Transients (Right Bank) 72A-2543-01 Rev. C 01/07 C-13...
- Page 116 Predefined Configurations Figure C.17 6 Voltages (Left Bank) Figure C.18 6 Low Range Currents (Left Bank) 72A-2543-01 Rev. C 01/07 C-14...
- Page 117 F6150/F6150A Power System Simulators User Guide Figure C.19 6 Low Range Transient Currents (Left Bank) Figure C.20 1 Voltage and 2 Low Range Currents (Left Bank) 72A-2543-01 Rev. C 01/07 C-15...
- Page 118 Predefined Configurations Figure C.21 1 Voltage and 2 Low Range Transient Currents (Left Bank) 72A-2543-01 Rev. C 01/07 C-16...
-
Page 119: Appendix D. Global Positioning System
Appendix D. Global Positioning System The receiver and antenna available for the F6150 / F6150A are useful for end-to-end testing, where two instruments must be precisely synchronized in order to simulate a power system fault accurately. Each instrument synchronizes its internal clock with the one pulse per second signal transmitted by satellites in the Global Positioning System (GPS). - Page 120 GPS Synchronization GPS Satellite Antenna Antenna Communications Link F6150/F6150A F6150/F6150A Instrument Instrument Relays under test PC with PC with F6CP S/W F6CP S/W Figure D.1 End-to-End Testing with GPS Synchronization 72A-2543-01 Rev. C 01/07...
-
Page 121: Setting Up Your Gps Equipment
12 V DC power supply, with power cord and connecting line The steps for using the GPS are: Connect the 15-pin adapter cable for the F6150 / F6150A Instrument to the GPS port on the instrument front panel. Connect the 100’ cable to the adapter cable. -
Page 122: Conducting The Test
Enter the agreed time in the Go At field of the F6CP window. Once each second, the F6150 / F6150A receives the exact time from the GPS receiver. When the reference time is the same as the common Go At time specified for each test instrument, the two instruments apply the specified fault to each relay. -
Page 123: Appendix E. Timing Between State Changes
Appendix E. Timing Between State Changes The F6150 builds waveforms based on a 10 kHz sample rate. Its waveforms are assembled with data every 100 microseconds or 0.1 milliseconds. When the instrument generates a waveform, it rounds the total time for the required number of cycles to the nearest 0.1 millisecond. - Page 124 72A-2543-01 Rev. C 01/07...
- Page 125 F6150 / F6150A Power System Simulators User Guide Index Amplifier Circuit Boards Analog I/O Circuit Board 4-11 Battery Simulator Checks Cleaning the F6150 4-10 Component Checkout Procedures Connecting Power Power Control Panel general explanation Convertible V/I Sources convertible voltage/current sources...
- Page 126 4-11 variable output battery simulator 4-12 voltage/current amplifier board checks voltage/current sources F6150 instrument front panel 5-20 F6150 with Fixed Output Battery Simulator 5-19 F6150 with Variable Output Battery Simulator F6XXX firmware description Field Replacement cover removal 5-19...
- Page 127 F6150 / F6150A Power System Simulators User Guide Getting Started Global Positioning System Synchronization Testing Testing GPS Equipment Setup GPS Synchronization Graphic Window Hardware architecture 4-13 Hardware Errors IP Address LED Status Indicators 4-10 Power Supply Checks Power Supply Circuit Board...
- Page 128 Source 2-3 , 3-6 Configuration Source Configuration compliance voltage/current range current sources predefined configurations rules source selection 4-16 Source Errors 4-17 System Errors Troubleshooting 4-12 cooling fan checks Customer Service 4-12 voltage/current amplifier boards verification Troubleshooting Flow Charts Troubleshooting Techniques Utilities Set IP Address Visual Check...
Need help?
Do you have a question about the F6150 and is the answer not in the manual?
Questions and answers