Table of Contents
Advertisement
Quick Links
COSEC COGNIFACE INTEGRA
COGNIFACE INTEGRA100
COGNIFACE INTEGRA200
Safety Instructions
These instructions are intended to ensure that the user can
use the product correctly to avoid danger or property loss.
Cautions
Do not install the device:
On unstable surface.
•
Where ferromagnetic field or noise is induced.
•
Where static is created, such as desks made of plastics,
•
carpets.
Near volatile inflammable materials or inflammable goods such
•
as drapes.
Where volatile gas and/or inflammable gas is created.
•
Warning
Installing and servicing should be done only by qualified
•
technician.
There are no user-serviceable parts inside.
•
Opening or removing the device cover may result in electric
•
shock or exposure to other hazards.
Use the device only for the purpose for which it was designed.
•
Advertisement
Table of Contents

Related Manuals for Matrix Cogniface Integra 100E


Summary of Contents for Matrix Cogniface Integra 100E
- Page 1 Safety Instructions COSEC COGNIFACE INTEGRA These instructions are intended to ensure that the user can use the product correctly to avoid danger or property loss. Cautions COGNIFACE INTEGRA200 Do not install the device: On unstable surface. • Where ferromagnetic field or noise is induced. •...
-
Page 2: Table Of Contents
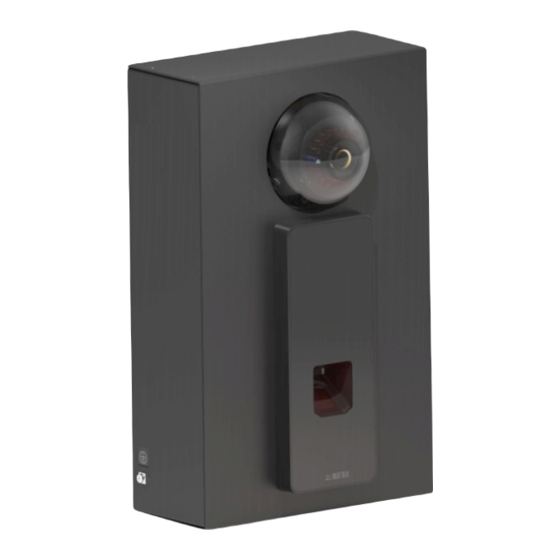
Please read this guide first for correct installation and retain it for future reference. The information in this guide is prevailing at the time of publication. However, Matrix Comsec reserves the right to make changes in product design and specifications without prior notice. - Page 3 The Matrix ARGO device, is engineered with high-end wireless terminals for • image accurately. In COGNIFACE INTEGRA, Matrix IP Camera is used (Refer Figure Time & Attendance. Thus making it a best solution for providing Face 3). It is a Standard 2MP Dome Camera with Focal length of 2.8mm, mounted recognition feature when it is integrated with an IP Camera.
-
Page 4: What Your Package Contains
Things you will Need To power COGNIFACE INTEGRA, plug-in the Adapter and connect the cable into power cable slot and Switch ON the device. This will provide power to Power Drill Ÿ all the devices: IP Camera, COSEC ARGO and FR Module in COGNIFACE A Screw Driver Ÿ... - Page 5 Remove the lid of battery compartment by unscrewing four screws with the After opening the battery compartment, place four battery cells in the space • • help of screw driver. Keep those screws aside carefully because they will be given as shown in Figure 6. required to fix the lid of battery compartment back into its position once the battery cells are inserted.
- Page 6 Figure 8 Close the lid of the battery compartment as shown in Figure 7 and tighten • those four screws back into their position with the help of screw driver as shown in Figure 8. In case of power cut, this will provide battery back-up for minimum 2 hours. •...
-
Page 7: Installation Instructions
Installation Instructions Figure 10 A) Key Slot Mounting 1. Place the mounting template against the wall where Installation is to be done. Trace four screw holes using mounting template with pen/pencil as shown in the Figure 9 and Figure 10 below. Figure 9... - Page 8 2. Drill four screw holes(A,B,C,D) along the traced markings with the help of 3. Fix the supplied screw grips into the A, B, C and D screw holes as shown in power drill as shown in Figure 11 below. the Figure 12. Figure 12 Figure 11...
- Page 9 Figure 14 4. Insert screws into screw holes A, B, C and D having screw grips as shown in the Figure 13 and Figure 14. Figure 13...
- Page 10 Figure 16 5. Align Key hole slots of COSEC COGNIFACE INTEGRA with the screws A, B, C and D on the wall and slightly slide it downwards as shown in Figure 15 and Figure 16. Figure 15...
- Page 11 B) Through Slot Mounting 5. Detach the Ethernet Cable and the DC Jack Cable of COSEC ARGO Device, see Figure 18. Follow Steps-1,2,3 of Key Slot Mounting as initial steps for Through Slot Mounting. Figure 18 1. Place the mounting template against the wall where Installation is to be done. Trace four screw holes using mounting template with pen/pencil as shown in the Figure 9 and Figure 10.
- Page 12 Figure 20 6. Remove the COSEC ARGO Device as shown in Figure 19 and keep it aside with caution. Figure 19 7. Unscrew the eight screws present on the Top Enclosure of the Device as shown in Figure 20.
- Page 13 9. Fix the four screws in the through slots of bottom enclosure. Tighten screw 8. Detach the two connections: Ethernet Cable, DC Jack Cable present at the 1 in screw hole A, screw 2 in screw hole B, screw 3 in screw hole C and top and remove the Top Enclosure as shown in Figure 21.
- Page 14 11. Before placing the ARGO Device back into its position, remember to plug-in 10. After properly tightening the screws, close the enclosure box by fixing top the Ethernet Cable and the DC Jack Cable correctly. Now tighten the screw enclosure back into its position as shown in Figure 23. Tighten those 8 screws present at the bottom of the COSEC ARGO Device to fix it back into its position, back with the help of screw driver.
-
Page 15: Technical Specifications
Technical Specifications Assigning IP Address and Other Network Settings COGNIFACE Specification COGNIFACE COGNIFACE INTEGRA100/200M Parameters INTEGRA100/200E INTEGRA100/200I For Face Recognition feature to work successfully, all the devices i.e COSEC ARGO device, IP Camera and FR module must be in same network by default. User Capacity 50,000 For Face recognition, there should be availability of platform and FR... -
Page 16: Disposal Of Product After End-Of-Life
15 of the FCC Rules. If you are unable to dispose-off the products or unable to locate e-waste recyclers, you may return the products to Matrix Return Material These limits are designed to provide reasonable protection against harmful Authorization (RMA) department.
Need help?
Do you have a question about the Cogniface Integra 100E and is the answer not in the manual?
Questions and answers