Advertisement
Quick Links
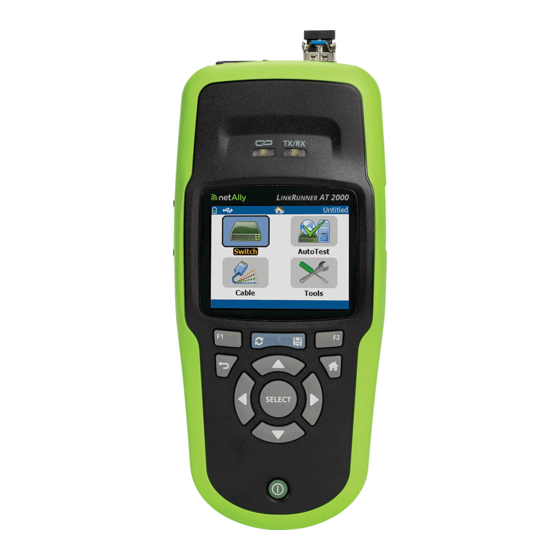
LinkRunner
Network Auto-Tester
Quick Start Guide
RJ-45 Ethernet Port
10/100/1000
Network
Tx/Rx
Connection
Indicator LED
Indicator
LED
mini-USB
LCD Display
Cable test
wiremap-
ping input
Power
Button
Clear/
Refresh
Soft Key
F1
Back
The LinkRunner AT is a portable device that
allows networking professionals to easily verify
network availability and copper and fiber cable
connectivity, identify networks and ports, and
generate reports. LinkRunner AT 2000 can act as
a packet reflector for performance tests run by
other NetAlly testers.
Link-Live Cloud Service
system for collecting, organizing, and reporting
your connection test results, which are auto-
matically uploaded once your LinkRunner AT is
claimed and configured.
LinkRunner Manager
application for locally updating your software,
creating profiles, storing results, and generating
reports. You can download LinkRunner Manager
NetAlly.com/products/LinkRunner
from
All manuals and user guides at all-guides.com
AT
™
Fiber Port
(Model 2000 only)
Kensington
Lock
Port
Tx/Rx
Charging
Battery
Port
cover
Charging
and
Indicator
screw
LED
Save
data
Soft Key
F2
Home
Navigation
SELECT
buttons
is a free, online
is a Windows PC
.
LinkRunner AT's key features include:
• Multiple user-configured AutoTests.
• TruePower™ Power over Ethernet (PoE) testing
up to 30 W with LinkRunner AT 2000.
• Ethernet speed and duplex verification at 10/100
Gigabit rates.
• Twisted pair and fiber optic link identification.
• Cable length measurement, fault location, fault
type detection, and wiremap verification.
• Nearest switch identification with port number,
VLAN, and IP subnet provisioned.
• DHCP, DNS, and Gateway connectivity tests.
• Ping and TCP port connectivity tests with up to
10 user-selected targets.
Get the complete LinkRunner AT Network
Auto-Tester User Manual at NetAlly.com/
products/LinkRunner.
1
Power Up and Connect
Charge the internal battery by plugging the
a)
included power supply into the charging port.
The battery will fully charge in 3 hours.
Press the power button to start up the unit.
b)
Connect your LinkRunner AT to an active
c)
Internet connection using the Ethernet port.
Your LinkRunner AT is now ready to perform tests
on your network and display results.
2
Sign Up/Sign In
To get started with Link-Live, create a user
a)
account at Link-Live.com.
Follow the instructions in the activation email
b)
you receive from Link-Live.
Then, sign in.
c)
3
Claim to Link-Live
The first time you sign in to Link-Live, a pop-up
a)
window appears prompting you to claim a
device.
If you already have units claimed in Link-Live,
navigate to the Units page from the
left side navigation menu, and click
the Claim Unit button at the lower
right corner.
Select your device (LinkRunner AT), and follow
b)
the on-screen instructions to finish claiming.
For more information on using Link-Live, open
c)
Support from the left side menu.
Register
Register your product at NetAlly.com/
Registration to receive update information.
Advertisement

Related Manuals for netAlly LinkRunner AT


Summary of Contents for netAlly LinkRunner AT
- Page 1 Connect your LinkRunner AT to an active Internet connection using the Ethernet port. Clear/ Save Refresh data Your LinkRunner AT is now ready to perform tests on your network and display results. Soft Key Soft Key Sign Up/Sign In Home...
- Page 2 All manuals and user guides at all-guides.com *770-000047* PN 770-000047 07/2019 © 2019 NetAlly...
Need help?
Do you have a question about the LinkRunner AT and is the answer not in the manual?
Questions and answers