Table of Contents
Advertisement
Quick Links
IMPORTANT SAFETY INSTRUCTIONS
WARNING:
not followed precisely, fire or explosion may result causing property
damage, personal injury or loss of life.
READ AND SAVE THESE INSTRUCTIONS
others are very important.
We have provided many important safety messages throughout this manual and
on the appliance.
Read all the instructions before using the appliance and always obey all safety
messages.
Table of Contents
If the instructions contained in this manual are
- Your safety and the safety of
8
8
8
9
9
10
10
11
11
13
16
19
19
19
21
22
23
3
Advertisement
Table of Contents

Related Manuals for Smeg SOU3300TX


Summary of Contents for Smeg SOU3300TX
-
Page 1: Table Of Contents
Table of Contents 1 Description 1.1 General Description 1.2 Control panel 1.3 Other parts 1.4 Available accessories 2 Use 2.1 First use 2.2 Use of accessories 2.3 Using the oven 2.4 Programming clock 2.5 Cooking tips 3 Cleaning and maintenance 3.1 Surface cleaning 3.2 Cleaning the door 3.3 Cleaning inside the oven... - Page 2 Important Safety Instructions RECOGNIZE SAFETY INFORMATION This is a safety alert symbol. This symbol alerts you to potential hazards that can result in severe personal injury or loss of life. UNDERSTAND SIGNAL WORDS A signal word - DANGER, WARNING or CAUTION - is used with the safety alert symbol.
- Page 3 Important Safety Instructions WARNING To reduce the risk of fire, electrical shock, personal injury, or damage when using the appliance, follow basic safety precautions, including the following: • Read all instructions. • WEAR PROPER APPAREL: Loose-fitting or hanging garments should never be worn •...
- Page 4 Important Safety Instructions for air intake. • DO NOT USE ALUMINUM FOIL TO LINE ANY PART OF THE OVEN. Use of • ELECTRICAL GROUNDING IS a foil liner can result in an electrical REQUIRED. It is the customer’s shock or fire hazard or obstruct the flow responsibility: of heat and air.
- Page 5 Important Safety Instructions • Do Not Use Water on Grease Fires - How to read the user manual Smother fire or flame or use dry This user manual uses the following reading chemical or foam-type extinguisher. conventions: • Use Only Dry Potholders - Moist or Instructions damp potholders on hot surfaces may result in burns from steam.
-
Page 6: Description
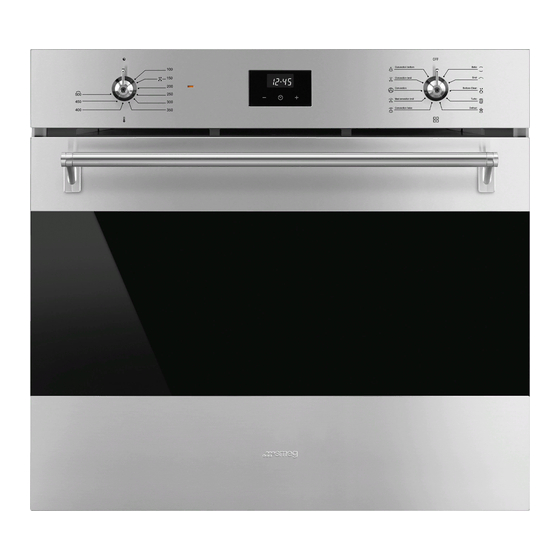
Description 1 Description 1.1 General Description 1 Control panel 4 Door 2 Oven light 5 Fan 3 Door gasket 6 Rack/tray support frames Frame shelf 1.2 Control panel 1 Temperature knob 2 Thermostat indicator light This knob allows you to select the cooking When the indicator light is flashing, it temperature and the Vapor Clean indicates that the oven is heating up to... -
Page 7: Other Parts
Description 3 Programmer clock Internal lighting Useful for displaying the current time, setting The internal lighting for the appliance turns programmed cooking operations and setting the timer. • when the door is opened; • when any function is started, except for 4 Function knob the Vapor Clean function. -
Page 8: Use
2 Use Improper use Risk of damage to enameled Warnings surfaces High temperature inside the oven • Do not cover the bottom of the oven with while in use sheets of aluminum or tin foil. Burn hazard • If you wish to use parchment paper, place it so that it will not interfere with •... -
Page 9: Use Of Accessories
2.2 Use of accessories 2.3 Using the oven Racks Switching on the oven Racks and trays must be inserted into the To switch the oven on: side guides until they stop. 1. Select the cooking function using the • The mechanical safety locks that prevent function knob. - Page 10 Broil Convection bake The heat coming from the broiler The operation of the fan, combined element gives perfect broiling results with traditional cooking, ensures above all for thin and medium uniform cooking even with complex thickness meat and, in combination recipes.
-
Page 11: Programming Clock
Setting the time Convection bottom The combination of the fan with just If the time is not set, the oven will the bottom heating element allows not switch on. cooking to be completed more rapidly. This system is On the first use, or after a power failure, the recommended for sterilizing or for finishing off the cooking of foods which are already well-cooked on... - Page 12 Timed cooking Minute minder timer Timed cooking is the function The minute minder timer does not which allows a cooking operation stop the cooking operation but to be started and then ended after rather informs the user when the set a specific length of time set by the time has run out.
- Page 13 5. Wait approx. 5 seconds without pressing Programmed cooking any key in order for the function to Programmed cooking is the activate. The current time and the symbol function which allows a cooking will appear on the display. operation to be started at a set time and then ended after a At the end of cooking the heating elements specific length of time set by the...
-
Page 14: Cooking Tips
At the end of cooking the heating elements 2.5 Cooking tips will be deactivated. On the display, the General tips symbol turns off, the symbol • Use a convection function to achieve flashes and the buzzer sounds. uniform cooking at several levels. 6. - Page 15 • To check whether the cake is baked Meaning of the cooking chart numbers through, stick a toothpick into its highest In the rightmost column of the cooking chart point at the end of the baking time. If the there’s a series of numbers that correspond dough does not stick to the toothpick, the to recommendations relating to the dessert is cooked.
- Page 16 Cooking information chart Weight Temp. Food Function Shelf Time (min.) (°F) (lbs.) Focaccia bread Turbo 25/30’ Bread 6 x 0.3 Bake 38/42’ Pizza 1.5/2.5 Conv. Bake 10/15’ Pizza (frozen) Conv. Bake 3/5’ Quiche Bake 40/45’ Grilled vegetables Broil 8’ 1 + 5’...
-
Page 17: Cleaning And Maintenance
Cleaning and Maintenance 3 Cleaning and maintenance Food stains or residues Do not use steel wool or sharp scrapers: Warnings they will damage the surface. Use ordinary, non-abrasive products, with Improper use the aid of wooden or plastic tools if Risk of damage to surfaces necessary. - Page 18 Cleaning and Maintenance 2. Grasp the door on both sides with both Removing the inner and intermediate hands. Lift it, forming an angle of about glasses 30°, and remove it. To facilitate cleaning, the inner glass panels of the door can be removed. To make this easier, we recommend that you remove the door before removing the glass panels.
-
Page 19: Cleaning Inside The Oven
Cleaning and Maintenance 3. Some models have an intermediate glass 3.3 Cleaning inside the oven panel. Remove the intermediate panel by Proper maintenance of the oven's interior lifting it upwards. requires that it be cleaned regularly, after allowing it to cool. Avoid leaving dried up food inside the oven because it could damage the enamel surface. -
Page 20: Vapor Clean
Cleaning and Maintenance • When you have finished cleaning the • Pour approx. 13.5 fl. oz. (400 cc - 1.7 oven, repeat the procedures indicated cups) of water onto the floor of the oven. above to reposition the guide frames. Make sure it does not overflow out of the cavity. -
Page 21: Extraordinary Maintenance
Cleaning and Maintenance Vapor Clean setting 3.5 Extraordinary maintenance Replacing the oven light 1. Turn the function knob to the symbol Live parts and the temperature knob to the Danger of shock symbol. 2. Set a cooking time of 18 minutes using •... - Page 22 Cleaning and Maintenance Removing and re-inserting the gasket 4. Loosen and remove the light bulb. To remove the oven’s gasket: • Unhook the highlighted hooks and pull the gasket out. Do not touch the halogen bulb with your fingers; cover them with an insulating cloth.
Need help?
Do you have a question about the SOU3300TX and is the answer not in the manual?
Questions and answers