Table of Contents
Advertisement
Quick Links
America's Leader in Solar Powered Ventilation
Installation Guide
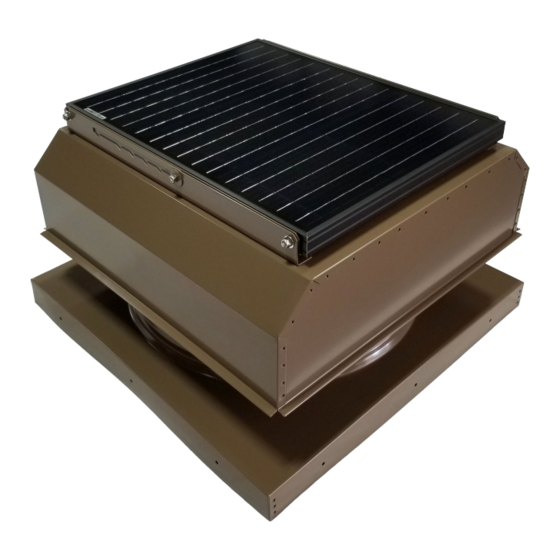
GEN3 CMA/CMD Model Series Fans
ATTENTION:
BEFORE PROCEEDING WITH YOUR INSTALLATION. MAKE SURE YOU HAVE
THE REQUIRED TOOLS AND MATERIALS TO COMPLETE THE INSTALLATION
OF YOUR SOLAR ATTIC FAN BEFORE BEGINNING.
PLEASE READ THROUGH THIS ENTIRE INSTRUCTION GUIDE
AB–2543
AB–3543
AB–4543
AB–6543
Advertisement
Table of Contents

Related Manuals for Attic Breeze GEN3 CMA Series


Summary of Contents for Attic Breeze GEN3 CMA Series
- Page 1 America's Leader in Solar Powered Ventilation Installation Guide AB–2543 AB–3543 AB–4543 AB–6543 GEN3 CMA/CMD Model Series Fans ATTENTION: PLEASE READ THROUGH THIS ENTIRE INSTRUCTION GUIDE BEFORE PROCEEDING WITH YOUR INSTALLATION. MAKE SURE YOU HAVE THE REQUIRED TOOLS AND MATERIALS TO COMPLETE THE INSTALLATION OF YOUR SOLAR ATTIC FAN BEFORE BEGINNING.
- Page 2 Getting Started Your Attic Breeze curb-mount solar attic fan is designed for easy installation with metal roofs, tile roofs, or roofs featuring other high-profile materials where a roof curb is required for proper installation. If installing our products on a composite shingled roof or a simliar low-profile roof type, please contact Attic Breeze for information on our self-flashing fans designed for those roof types.
- Page 3 Install the solar panel mounting brackets per the instructions included with your specific Attic Breeze bracket kit. Plug in the power cord to the connector on back of the remote solar panel and securely mount the solar panel/bracket assembly as required to your roof or structure.
- Page 4 Adjusting the Solar Panel The solar panel on your Attic Breeze solar attic fan may either be left down in the horizontal mounted position as received from the factory, or the solar panel bracket may be raised to pivot the solar panel toward the south in order to get better sun exposure.
Need help?
Do you have a question about the GEN3 CMA Series and is the answer not in the manual?
Questions and answers