MR MESSKO MPreC Operating Instructions Manual
Test bench
Hide thumbs
Also See for MESSKO MPreC:
- Operating instructions manual (60 pages) ,
- Operating instructions manual (70 pages)

Related Manuals for MR MESSKO MPreC


Summary of Contents for MR MESSKO MPreC
- Page 1 MESSKO MPreC ® ® 试验台 MESSKO MPreC tESt bEnCh ® ® 使用说明书/Operating Instructions bA 3451814/00 Zh-En . MESSKO InStRUMEntS...
- Page 2 bA 3451814/00 Zh-En...
-
Page 3: Table Of Contents
目录/Contents Contents 目录 Safety ....... 17 安全 . . . . . . . . . . . . . . . . . . . 4 Safety notes . -
Page 4: 安全提示
安全 安全 注意 1.1 安全提示 设备的安装、电气连接、调试和维护必须由合格的 专业人员严格遵照本使用说明书来进行。 从事本设备的安装、调试和运行工作的所有人员必须 操作人员应保证按照规定使用本设备。 - 具有足够的专业资格, 为安全起见,事先未经 MESSKO 的同意不得擅自以 - 严格遵守本使用说明书。 及违规进行安装、电气连接、调试和运行操作! 违章操作或错误使用可能导致 - 危及人身安全, - 损坏本设备和用户的其它财产, - 降低本设备的工作效率。 本使用说明书包括下列提示,以强调重要的注意事项。 警告 表示针对人身安全的特殊危险。忽视该提示可能造 成重伤或死亡。 注意 表示针对本设备或用户其它财产的危险。另外不排 除可能危害人身安全。 提示 表示针对某具体事项的重要说明。 1.2 按规定使用 Messko ® MPreC ® 试验台测试并记录油浸式变压器上压力 释放阀在拆卸状态下的准确性和功能安全性。 调试设备前,必须注意并遵守铭牌上和使用说明书中规 定的使用限值。... -
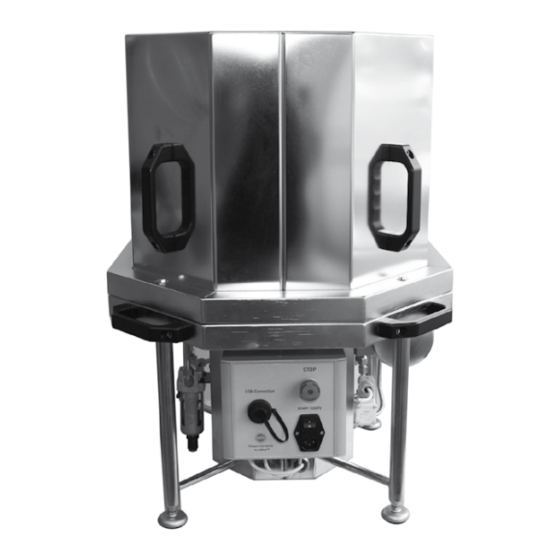
Page 5: 产品说明
产品说明 产品说明 MESSKO ® MPreC ® 试验台测试并记录油浸式变压器上压力 提示 释放阀在拆卸状态下的准确性和功能安全性。 MESSKO ® MPreC ® 试验台只适用于法兰有六个安装 移动试验台是用于调试、运行和维护变压器的检测设 孔,且安装孔中心距为235mm的压力释放阀。 备。 1 保护罩 2.1 供货范围 2 手柄(保护罩上有 4 个) 3 手柄(底部有 4 个) MESSKO MPreC 试验台(含保护罩) ® ® MESSKO MPreC 试验台软件 ® ® 4 压缩空气接口 G1/2“ USB 2.0 A 型到 B 型线缆 5 USB 接口 使用说明书 6 电源接口 带 IEC 插头的电源线 7 急停按钮 8 主过滤器(压缩空气)... - Page 6 调试 调试 说明 图 请将 MPreC 试验台放在平坦的水平面 ® 上。 警告 请确保试验台底部稳定,不会滑动或倾斜。 注意 建议由两人或多人抬起试验台并将其放到正 确位置(重量约为 50 kg)。 两个人从 MPreC 试验台底部向上提起保 ® 护罩并将其放在安全的位置。 注意 建议由两人从试验台底部抬起保护罩。 通过现有的 G1/2“ 接口连接压缩空气供 应。 注意 进给的压缩空气的压力必须在 4 bar 和 10 bar 之间。 将压缩空气供应(压缩空气瓶、空气压缩机 等)安全连接到现有压缩空气接口时,必须 遵守所在国家或地区的规定。 提示 必须使用符合 ISO 8573-1:2001 (E) 质量 等级 2.2.4(无尘、无油、无水)的 干净 的压缩空气。 bA 3451814/00 Zh-En...
- Page 7 调试 说明 图 用随附的电源线连接电源并打开设备。 警告 户外使用时,如有必要,请根据天气采取 适当的保护。 通过 USB 接口和随附的 USB 线缆与您的 PC 或笔记本电脑之间建立数据连接。 启动随附 CD 中的 MESSKO MPreC 试验 ® ® 台安装程序。要求的操作系统是含有 SP 3 的 Microsoft Windows XP 或更新的 MS Windows 版本。 按照安装向导中的指导操作。 如果安装成功,则可以通过创建的 MPreC 程序图标启动该软件。 必要时可以通过“Uninstall MPreC”(卸 载 MPreC)将其卸载。 bA 3451814/00 Zh-En...
- Page 8 运行 运行 说明 图 请取下要测试的压力释放阀的保护罩。 提示 确保压力释放阀的法兰,特别是安装密封 件无脏污。 用 M12 螺栓和垫圈通过安装法兰上的 6 个孔将压力释放阀安装在试验台上。安装 时必须在设备下方安装一个安装密封件。 提示 安装压力释放阀时请注意制造商的说明。 用六个 M12 螺栓和六个垫圈将压力释放阀 拧紧在 MPreC 试验台的支承板上。 注意 请确保 M12 固定螺栓的长度不超过压力释 放阀的法兰厚度再加 15 mm(紧固板螺纹 长度)。 bA 3451814/00 Zh-En...
- Page 9 运行 说明 图 两个人将保护罩放置在 MPreC 试验台上。 注意不要碰到压力释放阀的信号标杆。 注意 建议由两人将保护罩放到试验台底部。 通过现有的 G1/2“ 接口连接压缩空气供 应。 注意 进给的压缩空气的压力必须在 4 bar 和 10 bar 之间。 将压缩空气供应(压缩空气瓶、空气压缩机 等)安全连接到现有压缩空气接口时,必须 提示 遵守所在国家或地区的规定。 必须使用符合 ISO 8573-1:2001 (E) 质量 等级 2.2.4(无尘、无油、无水)的干净的 压缩空气。 用随附的电源线连接电源并打开设备。 警告 户外使用时,如有必要,请根据天气采取 适当的保护。 MPreC 试验台运行时,急停按钮中间的 LED 呈红色。 注意 按此键可以在试验台开启后随时将其关闭。 通过 USB 接口和随附的 USB 线缆与您的 PC 或笔记本电脑之间建立连接。 bA 3451814/00 Zh-En...
- Page 10 运行 说明 图 通过程序图标启动 MPreC 应用软件。 选择用户界面的语言(英语或中文)。切 换语言必须重新启动软件。 通过 “Settings”(设置)可以指定试验 记录保存的格式(“PDF” 和/或 “Pic- ture”)。 在下方的输入行中可以指定保存路径。 如果选择了 “Export (autom.): enabled” (输出(自动):启用),那么自动试验过程 结束后,输出文件将自动保存至指定路径。 请在 “Serial no.”(序列号)下输入压 力释放阀的序列号(必填)。 在 “Additional text”(附加文本)下 可以输入附加文本。 请选择要试验的压力释放阀的压力范围。 请选择试验次数(1、5 或 10) 开始试验。 提示 用鼠标点击程序按钮“Start test”(开 始试验)后,试验过程自动启动,而且在 释放压力释放阀进行压力补偿时发出较大 噪声。 bA 3451814/00 Zh-En...
- Page 11 运行 说明 图 试验结束后选择“Testresults”(试验结 果),检查试验结果。 1 次测量试验的示例 10 次测量试验的示例 如果未选择“Export (autom.): en- abled”(输出(自动):启用)选择 字段,那么试验结束后可以选择“PDF- Report”(PDF 报告)和“OK”将试验结 果以 PDF 文件保存在指定路径下。 选择“Picture”(图片)和“OK”,试验 记录将以图片文件格式 (jpg) 保存在指定 路径下。然后可以将该文件导入或编辑为 Word 文件。 保存路径可以随时更改。 bA 3451814/00 Zh-En...
-
Page 12: 维护和服务
维护和服务 维护和服务 MESSKO MPreC 移动试验台无需维护。 建议每 3 年更换或校准压力变送器。 5.1 更换过滤器 注意 更换过滤器前必须断开压缩空气供应。 说明 图 根据脏污程度更换主过滤器和/或预 过滤器。 主过滤器 预过滤器 提示 脏污程度与使用周期和使用的压缩空气质量有关。 向下按预过滤器的锁。 将锁保持在该位置并向左转动过滤器 滤芯。 bA 3451814/00 Zh-En... - Page 13 维护和服务 说明 图 当标记 I(上)和 II(下,在滤芯 上)正对时,向下拉出过滤器滤芯。 向左旋下过滤器。 将过滤器从顶部和底部的黑色塑料部 分拆下,更换新的过滤器。 按相反顺序进行安装(步骤 5、4、3 和 2)。 制造商:SMC, 订购号 AF30P-060S bA 3451814/00 Zh-En...
-
Page 14: 技术数据
维护和服务 技术数据 说明 图 以同样的方法更换主过滤器。 更换新的主过滤器芯子。 这里浅色的过滤器和顶部和底部的黑 色塑料部分是一体的,要一起更换。 制造商:SMC 订购号 AFM30P-060AS 按相反顺序进行安装(步骤 5、4、3 和 2)。 技术数据 外壳: 压缩空气供应: 尺寸: 约 800 mm x 600 mm x 600 mm 压力: 4 .0 bar 至 10 bar 之间 约 50 kg 重量: 压缩空气质量: 符合 ISO 8573-1:2001 (E) 标准 软件: MPreC 压力释放阀试验 2.2.4 等级(无尘、无油、无水)。 ® 操作系统要求: 压力测量值: 含有 SP 3 的 MS Windows XP 测量范围: 4 psi ...30 psi 或 准确性: ±1 psi(4 psi 至 12 psi 范围) 更新的 MS Windows 版本;... - Page 15 附录 7.1 尺寸 bA 3451814/00 Zh-En...
-
Page 16: 测试证书
附录 7.2 测试证书 bA 3451814/00 Zh-En... -
Page 17: Safety
Safety Safety CAUtIOn Safety notes Only qualified, trained staff must carry out instal- lation, electrical connection, commissioning and All persons involved with the fitting, commissioning and maintenance of the device in accordance with these operation of the device must be Operating Instructions. - adequately professionally qualified and the operator shall ensure that the device is used - strictly observe these operating instructions. for its intended purpose. -
Page 18: Product Description
Product description Product description the MESSKO MPreC test bench tests and logs the ® ® accuracy and functional safety of pressure relief valves nOtE on oil-filled transformers in the disassembled state. the MESSKO MPreC test bench is only suitable for ® ® the mobile test bench is an additional safety package pressure relief valves which have 6 holes for attach- for the commissioning, operation and maintenance of ment on the flange side and a pitch circle of 235 mm. -
Page 19: Commissioning
Commissioning Commissioning Description Image Place the MPreC test bench on a level ® horizontal surface. WARnInG Ensure that the testing device has a firm base and cannot slip or tip over. CAUtIOn It is recomended to carry and position the test bench by two or more people (weight approx. - Page 20 USb port and the USb cable supplied. Launch the setup program of the MESSKO MPreC test bench from the CD supplied. System requirement is Microsoft Windows XP including SP 3 or a newer version of MS Windows.
-
Page 21: Operation
Operation Operation Description Image Remove the cover from the pressure relief valve to be tested. nOtE Ensure that the flange side of the pressure relief valve and particularly the installation seal are free of dirt and contamination. Use M12 screws and washers in the 6 holes on the housing flange to install the pressure relief valve on the table of the test bench.An installation seal must be fitted under the device during installation. - Page 22 Operation Description Image two people are required to replace the cover on the MPreC test bench.Do not knock the signal pin when doing this. CAUtIOn It is recomended to fit the hood to the lower part of the test bench by two people. Connect the compressed air supply via the existing G1/2”...
- Page 23 Operation Description Image Start the MPreC software via the program icon. Select the language of the user interface (English or Chinese). Relaunch the soft- ware to change the language. Via „Settings“ you can specify the format („PDF“ and/or „Picture“) of the test protocol.
- Page 24 Operation Description Image After completion of the test, select “Test results” to examine the test result. Example for testing with one measuring cycle. Example for testing with 10 measuring cycles. If the select box „Export (autom.): enabled“ is not selected, then the test protocol can be stored as PDF file under the specified path by selecting „PDF-Report“ und „OK“. by selecting „Picture“...
-
Page 25: Maintenance And Service
Maintenance and service Maintenance and service the mobile MESSKO MPreC test bench is maintenance-free. It is recommended that the pressure transmitter is replaced or calibrated every 3 years. CAUtIOn Filter change It is essential to disconnect the pressure air supply before replacing the filter. - Page 26 Maintenance and service Description Image Pull the filter cartridge off downwards when the I (above) and II (below on the cartridge) marks are opposite each other. Twist the filter to the left and remove. Separate the filter insert from the plastic top and bottom parts and replace it with a new one. Complete the installation in reverse order (steps 5, 4, 3, and 2).
-
Page 27: Technical Data
Maintenance and service Technical data Description Image Proceed in the same manner when replacing the main filter. Replace the filter insert of the main filter with a new one. In this case, the light-coloured filter and black plastic top and bottom parts form a unit and must be re- placed together. Manufacturer:SMC Part-no.AFM30P-060AS Complete the installation in reverse order (steps 5, 4, 3, and 2). -
Page 28: Appendix
Appendix Dimensions bA 3451814/00 Zh-En... -
Page 29: Test Certificate
Appendix 7.2 Test certificate bA 3451814/00 Zh-En... - Page 30 bA 3451814/00 Zh-En...
- Page 31 bA 3451814/00 Zh-En...
- Page 32 Messko Gmbh Gewerbegebiet An den Drei hasen Messko-Platz 1, 61440 Oberursel, Germany Phone: +49 6171 6398-0 Fax: +49 6171 6398-98 E-Mail: info@messko.com www.messko.com Please note: the data in our publications may differ from the data of the devices delivered.We reserve the right to make changes without notice. bA 3451814/00 Zh-En –...
Need help?
Do you have a question about the MESSKO MPreC and is the answer not in the manual?
Questions and answers