Table of Contents

Related Manuals for XFT Medical XFT-120G


Summary of Contents for XFT Medical XFT-120G
- Page 1 AED TRAINER XFT-120G Direction for use Thank you for purchasing XFT-120G AED Trainer Please read the instruction manual carefully and thoroughly before operating this device. Also please keep it available for future reference.
-
Page 2: Table Of Contents
Content 1. Product Introduction 2. Product Illustration 2.1 The Trainer 2.2 The Trainer Display Screen 2.3 The Remote Control 2.4 Accessories 3.Operating Instruction 3.1 Preparation 3.2 Power on and select training mode 3.3 Connecting Electrode Pad 3.4 Follow the voice prompts 3.5 Setting Interface 3.6 Shutdown 4. -
Page 3: Product Introduction
Atmospheric pressure limitation 1. Product Introduction XFT-120G AED (Automated External Defibrillator) Trainer is specifically designed to train first-aid personnel before they use a real clinical AED. The AED Trainer completely simulates the operation of A E D in the training guide and training program, but does not deliver high voltage electric shock, protecting the safety of trainees. -
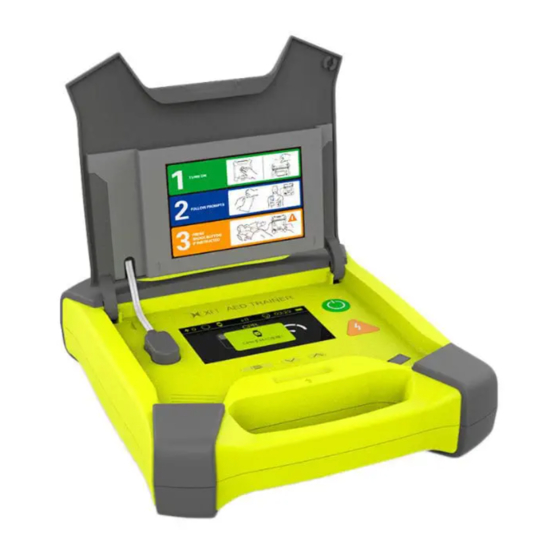
Page 4: Product Illustration
Directions for Use 2. Product Illustration XFT-120G AED Trainer consists of the Trainer, Remote Control, Electrode Pads, Pad Sensors, Instruction Manual, Power Adapter, and Storage Bag. 2.1 The Trainer 2.1.1 Front View Fig. 1 Front View Fig.2 Open the Cover... - Page 5 Directions for Use 9) Up Button When it is on the working interface, user can press this button to choose different scenarios; When it is on setting interface, user can press this button to switch the selection. 10) Down button When it is on the working interface, user can press this button to choose different scenarios;...
-
Page 6: The Trainer Display Screen
Directions for Use 2.2 The Display Screen Fig.7 Display Screen Explanation Indicates the times of shocks the Trainer has delivered “0” means no shock. Indicates that the trainer is currently in semi-automatic mode; Indicates that the trainer is currently in the full-automatic mode. Indicates that the trainer is connected to the CPR wristband;... -
Page 7: The Remote Control
Directions for Use 2.3 The Remote Control Fig. 8 Remote Control 1) Scenario Buttons Press these buttons to select basic scenario from 0-9 scenario (see Table 3 for details of each scenario); 2) Stop CPR Button If you press this button during the CPR process, you will end the CPR process ahead of time and go directly to the next process. - Page 8 Directions for Use 5) Semi/ Fully-automactic Button Press this button to select between semi-automatic scenario or fully-automatic scenario. 6) Simulate Electrode is Well Connected Press this button during training, the trainer enters into the electrode pads connect good program, and then according to the voice prompt for training. 7) Simulated Electrode is not Well Connected: Press this button during training, the trainer prompts “Press pads firmly to patient's bare chest”, and then prompts “poor pads contact”...
- Page 9 Directions for Use 9) Simulate a Shockable Rhythm: Press this button during training, the trainer enters into a shockable rhythm program, and then train according to the voice prompts. 10) Simulate a Non-shockable Rhythm: Press this button during training, the trainer enters into a non-shockable rhythm program, and then train according to the voice prompts.
- Page 10 Directions for Use 13. Simulate the Compression is Too Slow: During the CPR process, when press this button, the trainer screen prompts to push faster. Fig. 17 14. Simulate the Compression is Too Fast: During the CPR process, when press this button, the trainer screen prompts to push slower.
-
Page 11: Accessories
2.4 Accessories Electrode Pads Adapter Battery AED TRAINER XFT-120G Direction for use Thank you for purchasing X FT-120G AED Trainer Please read the instruction manual carefully and thoroughly before operating this device. Also please keep it available for future reference. -
Page 12: Operating Instruction
Directions for Use 3. Operating Instruction 3.1 Preparation 3.1.1 Electrode pads placement Take out the electrode from the package and place it on the manikin. Note: If the adult mode is used, the adult electrode pads is attached to the position shown in Fig.22;... -
Page 13: Power On And Select Training Mode
Directions for Use The connection status displayed on the CPR wristband screen is as follows: CPR wristband Explanation screen display Unconnected icon: The icon will show when the C P R wristband is not connected to the trainer. When the CPR wristband is turned on and the trainer is not turned on, the CPR wristband will search for the trainer to connect. -
Page 14: Connecting Electrode Pad
Directions for Use 3.3 Connecting Electrode Pad 1) Take out the electrode pads (the adult electrode pads are pre-connected to the trainer); 2) Place the electrode pads to the manikin according to the illustration on the electrode pads; 3) Follow the voice prompts to perform related operations. Fig. -
Page 15: Follow The Voice Prompts
Directions for Use 3.4 Follow the Voice Prompts According to the selected training mode, the operation is performed according to the prompt voice of the trainer. Fig. 29 Follow the voice prompts to operate 3.5 Setting Interface If the user needs more settings, he or she can go to the settings page to make related settings. - Page 16 Directions for Use 3.5.2 Metronome setting 1) Open the trainer's cover to power on. 2) Press and hold for 3 seconds to enter the setting interface. 3) Select the Metronome option by pressing the “ ” or “ ” button. 4) Press to enter the Metronome setting page.
-
Page 17: Shutdown
Directions for Use 3.5.4 System Setting 1) Open the trainer's cover to power on. 2) Press and hold for 3 seconds to enter the System setting interface. 3) Select the System option by pressing the “ ” or “ ” button. 4) Press to enter the System settings page. -
Page 18: Product Maintenance
Directions for Use 4. Product Maintenance 4.1 Maintenance for the Trainer If the trainer is dirty, wipe with soft cloth with water or neutral detergent. Wring it thoroughly and wipe the main unit. Do not wipe the main unit with thinner, benzine, etc. Do not wipe the main unit with other volatile preparations. - Page 19 Directions for Use 2) The Trainer battery charging: When the battery is exhausted, please charge the battery in time. Fig. 35 The Trainer battery charging After using for a while, if the volume is not normal or does not work properly, the battery may be running out.
-
Page 20: Working Condition And Storage Condition
Directions for Use 4) Safe Use of Rechargeable Batteries: ◆ Do not charge/discharge more than the specified current. ◆ Do not short circuit the battery/battery pack, as this may cause permanent damage to the battery/battery pack. ◆ Do not burn or destroy the battery/battery pack. ◆... -
Page 21: Specification And Product Contents
Directions for Use 5. Specification and Product Contents 5.1 The Trainer Model: XFT-120G Product Name: AED Trainer Power:DC 7.4V/2600mAh,rechargeable lithium battery Shutdown current: ≤10µA Working current: ≤500mA Size: 253x230x71mm Weight: 865±35g Rechargeable lithium battery: ICR18650, 7.4V 2600mAh, 37x67x19mm 5.2 Remote Control Power: DC 3.0V(CR2032 Button cell) -
Page 22: Product Contents
Directions for Use 5.3 Product Contents Table 1 Quantity Unit Remarks Content The Trainer Remote Control Adult Electrode Pads Pair Child Electrode Pads Pair Adult Pad Sensors Pairs Child Pad Sensors Pairs CPR Wristband Optional Battery Rechargebale Power Adapter Instruction Manual Storage Bag Table2: Accessories ordering reference number Accessories... - Page 23 Directions for Use Table3: 10 preprogrammed scenarios in XFT-120G AED Trainer Scenarios Description Operation Shockable rhythm Ventricular Fibrillation- 1 shock With single-shock conversion Non-shockable rhythm Shockable rhythm Ventricular Fibrillation- 4 shocks With multiple-shocks required Non-shockable rhythm for conversion Poor pad connection...
-
Page 24: After-Sales Service
Product name: Model no.: Purchase date: Product serial no.: Buyer's information: Distributor's information: Manufacturer: Shenzhen XFT Medical Limited Add: Room 203, Building 1, Biomedicine Innovations Industrial Park, #14 Jinhui Road, Pingshan District, Shenzhen, China Tel: 86-755-29888818 Web: www.xft-china.com Mail: xft@xft.cn... - Page 25 Product Name: AED Trainer Model: XFT-120G Shenzhen XFT Medical Limited Room 203, Building 1, Biomedicine Innovations Industrial Park, #14 Jinhui Road, Pingshan District, Shenzhen, China Tel: 86-755-29888818 Web: www.xft-china.com Mail: xft@xft.cn Date:2019/7/31 Doc. No.: XFT-120G-A Version: C...
Need help?
Do you have a question about the XFT-120G and is the answer not in the manual?
Questions and answers