
Related Manuals for XFT Medical XFT-120G

Summary of Contents for XFT Medical XFT-120G
- Page 1 Thank you for purchasing XFT-120G AED Trainer Please read the instruction manual carefully and thoroughly before operating this device. Also please keep it available for future reference. 1 / 20...
-
Page 2: Table Of Contents
Content 1. Product Introduction.................................3 2. Product Illustration................................3 2.1 The Trainer................................4 2.2 The Trainer Display Screen............................6 2.3 The Remote Control...............................7 2.4 Accessories................................10 3.Operating Instruction............................... 11 3.1 Preparation................................11 3.2 Power on and select training mode........................12 3.3 Connecting Electrode Pad............................ 12 3.4 Follow the voice prompts.............................13 3.5 Setting Interface.............................. -
Page 3: Product Introduction
CPR procedures and related medical procedures. 2. Product Illustration XFT-120G AED Trainer consists of the Trainer, Remote Control, Electrode Pads, Pad Sensors, Instruction Manual, Power Adapter, and Storage Bag. 3 / 20... -
Page 4: The Trainer
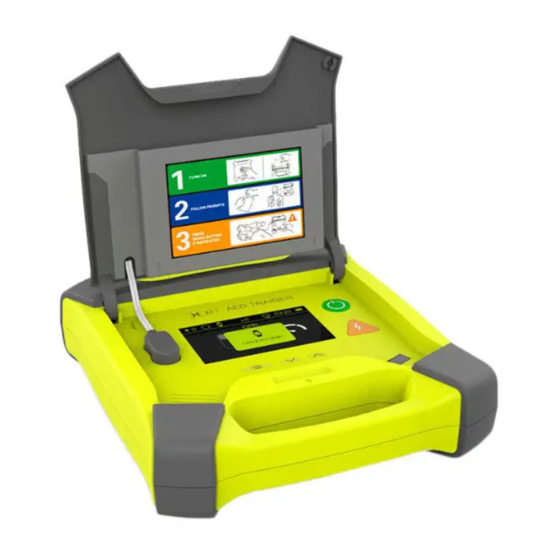
2.1 The Trainer 2.1.1. Front View Fig. 1 Front View Fig.2 Open the Cover 1) Handle 2) Cover When Open the cover, the AED Trainer will be turned one; when close the cover, the AED Trainer will be turned off. 3) USB Interface It is used to upgrade the software. - Page 5 Fig.3 Rear View Fig.4 Take Out the Remote Control 1) Remote Control The remote control is stored in the back side of the AED Trainer.User can remove it from the trainer when doing the training. 2.1.3 Botton View Fig.5 Botton View Fig.6 Remove the Battery Module 1) Battery Module The battery module is rechargeable.
-
Page 6: The Trainer Display Screen
2.2 The Display Screen Fig.7 Display Screen Explanation Indicates the times of shocks the Trainer has delivered “0” means no shock Indicates that the trainer is currently in semi-automatic mode; Indicates that the trainer is currently in the full-automatic mode. Indicates that the trainer is connected to the CPR wristband;... -
Page 7: The Remote Control
2.3 The Remote Control Scenario Buttons Stop CPR Button Volume +/-Button Play/Pause Button Simulate Electrode is Well Connected Simulate Electrode is not Well Connected Simulate Motion Interference Semi/ Fully-automactic Button Simulate a Non-shockable Rhythm Simulate Low Battery Simulate System Error Simulate a Shockable Rhythm Simulate the Compression is Too Soft Simulate the Compression is Too Fast... - Page 8 Fig. 7 Fig. 8 8) Simulate Motion Interference: Press this button during the first heart rhythm analysis, the trainer prompts “Analysis interrupted (Fig. 9), Stop all motion (Fig. 10)”; press this button during the second heart rhythm analysis, the trainer prompts “Stop all motion (Figure 10), Cannot analyze (Figure 11)"...
- Page 9 Fig. 12 Fig. 13 12. Simulate System Error: In the normal use of the trainer, press this button, the trainer screen prompts ”System Error”.. Fig. 14 13. Simulate the Compression is Too Slow: During the CPR process, when press this button, the trainer screen prompts to push faster. Fig.
-
Page 10: Accessories
Fig. 17 16. Simulate the Compression is too Hard: During the CPR process, when press this button, the trainer screen prompts to push softer. Fig. 18 2.4Accessories Fig. 19 10 / 20... -
Page 11: Operating Instruction
3. Operating Instruction 3.1 Preparation 3.1.1 Electrode pads placement Take out the electrode from the package and place it on the manikin. Note: If the adult mode is used, the adult electrode pads is attached to the position shown in Figure 20; if the child mode is used, the child electrode pads is attached to the position shown in Figure 21. -
Page 12: Power On And Select Training Mode
Disconnect icon: The icon will show when the CPR wristband is disconnected from the trainer. When the CPR wristband is connected to the trainer, if the trainer is turned off, this icon will be displayed on the CPR wristband screen. 3.2 Power On and Select Training Mode Open the cover, (the power button ) light is on, and then select the training scenario through the remote control. -
Page 13: Follow The Voice Prompts
Fig. 26 Adult Electrode pad and Child Electrode pad Do not bend or stretch the electrode wires. When pulling out the electrode from the trainer, press and hold the terminal to pull it out. The factory default is to use the adult electrode, one end has been connected to the trainer; if you need to replace with the child electrode, firstly pull out the adult electrode, and then replace it with a child's electrode. - Page 14 7) Press the “ ” or “ ” button to return to the start page of setting 8) Press and hold for 3 seconds to exit the setting interface. Then follow the voice prompts in the normal order for training. Fig.
- Page 15 3) Select the CPR wristband by pressing the “ ” or “ ” button 4) Press to enter the CPR wristband setting page 5) Select the desired option by pressing the " " or " " button 6) Press to confirm the selection 7) Press the “...
-
Page 16: Shutdown
Fig. 31 System setting 3.6 Shutdown When the training is over, close the trainer’s cover to turn off the device. In addition, the trainer also has an automatic shutdown function: 1) Low voltage automatic shutdown. 2) If it is in the setting interface for more than 8 minutes, it will automatically shut down. 3) If the trainer pauses for 8 minutes, it will automatically shut down if there is no operation. - Page 17 Fig. 32 The Trainer battery installation 2) The Trainer battery charging: When the battery is exhausted, please charge the battery in time. Fig. 33 The Trainer battery charging * After using for a while, if the volume is not normal or does not work properly, the battery may be running out. Please replace the battery or charge the battery.
-
Page 18: Working Condition And Storage Condition
Atmospheric pressure: 86kPa-106kPa Storage Condition Temperature: -20℃-55℃ Humidity: ≤93% (Non-condensing) Atmospheric pressure: 70kP a-106kPa 5. Specification and Product Contents 5.1The Trainer Model: XFT-120G Product Name: AED Trainer Power:DC 7.4V/2600mAh,rechargeable lithium battery Shutdown current: ≤10µA Working current: ≤500mA Size: 253*230*71mm Weight: 865±35g Rrechargeable lithium battery :ICR18650,7.4V 2600mAh,... -
Page 19: Product Contents
4320010131 CPR Wristband Battery 5030701001 Power Adapter 1140210033 Instruction Manual 4010701001 Storage Bag 4450701001 Table3: 10 preprogrammed scenarios in XFT-120G AED Trainer Scenarios Description Operation Ventricular Fibrillation- Shockable rhythm With single-shock conversion 1 shock Non-shockable rhythm Ventricular Fibrillation- Shockable rhythm... -
Page 20: After-Sales Service
It is charged according to the stipulation of the repair service of the warranty. Please contact XFT if you need warranty service. Product Name: AED Trainer Model: XFT-120G Shenzhen XFT Medical Limited Room203, Building 1, Biomedicine Innovations Industrial Park, #14 Jinhui Road, Pingshan New District, Shenzhen, China Date:2019/7/31 Doc. - Page 21 FCC COMPLIANCE STATEMENT: This device complies with part 15 of the FCC Rules. Operation is subject to the following two conditions: (1) This device may not cause harmful interference, and (2) this device must accept any interference received, including interference that may cause undesired operation. Note: This equipment has been tested and found to comply with the limits for a Class B digital device, pursuant to Part 15 of the FCC Rules.
Need help?
Do you have a question about the XFT-120G and is the answer not in the manual?
Questions and answers