Table of Contents
Advertisement
Quick Links
Installation, Operation and Maintenance
Rionfuser™ Electrofusion
Processor
WARNING
!
Read this Manual BEFORE using this equipment.
Failure to read and follow all safety and use infor-
mation can result in death, serious personal injury,
property damage, or damage to the equipment.
Keep this Manual for future reference.
DANGER
!
Electricity, electrocution and shock hazards.
WARNING
!
Local building or plumbing codes
may require modifications to
the information provided. You
are required to consult the local
building and plumbing codes prior
to installation. If the information
provided here is not consistent
with local building or plumbing
codes, the local codes should be
followed. This product must be
installed by a licensed contractor
in accordance with local codes
and ordinances.
NOTICE
Follow the guidelines listed here for
proper installation, operation, and
maintenance.
IOM-OR-RIONFUSE
Advertisement
Table of Contents

Subscribe to Our Youtube Channel
Related Manuals for Watts ORION Rionfuser


Summary of Contents for Watts ORION Rionfuser
- Page 1 IOM-OR-RIONFUSE Installation, Operation and Maintenance Rionfuser™ Electrofusion Processor WARNING Read this Manual BEFORE using this equipment. Failure to read and follow all safety and use infor- mation can result in death, serious personal injury, property damage, or damage to the equipment. Keep this Manual for future reference.
-
Page 2: Table Of Contents
Table of Contents Page Important Safety Information ............3 Warranty and Limitations of Liability . -
Page 3: Important Safety Information
It is your responsibility to ensure that this control is safely installed according to all applicable codes and standards. Watts is not responsible for damages resulting from improper installation and/or maintenance. NOTICE Do not attempt to service the control. There Read manual and all prod- are no user serviceable parts inside the control. -
Page 4: Introduction
WATTS makes no guarantee of results and assumes no obligation or liability in connection with its advice. The integrity of the piping system is the ultimate responsibility of the installer. -
Page 5: Specifications
Specifications Parameter Rionfuser LT Rionfuser RF-3000LE Rionfuser RF-3000LE Bluetooth Supply Voltage 97 VAC to 150 VAC Supply Frequency 47 Hz to 70 Hz Supply Waveform Sine Wave or Square Wave Output Current 20 Amps AC Output Voltage 95 volts AC at 120 Volts Input Operating Tem- 0°F to 120°F perature Range... -
Page 6: Descriptions Of Controls
Descriptions of Controls Notes References to controls in this section are displayed exactly as they appear throughout the remainder of this document. The START button may mean START, CONTINUE, OK or SAVE depending upon the context of the operation being performed at the time. The STOP button may mean STOP, RESET, or CANCEL depending upon the context of the operation being performed at the time. -
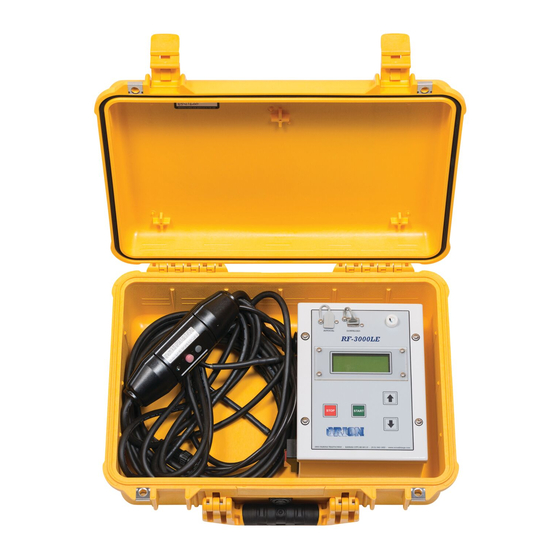
Page 7: Faceplate Controls
Faceplate Controls Faceplate Controls RF-3000LE Bluetooth ® RF-3000LE Bluetooth Temperature Sensor Replaceable Display Shield 4X20 LCD Display UP button STOP button DOWN button START button... - Page 8 Faceplate Controls RF-3000LE USB RF-3000LE-USB USB Type A Port USB Type B Port Temperature Sensor 4X20 LCD Display Replaceable Display Shield UP button STOP button DOWN button START button...
-
Page 9: Side Panel Controls
Faceplate Controls Rionfuser LT Rionfuser LT 4X20 LCD Display GFCI Temperature Sensor Serial Port UP button STOP button DOWN button Emergency STOP Switch START button Side Panel Controls Side Panel Controls RF-3000LE RF-3000LE Buzzer Fuse Output Cable Emergency STOP Switch Input Cable... -
Page 10: Output Cable
Cables Output Cable 4.0mm Lead Ends (Field Replaceable Shown) Input Cable RF-3000LE Input Cable GFCI... -
Page 11: Customer Responsibilities
• Dropping the processor • Dragging the processor by the cables leads Subscribe to the recommended calibration service offered by WATTS (See page 13). The Rionfuser Electrofusion Processor will provide the proper outputs for a complete fusion based on the inputs received from the operator. -
Page 12: Calibration Recommendations
Always insure the package for the full replace- ment value. Keep in mind that most carriers will not honor insurance claims if the product is not shipped in accordance with their guidelines. WATTS is not responsible for damage caused in shipping. -
Page 13: General Operation
General Operation Power Up Start by making sure the processor's Emergency STOP switch is in the OFF position. Next, start the generator. Make sure it is running smoothly in high-speed manual mode before plugging in the Rionfuser Electrofusion Processor. It is strongly recommended that the Rionfuser Electrofusion Processor is the only device being powered by that generator. - Page 14 General Operation Power Up (Cont.) The third line indicates the ambient temperature the processor is measuring. Check to make sure the temperature is accurate. If the processor has been in direct sunlight or has been moved from a hot or cold environment, the temperature may not be correct.
- Page 15 Power Up (Cont.) When the Output Leads are connected to the fitting, the processor will measure the fitting resis- tance and display a screen similar to the following: VERIFYING RESISTANCE If you wish to view the resistance measurement made by the processor, press and hold the UP button.
-
Page 16: Rionfuse Cf
Power Up (Cont.) Rionfuse CF To fuse a CF fitting, first choose the size: SELECT SIZE 1.5 in Use the UP/DOWN buttons to scroll through the list of available sizes. When you get to the size that you want, press the START button to confirm the selection. Next, you will be prompted to select the type of heat cycle: SELECT TYPE OF CYCLE 1. -
Page 17: Rionfuse Pvdf
Power Up (Cont.) Rionfuse PVDF To fuse a PVDF fitting, first choose the size: SELECT SIZE 1.5 in Use the UP/DOWN buttons to scroll through the list of available sizes. When you get to the size that you want, press the START button to confirm the selection. Next, you will be prompted to select the type of heat cycle: SELECT TYPE OF CYCLE 1. -
Page 18: Manual Fusion
Power Up (Cont.) Manual Fusion **Pre-configured CF or PVDF fittings are always preferred and should be used whenever possible. Manual Fusions require additional care and attentiveness on the part of the operator to ensure the appropriate fusion parameters are entered. For this reason, Manual Fusions should ONLY be performed by a fully trained operator using specifications provided by the fitting's manufacturer. - Page 19 Power Up (Cont.) ENTER FUSION TIME 1 min 30 sec Enter the number of SECONDS using the UP button and DOWN button to increment and decre- ment the current value. As either button is held, the numbers will continue to scroll, slowly at first and then faster as time passes.
-
Page 20: Completing A Fusion
Completing A Fusion After selecting a fusion style, a verification screen similar to the one shown below will be displayed: VERIFY PREHEAT DATA VERIFY WELD DATA CF 1 . 5" CF 1 . 5" 1 min 30 sec 1 min 30 sec PRESS START PRESS START This screen shows :... - Page 21 Completing A Fusion (Cont.) As the fusion proceeds, the following screen will be displayed: FUSION NUMBER: 0125 60 sec This screen shows the number of the current fusion as well as the time remaining (In this case, 60 seconds). If you want to see more detailed information, press and hold the UP button to display the following fusion information screen: FUSION NUMBER: 0125...
-
Page 22: User Menus
User Menus Basic User Menu The Basic User Menu is accessed by holding the UP button when the processor is first powered up. Keep holding the UP button through the INTERNAL SELF TEST screen until the process displays a screen similar to the following: GENERAL SETTINGS 1. -
Page 23: Setting The Language
Advanced User Menus Setting the Language When Option 3 is highlighted, press the START button to select it. Use the UP/DOWN buttons to toggle between all supported languages. When the desired language is displayed, press the START button to save. The standard language supported by the Rionfuser Electrofusion Processor is English. -
Page 24: Appendix
Advanced User Menus Connecting Multiple Fittings The Rionfuser Electrofusion Processor is capable of fusing multiple fittings at the same time. The number of fittings that one can fuse is dependent upon the size of the fitting and the quality of the power supply. -
Page 25: Downloading Data
Downloading Data Data Stored The following data is stored for each fusion that the processor performs. Depending on the processor model, data stored in the processor can be downloaded to a USB Flash drive or wirelessly via Blue- tooth with the EF Utilities app. Field Description The serial number of the processor. -
Page 26: Downloading To A Usb Flashdrive
Downloading to a USB Flash Drive Fusion data from an RF-3000LE USB or Rionfuser LT Electrofusion Processor is downloaded onto an external USB flash drive. The data is output in a binary format that is compatible with a free mac- ro-enabled Excel Spreadsheet. -
Page 27: Downloading Wirelessly
Downloading Wirelessly Fusion data from an RF-3000LE Bluetooth Electrofusion Processor is downloaded wirelessly through the EF Utilities app. Once data has been downloaded, it can be viewed at any time with a smart phone, tablet, or computer. To download fusion data from the processor to the EF Utilities app, perform the following steps: 1. -
Page 28: General Maintenance
General Maintenance Changing the Fuse ** This section applies to the RF-3000LE Electrofusion Processor only. The Rionfuser LT Electrofu- sion Processor has no external fuse that can be changed. Important Notes • The fuse protects the internal electronic circuitry. If the display lights up when power is turned on, you DO NOT need to replace the fuse. -
Page 29: Power Sources
POWER SOURCES When installing electrofusion fittings in field applications, it is necessary to have a reliable source of AC power for the processor. This AC power source should: • be well maintained and subjected to a periodic maintenance schedule. • provide output voltage within the specified operating range. •... -
Page 30: Calibration Warnings
The processor will countdown the number of days until calibration is due. The text mm/dd/yyyy shows the month, day, and year that the calibration is due. To avoid being locked out of the processor, WATTS recommends scheduling a calibration as soon as it starts to display this reminder message. -
Page 31: Temperature Measurements
Temperature Measurements The processor's temperature sensor is located on the face plate (See page 8). The temperature sensor does not respond immediately to thermal changes. In order to ensure accurate ambient temperature measurements, the processor should be left in the fitting environment for at least 15 minutes. -
Page 32: Warning And Error Codes
Warnings & Error Codes Warning Codes A warning code will be displayed when a situation exists that (in the manufacturer's opinion) may adversely affect the performance of the processor over time. Warning codes are designed for informational purposes only and have no effect on the outcome of a fusion. A warning code may be displayed either before or after a fusion and will require operator acknowledgment before normal operation can resume. - Page 33 Error Codes (Cont.) Code Problem Resolution Reference voltage out of tolerance. Processor must be returned for calibration. You cannot fuse if the error is detected. STOP pressed during previous Do not press the STOP button during the fusion fusion. unless in an emergency situation. Fusion complete with no other There were no problems with this fusion.
- Page 34 Error Codes (Cont.) Code Problem Resolution Resistor ID fusion cannot be com- Verify that the fitting and the processor both sup- pleted because the value was not port the Resistor ID method. If so, the problem is decoded into a valid fusion time. with the fitting, the output cable or the processor calibration.
- Page 35 Limited Warranty: Watts Regulator Co. (the “Company”) warrants each product to be free from defects in material and workmanship under normal usage for a period of one year from the date of original shipment. In the event of such defects within the warranty period, the Company will, at its option, replace or recondition the product without charge.
Need help?
Do you have a question about the ORION Rionfuser and is the answer not in the manual?
Questions and answers