Table of Contents
Advertisement
Quick Links
Advertisement
Table of Contents

Related Manuals for DigiTech AP4006


Summary of Contents for DigiTech AP4006
- Page 1 Portable LED Projector with Built-in Speakers Model: AP4006 Instruction Manu al...
-
Page 2: Table Of Contents
Table of Contents General Safety Instructions Portable LED Projector Product Overview Controls Power Adaptor Installation Remote Control Installing/Removing Remote Control Batteries Product Operation Placing Your Projector Placing Your Projector on the Ceiling Adjust Vertical Position Removing and Closing Lens Cover Reducing Image Distortion Connecting HDMI to the Projector HDMI HD Signal Input... -
Page 3: General Safety Instructions
GENERAL SAFETY INSTRUCTIONS: Do not look directly into the projector light. Don’t touch the projector lens. Mains adapter is used as disconnect device and it should remain readily operable during intended use. In order to disconnect the apparatus from the mains completely, the mains plug should be disconnected from the mains socket outlet completely. -
Page 4: Portable Led Projector
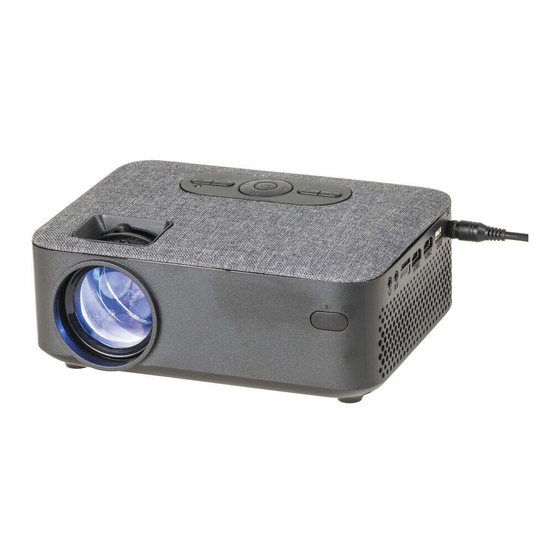
PRODUCT OVERVIEW: Power Button Micro SD Card Slot Return Button HDMI Port 1 Navigation HDMI Port 2 Menu Button USB Port Source Button Keystone Connection VGA Port Focusing Ring Power ON Indicator Lens IR Window (Rear Side) Headphone Jack IR Window (Front Side) Adjusting Knob... -
Page 5: Controls
CONTROLS: POWER ADAPTOR INSTALLATION: Follow below picture to connect power adapter. Connect small end of adapter first. Plug the adapter body to power outlet. -
Page 6: Remote Control
REMOTE CONTROL: Power FLIP VOL – VOL + Press to ON/OFF power. SOURCE Mute Press to mute volume. Previous / Next Press to skip between chapters MENU EXIT or tracks. Back / Fwd Press to search through an individual chapter or track. GOTO ZOOM Stop... -
Page 7: Installing/Removing Remote Control
INSTALLING/REMOVING REMOTE CONTROL BATTERIES: Batteries AAA / UM4 Requires 2 x AAA AAA / UM4 batteries (not included). BATTERY DOOR Remove the battery compartment cover on the back of your remote by carefully sliding to open. The battery cover can then be lifted away. Fit the correct batteries (2 X AAA batteries not included), referring to the polarity markings. -
Page 8: Placing Your Projector
PLACING YOUR PROJECTOR: Your projector can be installed in four different configurations (see picture below): Front Table: Select this location with the projector placed near the floor in front of the screen. This is the most common way to position the projector for quick setup and portability. -
Page 9: Placing Your Projector On The Ceiling
PLACING YOUR PROJECTOR ON THE CEILING: When installing the projector in the ceiling, please purchase a projector mount recommended by an installation professional and follow the instructions that come with the mount. Before installing the projector in the ceiling, please check to make sure the ceiling structure can support the weight of the projector and the mount. -
Page 10: Removing And Closing Lens Cover
REMOVING AND CLOSING THE LENS COVER: REDUCING IMAGE DISTORTION: It is recommended to move the projector as close to center of screen. Adjust the focus by turning the knob while observing the image pixels near the center of the screen. Optimal focus is obtained when the pixels are clearly visible. -
Page 11: Connecting Hdmi To The Projector
CONNECTING HDMI TO THE PROJECTOR: Follow below picture to connect HDMI cable and device. Turn off the unit before connect HDMI cable. After connect, press the POWER button to turn on unit and power indicator will light GREEN Press the SOURCE button to HDMI mode and the video of HDMI device will show on projector screen. -
Page 12: Connecting Av To The Projector
CONNECTING AV TO THE PROJECTOR: Follow below picture to connect AV cable and device. Turn off the unit before connect AV cable. After connect, press the POWER button to turn on unit and power indicator will light GREEN Press the button to AV mode and the video of AV device will show on projector screen. -
Page 13: Connecting Audio Output To The Projector
CONNECTING AUDIO OUTPUT TO THE PROJECTOR: Follow below picture to connect audio cable and device. Turn off the unit before connecting audio cable. Connect the audio cable by following the diagram below. After connect and turn on both units. Your projector sound from external device now. -
Page 14: Using Microsd Card And Usb Playback
USING MICROSD CARD AND USB PLAYBACK (MEDIA PLAYER): Tum off the unit before install USB / microSD Card. Install the USB device into USB port. After connect, press the POWER button to turn on unit and the power indicator light GREEN. Press the SOURCE button to enter and use NAVIGATION buttons to search the MEDIAPLAYER mode. -
Page 15: (Media Player) Troubleshooting
TROUBLESHOOTING: Issues Solutions No Image is Is the power light on? If it is not on, check the Projected or a “No projector is plugged into the mains, that the socket Signal” message is is switched on, and then press the power button on displayed. -
Page 16: Specifications
SPECIFICATIONS: Native Resolution: 800 x 480 Supported 1080p, 1080i, 720p, 576i, 480p and 480i via HDMI input Resolutions: Supported Files: MPEG1, MPEG2, MPEG4, JPEG, MP3 Projection Type: 1 LED light source + 4” LCD display LED Bulb 50,000 hours Lifespan: Light Intensity: 2800 Lumens (45 ANSI lm) Projection...
Need help?
Do you have a question about the AP4006 and is the answer not in the manual?
Questions and answers