Table of Contents
Advertisement
Quick Links
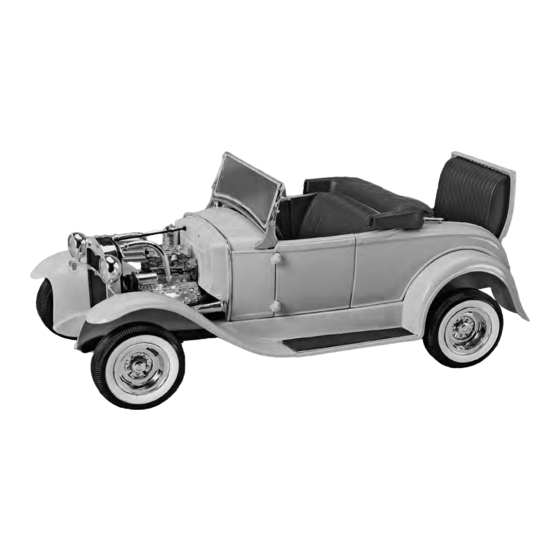
The Ford Model A of 1928–1931 also called the "A-bone" among rodders and customizers, was the second
huge success for the Ford Motor Company, after its predecessor, the Model T. During the 1940's and early 50's,
the Model "A"was a reliable, inexpensive car that proved to be ideal for customizing. With creativity and
ingenuity, the Model A's were often customized with the addition of new engines and custom parts that
added style and performance to suit their owner's tastes. The new Minicraft Hot Rod Roadster captures the
spirit of that era with custom wheels and tires, a flat-head V-8 engine and many custom chrome parts.
Decal Application:
Your Minicraft model includes high-quality waterslide decals. These decals adhere best to a glossy surface.
Use a sharp scissors or knife to cut individual decals from the carrier sheet. Do not cut into the clear film
surrounding the individual decals. It is recommended that you apply one decal at a time. Place the decal
section in warm water, when first inserted in the water your decal will curl, after approximately ten seconds
the decal will uncurl. Remove from water and lay on a paper towel. After approximately 10 - 20 seconds the
decal will slide freely from the backing paper. Use a small brush to help slide the decal from the backing
paper and into position on the model. Carefully blot excess water from the decal, using care not to move the
decal or tear it. If you choose to use a setting solution, apply a thin coat over the decal following the
manufacturer's instruction. Allow the decal to dry overnight. Wash any adhesive residue off the model with
a small wet towel.
www.minicraftmodels.com
Minicraft Models (USA) LLC
2136 12th Street Rockford, IL. 61104 847-429-9676
Printed in China
Advertisement
Table of Contents

Related Manuals for MINICRAFT 11240

Summary of Contents for MINICRAFT 11240
- Page 1 Model A’s were often customized with the addition of new engines and custom parts that added style and performance to suit their owner’s tastes. The new Minicraft Hot Rod Roadster captures the spirit of that era with custom wheels and tires, a flat-head V-8 engine and many custom chrome parts.
- Page 2 E 1 ~ 26 (Black) BEFORE BEGINNING ASSEMBLY Your MINICRAFT "Hot Rodney" model contains a wealth of highly detailed parts. Please take a moment to read the instruction sheet to become familiar with the parts before beginning assembly. Be sure to test the fit of all parts before gluing.
- Page 3 Right Left Note tab alignment to part 52 when assembled. Assemble generator and mount (22/14/25), then attach assembly to engine. Cement belt and pulleys (56) to positions shown. Press fit exhausts (9/10) (do not glue) to engine block. Exhausts should be glued in place after fitting the engine to chassis (Step 20).
- Page 4 Note alignment (viewed from front). Trap thinner tire between outer rim (42) and inner rim (40), then glue brake drum (38) to inner rim. Pass stub axle of part 31 through this assembly, then glue to hub (39). Cement support arms (34/30) to part 37. Trap thicker tire between outer rim (42) and inner rim (72), then glue brake drum (55) to inner rim.
- Page 5 PLEASE NOTE Be sure to test the fit of parts Q(33/35) in the respective holes in mating parts. Non-glued parts should move easily for proper movement of operable features. NOTE: All parts shown upside down. NOTE: All parts shown upside down. Front suspension parts not shown Snap wheel assembly onto stubs.
- Page 6 1/16" (2mm) End view Steps Shorten one end of hinge pins to dimensions shown. 32/33 Glue into position as shown. (Part is shown upside down). Cement dash to chassis, carefully threading the steering linkage through hole in firewall and aligning it with the small indentation on the lower dash.
- Page 7 Cement windshield M (3) to frame L (15), then to frame L (14). Slide L (10, 11) onto ends of L (14), then glue to body. Attach side screens M (2) and accessories. Assemble lights and glue to fenders. Cement handles J (29) to body, left and right sides.
Need help?
Do you have a question about the 11240 and is the answer not in the manual?
Questions and answers