Table of Contents
Advertisement
Quick Links
Advertisement
Table of Contents

Subscribe to Our Youtube Channel
Summary of Contents for Vega Absolute SMART-SS0102
- Page 1 SMOKE SENSOR SMART-SS0102 User Manual www.vega-absolute.ru...
- Page 2 Smart-SS0102 / User Manual Document Information Title Smoke sensor Smart-SS0102 Document type Manual – Translation from Russian Document number V05-SS0102-01 Revision and date 04 – 03 June 2021 This document applies to the following products: Product name Type number Vega Smart...
-
Page 3: Table Of Contents
“LoRaWAN settings” tab ................................. 23 “Smart-SS0102” tab ................................. 27 5 COMMUNICATION PROTOCOL ............................29 SMART-SS0102 transmits the following types of packets ....................29 SMART-SS0102 receives the following types of packets ....................31 6 STORAGE AND TRANSPORTATION REQUIREMENTS ...................... 33 7 CONTENT OF THE PACKAGE ..............................34 8 WARRANTY .................................... -
Page 4: Introduction
Smart-SS0102 / User Manual INTRODUCTION This manual is designated for Vega Smart-SS0102 Smoke sensor (hereinafter – device, sensor) manufactured by Vega-Absolute OOO and provides information on powering and activation procedure, control commands and functions of the device. This manual is targeted at specialists familiar with installation work fundamentals for electronic and electrical equipment. -
Page 5: Description And Operation
1 DESCRIPTION AND OPERATION DEVICE DESCRIPTION Vega Smart-SS0102 smoke sensor is designed to detect fire in a protected area, accompanied by the emission of smoke. The sensor periodically (every ten seconds) is analyzing the environment and switch on an emergency warning via a light and sound indication when a smoke is detected. -
Page 6: Functional
Data transmission is always by UTC regardless of specified time zone. FUNCTIONAL Vega Smart-SS0102 smoke sensor is class A device (LoRaWAN classification) and has the following features: o determination of smoke particles concentration in the room (smoke detector) -
Page 7: Specification
Smart-SS0102 / User Manual 2 SPECIFICATION Main Sensitivity 0,05…0,2 dB/m The volume of the sound signal while a no less 85 dB distance from the detector is 1 m Operating temperatures -10…+55 °С Relative air humidity at a temperature of +40 °С no more 93 %... -
Page 8: Operation
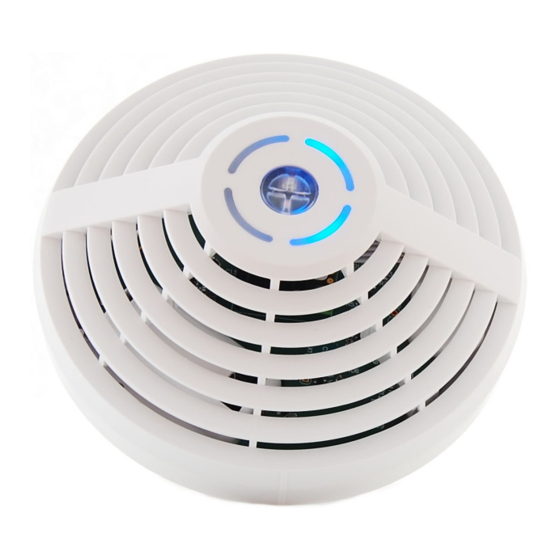
Smart-SS0102 / User Manual 3 OPERATION INDICATION A double color indicator is located on the front of the sensor housing which informs user about device state. The sensor also has a sound indication. Indicator on the Indicator on the front of the device... - Page 9 Smart-SS0102 / User Manual Battery malfunction A short red flash once A short beep once per a minute (missing or per second minute discharged) Two short red flashes A double short beep once per a minute Sensor malfunction once per second...
-
Page 10: Button
Smart-SS0102 / User Manual BUTTON The button is located on the front side of the housing and allows you to manage the device. The button on the front side of housing The table of transitions between modes and the logic of the button operation depending on the operating mode of the device. -
Page 11: Initial Startup
Smart-SS0102 / User Manual INITIAL STARTUP Smoke sensor is powered by two CR123A 3V 1400 mAh replaceable batteries. The one of them is main and the rest is reserve. While operating the device tests the batteries every half an hour. As a result of test the device determinates operability and availability of batteries. - Page 12 Smart-SS0102 / User Manual Before connecting the device, make sure that its registration data is entered in the network - Device EUI, Application EUI and Application Key for OTAA, or Device address, Application session key and Network session key for ABP...
-
Page 13: Mounting Recommendations
70 from 6,0 to 10,0 up to 65 from 10,0 to 12,0 up to 55 Smart-SS0102 structurally consists of two parts: device itself in the personal housing (1) and the mounting platform (2). Platform fasteners and corresponding holes on the... -
Page 14: Connecting Devices In The Line Of Solidarity Work
Smart-SS0102 / User Manual CONNECTING DEVICES IN THE LINE OF SOLIDARITY WORK Vega Smart-SS0101 sensors can be connected to a solidarity line. To do this, they must be connected in series with a signal wire in one circuit. It is recommended to connect no more than 10 sensors in one line with a wire length of no more than 50 meters. - Page 15 Smart-SS0102 / User Manual When smoke is detected, the first detector that detected it sets the alarm flag in the solidarity line and switches to the "Fire" mode. All other detectors in the line remain in the "Standby" mode and are armed, continuing to analyze the smoke in the room, but at the same time they sound like in the "Fire"...
-
Page 16: Connecting Via Usb
Smart-SS0102 / User Manual CONNECTING VIA USB The device Smart-SS0102 can be configured with the "Vega LoRaWAN Configurator" application (See part 4). micro-USB Before connecting the device to the computer for the first time, you must install the driver for the COM port stsw-stm32102, which can be downloaded from iotvega.com. After running the executable file VCP_V1.4.0_Setup.exe, the installer window will appear:... - Page 17 Smart-SS0102 / User Manual In this window, you need to click Next, then Install, and then the installation will begin. When the installation is completed successfully, the following screen appears: After pressing Finish the driver is ready for operation, - it is possible to connect the device via USB.
-
Page 18: Vega Lorawan Configurator
Smart-SS0102 / User Manual 4 VEGA LORAWAN CONFIGURATOR The "Vega LoRaWAN Configurator" application (hereinafter referred to as the configurator) is intended for setting up the device via USB. The configurator has two modes of operation - "Simple" and "Expert". In the "Simple"... - Page 19 Smart-SS0102 / User Manual The buttons "Export settings" and "Import settings" allow you to save a set of settings to a file and then load them from a file. The buttons "Get settings" and "Apply settings" are needed to display the current device settings in the program and to save the changed settings in the device memory, respectively.
-
Page 20: Connection To The Device
Smart-SS0102 / User Manual CONNECTION TO THE DEVICE For the connection to the device, perform the following steps: 1. Connect the USB cable to the device. 2. Start the "Vega LoRaWAN Configurator" application. 3. Click the "Connect" button in the menu on the left. -
Page 21: Device Info" Tab
Smart-SS0102 / User Manual “DEVICE INFO” TAB The "Device info" tab displays information about the device, its status, and the data needed to register the device in the LoRaWAN network. ABP info - displays the data necessary to register the device in the LoRaWAN network with ABP method (Activation By Personalization). - Page 22 Smart-SS0102 / User Manual Link check (not displayed in the "Simple" mode) - when pressed, the device sends a special signal to the LoRaWAN network, in response to which the network informs it of the number of gateways that received this signal and the signal quality. This button only works when the device is connected to the network.
-
Page 23: Lorawan Settings" Tab
Smart-SS0102 / User Manual “LORAWAN SETTINGS” TAB The "LoRaWAN Settings" tab allows you to configure various parameters of the LoRa network. Region - allows you to select one of two installed frequency plans or specify a custom frequency plan. Custom frequency plan is EU-868 based. - Page 24 Smart-SS0102 / User Manual Confirmed uplinks – when you choose "confirmed", the device will retry sending the packet until it receives the server confirmation, or until the "Uplink number of transmission" is over (see below). If you choose to send packets without confirmation, the modem will not know whether the packet delivered or not ADR –...
- Page 25 Smart-SS0102 / User Manual Uplink number of transmission (not displayed in the "Simple" mode) – if the "Confirmed uplinks" function is disabled, the device will simply send each packet as many times as specified in this option. If "Confirmed uplinks" is enabled, the device will send packets until it receives a confirmation or until it sends as many packets as specified in this option.
- Page 26 Smart-SS0102 / User Manual TX datarate (not displayed in the "Simple" mode) – the device transmission datarate at which it will transfer packets to the LoRaWAN™ network. This speed can be changed by the network server if the ADR algorithm is enabled.
-
Page 27: Smart-Ss0102" Tab
Smart-SS0102 / User Manual “SMART-SS0102” TAB The “Smart-SS0102” tab contains the settings of the connected device. States – displays the current state of the device: - Test - Standby mode - Alarm Fire! - Sensor removed - Sensor malfunction - Dustiness of the sensor chamber Battery 1 and Battery 2 –... - Page 28 Smart-SS0102 / User Manual Smoke sensor parameters – this part contains information about smoke sensor state. If the camera is clean and serviceable, then the voltage should be in the range of 30- 110 mV, the current is 174-328 mA, and the temperature on the thermistor should approximately correspond to the temperature in the room.
-
Page 29: Communication Protocol
Smart-SS0102 / User Manual 5 COMMUNICATION PROTOCOL This part describes the Smart-SS0102 data exchange protocol with LoRaWAN network. In fields consisting of several bytes, the little endian byte order is used SMART-SS0102 TRANSMITS THE FOLLOWING TYPES OF PACKETS 1. Packet with current state, sent by event on LoRaWAN port 2. - Page 30 Smart-SS0102 / User Manual 2. Packet with time correction request, sent every seven days on LoRaWAN port 4. Size in bytes Field description Data type 1 byte Packet type, this packet == 255 uint8 4 bytes Time of the modem at a moment of the packet...
-
Page 31: Smart-Ss0102 Receives The Following Types Of Packets
The package with settings sent to the device may not contain all the settings supported by the device, but only the part that needs to be changed. Table of ID of Smart-SS0102 parameters and these possible values ID of Description... - Page 32 Smart-SS0102 / User Manual Communication period 1 byte 1 – 1 hour 2 – 6 hours 3 – 12 hours 4 – 24 hours 5 – 5 minutes 6 – 15 minutes 7 – 30 minutes Data collection period 1 byte 1 –...
-
Page 33: Storage And Transportation Requirements
Smart-SS0102 / User Manual 6 STORAGE AND TRANSPORTATION REQUIREMENTS The Smart-SS0102 sensor shall be stored in the original packaging in heated room at temperatures +5°С to +40°С and relative humidity less than 85%. The sensor shall be transported in covered freight compartments of all types at any distance at temperatures -20°C to +65°C. -
Page 34: Content Of The Package
Smart-SS0102 / User Manual 7 CONTENT OF THE PACKAGE The sensor is delivered complete with: Smoke sensor Vega Smart-SS0102 – 1 pc. CR123A battery – 2 pcs. Factory certificate – 1 pc. Revision № 04 - 03 June 2021... -
Page 35: Warranty
Smart-SS0102 / User Manual 8 WARRANTY The manufacturer guarantees that the product complies with the current technical documentation, subject to the storage, transportation and operation conditions specified in the "User Manual". The warranty period is 36 months. The warranty does not apply to batteries. - Page 36 Smart-SS0102 / User Manual vega-absolute.ru User Manual © Vega-Absolute OOO 2020-2021 Revision № 04 - 03 June 2021...
Need help?
Do you have a question about the SMART-SS0102 and is the answer not in the manual?
Questions and answers