Advertisement
Quick Links
Advertisement

Related Manuals for Ranger design 1530-FS


Summary of Contents for Ranger design 1530-FS
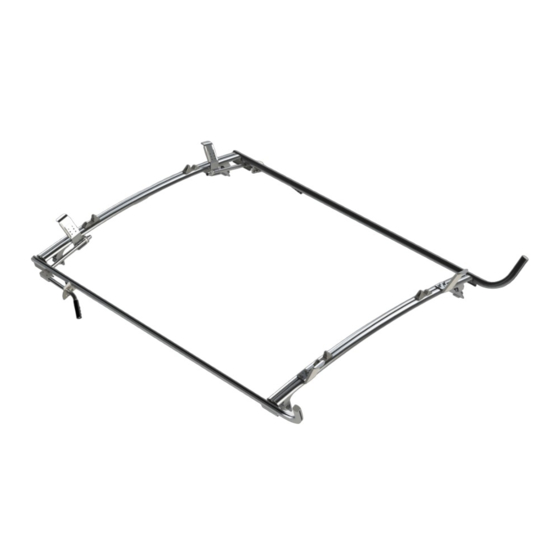
- Page 1 INSTALLATION GUIDE 1530-FS Double Clamp Ladder Rack Express / Savana ( Aluminum )
- Page 2 QUICK START GUIDE Phase 1 - Assembly q 1.1 Setup............................... 3 - 4 q 1.2 Ladder Rack Assembly........................5 - 14 Phase 2 - Installation q 2.1 Ladder Rack Installation........................15 - 18 q 2.2 Note..............................REQUIRED ITEMS NOTE: Use Sawhorses if possible, or use the box as a flat protective surface on the ground or table. q Cordless Impact q Ratchet q Tape Measure...
- Page 3 Ski ( Left ) 15-3011 Ski ( Right ) 15-3124 Rear Crossbow 15-3129 Front Crossbow 15-4290 Front Hook 94-1014 Assembly Fastener Kit 96-1014 Install Fastener Kit 1530-FS Installation Guide | REV. C2 | Page 3 For technical support, contact us at 1-800-565-5321...
- Page 4 #90-327 Hex Bolt 3/8" × 2-1/2" Lock Nut 4× # 94-109 3/8" SS304wax #98-109 Flat Washer #94-109 Lock Nut Flat Washer 4× 3/8" # 98-109 SS304 1530-FS Installation Guide | REV. C2 | Page 4 For technical support, contact us at 1-800-565-5321...
- Page 5 HARDWARE USED 4× hardware is pre assembled #90-225 Hex Bolt 5/16" - 18 × 2" SS304 #98-117 Flat Washer #98-117 Flat Washer #94-111 Lock Nut 1530-FS Installation Guide | REV. C2 | Page 5 For technical support, contact us at 1-800-565-5321...
- Page 6 5/16" × 3/4" SS304 5/16" × 3/4" SS304 4× 4× #90-491 Hex Bolt #90-491 Hex Bolt 5/16" × 1" SS304 5/16" × 1" SS304 1530-FS Installation Guide | REV. C2 | Page 6 For technical support, contact us at 1-800-565-5321...
- Page 7 1.2.4 Install the feet on the front, and rear crossbows. HARDWARE USED 8× hand tighten the nuts Carriage bolts are already on the crossbows. #98-117 Flat Washer #98-123 Lock Washer #94-105 Hex Nut 1530-FS Installation Guide | REV. C2 | Page 7 For technical support, contact us at 1-800-565-5321...
- Page 8 Marker HARDWARE USED 4× Carriage bolts are already on the crossbows. #98-117 Flat Washer #98-123 Lock Washer #94-105 Hex Nut 12 - 3/4" 1530-FS Installation Guide | REV. C2 | Page 8 For technical support, contact us at 1-800-565-5321...
- Page 9 Cutter HARDWARE USED 4× hardware is pre assembled #90-491 Carriage Bolt 5/16" × 1" #98-117 Flat Washer #98-123 Lock Washer #94-105 Hex Nut 1530-FS Installation Guide | REV. C2 | Page 9 For technical support, contact us at 1-800-565-5321...
- Page 10 Cordless Impact q 1/2" Socket HARDWARE USED 4× Carriage bolts are already on the ski. #98-117 Flat Washer #98-123 Lock Washer #94-105 Hex Nut 1530-FS Installation Guide | REV. C2 | Page 10 For technical support, contact us at 1-800-565-5321...
- Page 11 HARDWARE USED 4× hand tighten the nuts #90-491 Carriage Bolt 5/16" × 1" #98-117 Flat Washer #98-123 Lock Washer #94-105 Hex Nut 1530-FS Installation Guide | REV. C2 | Page 11 For technical support, contact us at 1-800-565-5321...
- Page 12 Marker HARDWARE USED 4× hardware is pre assembled #90-487 Carriage Bolt 5/16" × 3/4" #98-117 Flat Washer #98-123 Lock Washer #94-105 Hex Nut 1530-FS Installation Guide | REV. C2 | Page 12 For technical support, contact us at 1-800-565-5321...
- Page 13 1.2.10 Slide 3pcs. of carriage bolts on the rear end of the each ski, then attach end plugs on both ends of the skis. THIRD CROSSBOW TOOLS q Mallet end plug HARDWARE USED 6× #90-491 Carriage Bolt 5/16" × 1" SS304 1530-FS Installation Guide | REV. C2 | Page 13 For technical support, contact us at 1-800-565-5321...
- Page 14 #98-123 Lock Washer #94-105 Hex Nut 2× Carriage bolts are already on the ski. #98-160 Spacer #98-117 Flat Washer #98-123 Lock Washer #94-105 Hex Nut 1530-FS Installation Guide | REV. C2 | Page 14 For technical support, contact us at 1-800-565-5321...
- Page 15 2.1.1 Position the Ladder Rack ( minimum two persons ) on the roof, so that the feet sit in the gutters. NOTE: If you do not have a hoist, lift the ladder rack onto the roof manually. Ladder Rack 1530-FS Installation Guide | REV. C2 | Page 15 For technical support, contact us at 1-800-565-5321...
- Page 16 GUTTER CLIP TOOLS q Cordless Impact q 9/16" Socket HARDWARE USED 4× 6× #90-327 Hex Bolt 3/8" × 2-1/2" #98-109 Flat Washer #94-109 Lock Nut 1530-FS Installation Guide | REV. C2 | Page 16 For technical support, contact us at 1-800-565-5321...
- Page 17 NOTE: If you have a third crossbow, center the third crossbow between the front and rear crossbows. THIRD CROSSBOW TOOLS q Ratchet q 1/2" Socket 1530-FS Installation Guide | REV. C2 | Page 17 For technical support, contact us at 1-800-565-5321...
- Page 18 Now adjust the front hook to be snug against the ladder rung and tighten the bolts on the front crossbow. TOOLS q Cordless Impact q 1/2" Socket front hook 1530-FS Installation Guide | REV. C2 | Page 18 For technical support, contact us at 1-800-565-5321...
- Page 19 If the handle is interfering with the door or roof of the vehicle, disassemble the handle, then assemble it in an alternate position as shown. Handle 1530-FS Installation Guide | REV. C2 | Page 19 For technical support, contact us at 1-800-565-5321...
- Page 20 “You have successfully installed your Ladder Rack Thank you for doing business with us.” cs@rangerdesign.com For any feedback or suggestions you may have, please contact: 1530-FS Installation Guide | REV. C2 | Page 20 For technical support, contact us at 1-800-565-5321...
Need help?
Do you have a question about the 1530-FS and is the answer not in the manual?
Questions and answers