
Subscribe to Our Youtube Channel
Related Manuals for LION ATTACK


Summary of Contents for LION ATTACK
- Page 1 ATTACK ™ DIGITAL FIRE TRAINING SYSTEM USER’S MANUAL Original User Manual Version 2 06/19...
- Page 2 ATTACK system. ™ WARNING There are no user serviceable parts inside the ATTACK panel. Attempting to open ™ the unit or loosening screws on the back of the panel will void the warranty. WARNING...
-
Page 3: Table Of Contents
USING ATTACK ......................18 ADJUSTING THE SETTINGS...................19 CHANGING THE LANGUAGE ..................21 INDUSTRIAL REMOTE (OPTIONAL) ................21 CONDUCTING A SIMULATION USING THE ATTACK INDUSTRIAL REMOTE ......23 EXTINGUISHER TRAINING WITH ATTACK................24 SHUT DOWN OPERATION ....................26 ATTACK TRANSPORTATION ..................... 27 MAINTENANCE INSTRUCTIONS ..................28 WARRANTY INFORMATION ..................... -
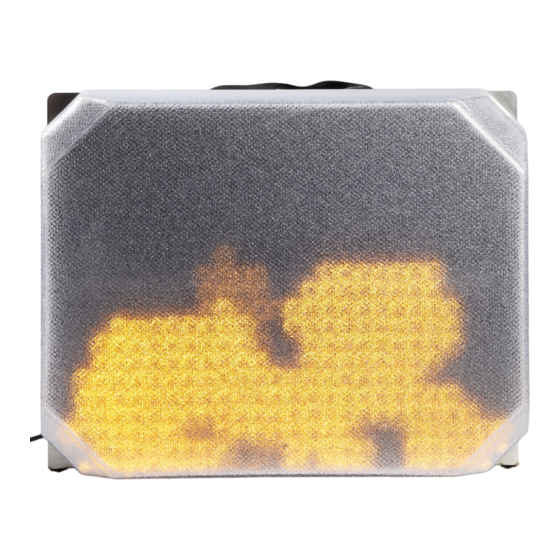
Page 4: How The Attack System Works
ATTACK can sense the location and amount of the water hitting the panel. If the trainee has properly aimed the extinguishant and used an effective technique; the digital fire will be extinguished. -
Page 5: For Your Safety
PPE (personal protective Use only in a well-ventilated area. equipment) in accordance with National Fire Do NOT position the ATTACK in an area with live Protection Association (NFPA) and local fire fires. Do NOT expose ATTACK to the heat of fire. -
Page 6: Attack Training System Parts & Accessories
™ 3. ATTACK TRAINING SYSTEM ™ PARTS & ACCESSORIES ATTACK is intended to provide safe and cost effective hose line training, general firefighter training, and fire extinguisher training. NUMBER PART DESCRIPTION ATTACK Digital Fire Training System Weighted Base with Refillable Water Tank... -
Page 7: Attack Training System Specifications
Overall base unit dimensions 28.5"W x 22.5"H x 5"D (73 x 57 x 13 cm) ATTACK Panel ABS, polycarbonate, stainless steel ATTACK Panel Weight 35 lbs. (16 kg) Weighted Base 33 lbs. (15 kg) empty (400 lbs. [180 kg] filled with water) -
Page 8: The Attack System Includes
This portable mounting system allows you to anchor the panel to the ground in almost any location. The weighted base utilizes a folding water bag with a rigid bottom and a metal plate to attach to ATTACK. When the reservoir is full it weighs 400 lbs. (180 kg) and ensures that the panel will stay in place when hit with a hose line. -
Page 9: Optional Accessories
ATTACK when not in use. ATTACK WALL MOUNTING BRACKET The mounting bracket allows you to mount your ATTACK on a floor, wall, or ceiling. ATTACK quickly attaches and detaches from the mounting so ATTACK can easily be moved from one location to another or so large arrays of panels can be set up quickly. - Page 10 This rugged waterproof handheld remote allows the trainer to have full control over the ATTACK evolution. The remote uses Wi-Fi to communicate with ATTACK so ™ the simulation can be started without line of sight to the panel. The remote can be clipped to turnout gear or clothing for easy access and convenience.
- Page 11 Standard referenced by OSHA in developing its regulations. Covers everything from portable extinguisher basics to advanced strategies for workers in industrial environments. (17 min.) LION EXTINGUISHER TAMPER SEALS Lock your extinguisher handles in place for a realistic training experience with these tamper seals. Seals come 500 per package.
-
Page 12: Lion Service Plans
Please see page 31 for contact details. WARNING Any damaged parts must be replaced prior to operating the ATTACK system. Use of replacement parts that are not authorized by LION or are not original equipment parts supplied by LION will void the warranty. WWW.LIONPROTECTS.COM... -
Page 13: Operating Instructions
SETTING UP THE ATTACK™ BASE UNIT FOR USE WITH A HOSE LINE Do NOT use ATTACK without reading the entire User’s Manual first. The ATTACK base unit must be supported by either the “weighted base” or the “wall mounting bracket” before using with a hose line or water extinguisher. - Page 14 Do not use power cords that ™ were not provided by LION. Align the triangle features on the connector and the plug. The power cord will always run towards the bottom of the panel when connected. Push the connector into the plug. There is no need to twist the collar on the plug.
- Page 15 Push the top of the panel against the back plate of the weighted base until you hear the pin click into place. Make sure the panel is securely mounted by pushing and pulling the panel in different directions. Plug the power cord into the power supply, then plug the power supply into a Ground Fault Circuit Interrupter (GFCI)/Residual-Current Circuit Breaker (RCCB) outlet that is within a dry environment and will not come in contact with any water spray.
- Page 16 Multiple brackets may be used for multi-panel set-ups. See figure below for guidance. Mount the bracket to the wall in the desired location. LION does not supply mounting hardware for this bracket. Choose hardware using appropriate hardware for the wall structure that: a.
- Page 17 ™ Connect the power cord to the back of ATTACK panel. Do not use power cords that were not provided by LION. Align the triangle features on the connector and the plug. The power cord will always run towards the bottom of the panel when connected.
- Page 18 GFCI is supplying power. WARNING Use the power cord provided by LION with the integrated GFCI. Do not alter the power cord or defeat the GFCI. Failure to follow these instructions could result in property damage, personal injury, or death.
- Page 19 Smoke Generator 4000 (ETNA) manual. Please note, the Smoke Generator 4000 (ETNA) is in DMX mode when used with the ATTACK. To use the Smoke Generator 4000 (ETNA) without the ATTACK, you may need to change the...
-
Page 20: Using Attack
In a scenario where secondary panels are being used, the secondary panel has all the features of the primary ATTACK panel, but must be in range of the primary panel in order to operate. The necessary range between the two panels will vary based on your training environment. -
Page 21: Adjusting The Settings
, a standard water can ® extinguisher, a LION laser driven extinguisher, a LION digital hose line or an actual hose line. The panel is designed to react to each extinguishing method differently. Thus, the appropriate mode of operation must be selected for the panel to respond correctly. - Page 22 ™ CHANGING THE CLASS OF FIRE SIMULATION The ATTACK can simulate combustible materials, flammable liquids, flammable gas and electrical fires. The fires all respond differently to simulate the different kinds of fire. For example, combustible material fires respond by gradually diminishing with the proper application of extinguishant, while flammable liquid fires are easily “knocked down”...
-
Page 23: Changing The Language
Industrial Remote can be used outside the training room to control an evolution as long as the remote is within range of ATTACK. The LED below the link button on the front of the remote indicates that the remote is linked with ATTACK. The LED is green when the remote is linked and communicating with a panel. - Page 24 Do not use 3.7V lithium batteries in the remote. USING THE INDUSTRIAL REMOTE When the Industrial Remote is first taken “out of the box,” it is not paired with any ATTACK panels and will not ™ control anything. Once the Industrial Remote and panel are linked, you do not need to repeat this procedure.
-
Page 25: Conducting A Simulation Using The Attack Industrial Remote
The screws should be tightened to 6.2 in-lbf (70 N-cm) of torque. Over tightening the screws could damage the remote. 8.6 CONDUCTING A SIMULATION USING THE ATTACK ™ INDUSTRIAL REMOTE... -
Page 26: Extinguisher Training With Attack
Do not direct laster at any person. TRAINING EVOLUTION PREPARATION Ensure that ATTACK is set up per the instructions in the section titled, “Setting Up The ATTACK Base Unit For Use With A Hose line”. The weighted base does not need to be filled with water. - Page 27 ATTACK’s digital flames can be stopped at any time by pressing the STOP button on the Setup Remote. Note that commands from the setup remote may be ignored by the panel when laser extinguishers or digital hand lines are being aimed at the ATTACK panel.
-
Page 28: Shut Down Operation
™ Unplug the power supply from the wall. Remove the ATTACK panel from the Weighted Base by pulling up on the lock pin. Unplug the power cord from the unit by twisting the collar on the connector counterclockwise, then pulling the connector away from the unit. -
Page 29: Attack Transportation
11. ATTACK TRANSPORTATION ™ The ATTACK Training System is ready for transport after the steps of the “Shut Down Operation” have been performed. When transporting ATTACK, the following procedures should be followed: The laser extinguisher should be turned off with the hose firmly positioned within the hose clip. -
Page 30: Maintenance Instructions
• Surfaces of the appliance may be cleaned with a general non-abrasive household cleaner. Only clean ATTACK when it is NOT powered on, in use, or plugged in. • Do not use petroleum-based cleaners to clean any component of the appliance. -
Page 31: Warranty Information
Labor costs to the account of LION are based on a predetermined rate schedule and any repair work must be done through an authorized LION dealer. This warranty covers labor and parts related defects. - Page 32 The original bill of sale or copy will be required together with a serial number and a model number when making any warranty claims from LION or authorized dealer. LION reserves the right to have its representative inspect any product or part thereof prior to honoring any warranty claim.
-
Page 33: Contact Information
14. CONTACT INFORMATION LION North America | South America 7200 Poe Avenue, Suite 4000 Dayton, OH 45414, U.S.A. info@lionprotects.com 800-548-6614 (PPE) 888-428-5539 (Training) Europe | Middle East | Asia Industrieweg 5, 5111 ND Baarle-Nassau, The Netherlands infoEMEA@lionprotects.com 0031-13-507-6800 WWW.LIONPROTECTS.COM... - Page 34 ATTACK DIGITAL FIRE TRAINING SYSTEM ™ NOTES WWW.LIONPROTECTS.COM...
- Page 35 NOTES WWW.LIONPROTECTS.COM...
- Page 36 WWW.LIONPROTECTS.COM Manufactured in the USA © LION Group, Inc. All rights reserved.
Need help?
Do you have a question about the ATTACK and is the answer not in the manual?
Questions and answers