Table of Contents
Advertisement
Quick Links
Advertisement
Table of Contents

Related Manuals for Minuteman RPM1581EV6

Summary of Contents for Minuteman RPM1581EV6
- Page 1 RPM1581EV6 (Remote Power Manager) User’s Manual...
-
Page 2: Table Of Contents
Table of Contents 1. IMPORTANT SAFETY INSTRUCTIONS .................. 2 2. Introduction ..........................4 3. RPM Package ........................... 5 4. Function ............................ 6 5. Installation ..........................7 6. Web Interface ........................... 8 7. Specifications .......................... 27 8. Obtaining Service ........................28 9. -
Page 3: Important Safety Instructions
1. IMPORTANT SAFETY INSTRUCTIONS This manual contains important instructions that should be followed during the installation and the operation of the Remote Power Manager (RPM). SAVE THESE INSTRUCTIONS An Important Notice To ensure safety a Qualified Service Personnel should perform the installation. ... - Page 4 In the unlikely case that the RPM needs to be returned to MINUTEMAN, please use the original packing material. Since MINUTEMAN is not responsible for shipping damage incurred when the system is returned, the original packing material is inexpensive insurance.
-
Page 5: Introduction
2. Introduction The RPM is an Internet ready device designed and equipped with an intelligent current-meter (True RMS) that will indicate the total power consumption of the RPM. Features: Built-in Web Server to support Remote Power Management Local LED displays Amps, IP Address ,Temperature or Humidity ... -
Page 6: Rpm Package
3. RPM Package The standard RPM package contains a Remote Power Manager unit with supporting hardware. The contents of the package are: Remote Power Manager Unit Rackmount Brackets CD-ROM, which contains: User Manual RPM Utility Manual ... -
Page 7: Function
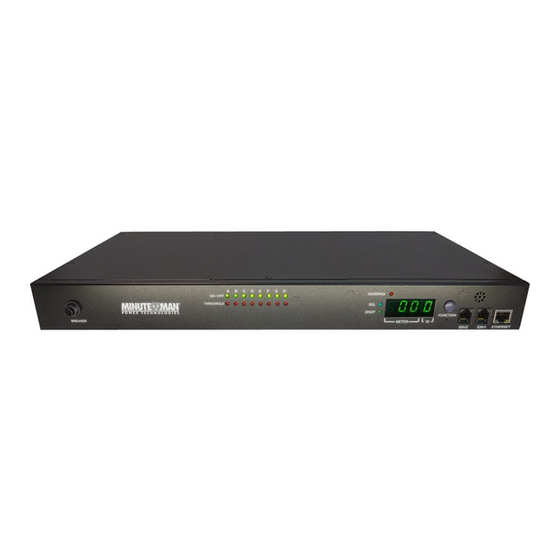
4. Function Functions Description Circuit Breaker Overload protection. ON / OFF (green) LEDs: On means the outlet is active. Off means the outlet is not active. Threshold (red) LEDs: On means the current has exceed the threshold LED Indicators setting. -
Page 8: Installation
5. Installation This RPM series is ONLY intended to be installed in an indoor temperature controlled environment that is free of conductive contaminants. DO NOT operate the RPM in: extremely dusty and/or unclean areas, locations near heating devices, water or excessive humidity, or where the RPM is exposed to direct sunlight. Select a location, which will provide good air circulation for the RPM at all times. -
Page 9: Web Interface
6. Web Interface Login: Enter the IP address of the RPM in a web browser. Note: The default setting for the IP address is DHCP enabled. If the RPM cannot get the IP from the DHCP server, the IP address will remain at the default IP address 192.168.0.216 The default user Name is snmp. - Page 10 Information: Overview This section shows the information about the RPM Power, the last five events that have occurred, and the status of the individual outlets. Because different models provide different information, the model you have may not display the same information. Outlet Status Setting Column: The schedule function is set.
- Page 11 Information: Power This section shows the information about the power, the current draw and status for each individual outlet. Information: System This section shows the information about the System, Network and SNMP:...
- Page 12 Information: Event Log This table lists all the events that have occurred. The existing values are overwritten when the maximum number of entries (5000) has been reached. You can filter the log based on specific dates and times. The event logs can be downloaded and saved for future reference.
- Page 13 Management: Control This allows the specified users to control the outlets. Select the outlet by checking the box and then click the ON or the OFF button to control the outlet. ON: Press the ON button to turn on the assigned outlets. OFF: Press the OFF button to turn off the assigned outlets.
- Page 14 Make Group: This allows the administrator to assign the outlets to make a group. Click on the Group button. Name the group (36 characters max), select the outlets to include in the group and click Add. Select the check box by the group that you want to control. Management: Schedule This allows the administrator to schedule turning OFF/ON the RPM’s outlets.
- Page 15 Management: Ping Action This allows the administrator to Ping the device that is connected to a specific outlet and if there is no response the RPM will automatically cycle power to a locked device connected to the specified outlet by rebooting the outlet.
- Page 16 Management: Event Action This allows the administrator to setup specific actions based on a selected event. The RPM can also receive SNMP traps from a specified device and then perform the selected action. Event Device: When the current for entire RPM exceeds the Warning or Overload thresholds the RPM will perform the action setup under the Action.
- Page 17 Management: Device This allows the administrator to configure the outlet name, the delay time and setup different users for specific outlets. Outlet Configuration Outlet Name: Rename the outlet. Delay ON: Set the delay time in seconds for the power on sequence. Delay OFF: Set the delay time in seconds for the power off sequence.
- Page 18 Management: Threshold This allows the administrator to configure the thresholds for the environmental probe, the entire RPM and each individual outlet. ENV Threshold Configuration: Set the lower and upper thresholds for the optional environmental probe then click Modify to change the settings. Once these thresholds are set see the management Event Actions to configure the actions based on these thresholds.
- Page 19 Configuration: Network This allows the administrator to configure the network settings. TCP/IP Settings for IPv4 Host Name: The host name of the RPM. DHCP Client: Enable/Disable DHCP to get the IP address from a DHCP server. The default setting for DHCP is enabled.
- Page 20 Configuration: Security This allows the administrator to configure the security settings to prevent unauthorized users from accessing the RPM. HTTP Configuration Server: Enabling or disabling the HTTP connection with the RPM. SSL: Enable or Disable the SSL function. The user may configure HTTPS protocol to use a port number other than standard HTTPS port (443).
- Page 21 Configuration: User This allows the administrator to add users and give them specific rights. No.: This is the number of users. The maximum number of users is eight. User: This is the user’s login name. The default administrator’s name is snmp. Password: This is the user’s login password.
- Page 22 Configuration: Mail This allows the administrator to setup the email notification. When an event occurs, the RPM can send out email messages to predefined accounts. Email Server: Enter the Hostname or IP address of the SMTP Mail Server that will be used to send emails. If entering a Hostname, you are also required to enter the DNS Address, see the Configuration Network tab.
- Page 23 Configuration: SNMP The RPM supports the SNMPv1, v2c and v3 traps to satisfy most of the user’s environment. This allows the administrator to setup the SNMP Traps. When an event occurs, the RPM can send out SNMP Traps to predefined targets. Once the SNMP configuration is complete click the Apply button to save the settings.
- Page 24 Configuration: Time This allows the administrator to setup the system time for the scheduled events. Time Configuration: Set the date and time manually, and then click the Apply button to save the settings. SNTP Configuration: Activate and then setup the Timeserver. Click the Apply button to save the settings.
- Page 25 Configuration: Radius This allows the administrator to configure the RADIUS parameters. Remote Authentication Dial-In User Service (RADIUS) is a widely deployed protocol enabling centralized authentication, authorization, and accounting for network access. RADIUS: Enable or Disable the RADIUS function. Primary Server: Input the Primary Server's IP address. Shared Secret: Input the Shared Secret of Primary Server.
- Page 26 This allows the administrator to setup the log information. Export Data Configuration: Export the log files in csv format. Syslog Configuration: Configure the RPM1581EV6 to send Systems logs. Data Log Configuration: Set the time interval to record the data logs.
- Page 27 Configuration: System This allows the administrator to configure the system. System Configuration: Configure one RPM and then its configuration file can be saved and then uploaded to another RPM. Firmware Upgrade: The firmware can be upgraded via the web page. Reset System: Reset the system back to the factory default setting.
-
Page 28: Specifications
7. Specifications Model Number RPM1581EV6 Load Capacity 12Amps (Max) INPUT PARAMETERS Number of Phases Single (12W +G) Nominal Voltage 100-120VAC Frequency 50/60Hz Input Protection Re-settable circuit breaker OUTPUT PARAMETERS Nominal Voltage 100-120VAC Frequency 50/60Hz Branch Circuit UL 60950-1 Protection Circuit Quantity... -
Page 29: Obtaining Service
The factory cannot accept any package without the RMA # marked on the outside. 5. Return the unit by insured, prepaid carrier to: Para Systems Inc. MINUTEMAN UPS 1809 W. Frankford Road, Suite 150 Carrollton, TX 75007 ATTN: RMA #... -
Page 30: Limited Product Warranty
9. Limited Product Warranty Para Systems, Inc. (Para Systems) warrants this equipment, when properly applied and operated within specified conditions, against faulty materials (excluding the batteries) or workmanship for a period of three years from the date of purchase. Para Systems Inc. (Para Systems) warrants the batteries for a period of two years from the date of purchase.
Need help?
Do you have a question about the RPM1581EV6 and is the answer not in the manual?
Questions and answers