Advertisement
Quick Links
THIS PRODUCT IS NOT INTENDED FOR
INSTITUTIONAL OR COMMERCIAL USE.
When contacting Delta Consumer Care please reference the above information. Before
contacting Delta Consumer Care please ensure that the information above matches the
information found on the label on the Headboard bottom rail, please reference the information
found on the product when contacting Delta Consumer Care.
To register your product for important safety alerts and updates to your product please visit
www.DeltaChildren.com and click on Product Registration.
March 24, 2014, 24435, R1
Read all instructions before assembly and use.
KEEP INSTRUCTIONS FOR FUTURE USE.
ADULT ASSEMBLY REQUIRED
Due to the presence of small parts during assembly, keep out of
reach of children until assembly is complete.
Consumer Care:
www.DeltaChildren.com
Delta Children's Products
114 West 26th Street
New York, NY 10001
Style #:
Date:
Conforms to
ASTM F1821
Safety Standards
Tele.212-645-9033
___________
Lot:
___________
___________
©2014 DELTA ENTERPRISE CORP.
A
REV
Advertisement

Related Manuals for Delta Children Classic


Summary of Contents for Delta Children Classic
- Page 1 ADULT ASSEMBLY REQUIRED Due to the presence of small parts during assembly, keep out of reach of children until assembly is complete. Consumer Care: www.DeltaChildren.com Delta Children’s Products 114 West 26th Street New York, NY 10001 Tele.212-645-9033 Style #: ___________...
- Page 2 - Do not scratch or chip the finish. - Inspect the product periodically, contact Delta Children's Products for replacement parts or questions. - Do not store the product or any parts in extreme temperatures and conditions such as a hot attic or a damp, cold basement.
- Page 3 PARTS: MAKE SURE THAT ALL PRE-ASSEMBLED PARTS ARE TIGHT. A. End Top Rail x 2 Part # 24423 C. End Bottom Rail x 2 Part # 24424 B. Headboard Middle Rail x 1 Part # 24493 D. Left Headboard Post x 1 Part # 24426 E.
- Page 4 PARTS: HARDWARE KIT PART #24434-986 FOR COLOR 100 OR #24434-988 FOR COLOR 607. SEE FRONT COVER. T. M6 x 85 mm Bolt x 8 Part # 5474 No drills necessary. Do not use power screwdriver. U. M6 x 60 mm Bolt x 16 Flat Head Screwdriver Part # 5469 (not supplied)
- Page 5 Step 1 Parts and tools required to complete step. T. M6 x 85 mm Bolt x 2 A. End Top Rail x 1 W. M6x13 mm Barrel Nut x 2 C. End Bottom Rail x 1 M4 Allen Wrench Supplied D.
- Page 6 Step 2 Parts and tools required to complete step. H. End Top Panel x 1 J. Headboard Bottom Panelx 1 From Step 1 B. Headboard Middle Rail x 1 Insert (1) Headboard Middle Rail (Part B) as shown. Slide End Top Panel (Part H) into End Top Rail (Part A) and Headboard Middle Rail (Part B) Grooves as shown.
- Page 7 Step 3 Parts and tools required to complete step. T. M6 x 85 mm Bolt x 2 W. M6x13 mm Barrel Nut x 2 From Step 2 E. Right Headboard Post x 1 M4 Allen Wrench Supplied Attach (1) Right Headboard Post (Part E) to the assembly from step 2 using (2) M6x85mm Bolts (Part T) and (2) M6x13mm Barrel Nuts (Part W).
- Page 8 Step 4 Parts and tools required to complete step. T. M6 x 85 mm Bolt x 2 A. End Top Rail x 1 W. M6x13 mm Barrel Nut x 2 C. End Bottom Rail x 1 M4 Allen Wrench Supplied F.
- Page 9 Step 5 Parts and tools required to complete step. H. End Top Panel x 1 From Step 4 Slide End Top Panel (Part H) into End Top Rail (Part A) and End Bottom Rail (Part C) Grooves as shown.
- Page 10 Step 6 Parts and tools required to complete step. T. M6 x 85 mm Bolt x 2 W. M6x13 mm Barrel Nut x 2 G. Right Footboard Post x 1 From Step 5 M4 Allen Wrench Supplied Attach (1) Right Footboard Post (Part G) to the assembly from step 5 using (2) M6x85mm Bolts (Part T) and (2) M6x13mm Barrel Nuts (Part W).
- Page 11 Step 7 Parts and tools required to complete step. From Step 3 U. M6 x 60 mm Bolt x 2 W. M6x13 mm Barrel Nut x 2 L. Right Back Side Rail x 1 M4 Allen Wrench Supplied Attach (1) Right Back Side Rail (Part L) to the assembly from step 3 using (2) M6x60mm Bolts (Part U) and (2) M6x13mm Barrel Nuts (Part W).
- Page 12 Step 8 Parts and tools required to complete step. N. Cross Slat x 5 From Step 7 Insert (5) Cross Slats (Part N) as shown.
- Page 13 Step 9 Parts and tools required to complete step. From Step 8 U. M6 x 60 mm Bolt x 2 W. M6x13 mm Barrel Nut x 2 K. Left Back Side Rail x 1 M4 Allen Wrench Supplied Attach (1) Left Back Side Rail (Part K) to the assembly from step 8 using (2) M6x60mm Bolts (Part U) and (2) M6x13mm Barrel Nuts (Part W).
- Page 14 Step 10 Parts and tools required to complete step. From Step 6 U. M6 x 60 mm Bolt x 2 W. M6x13 mm Barrel Nut x 2 M. Front Side Rail x 1 M4 Allen Wrench Supplied Attach (1) Front Side Rail (Part M) to the assembly from step 6 using (2) M6x60mm Bolts (Part U) and (2) M6x13mm Barrel Nuts (Part W).
- Page 15 Step 11 Parts and tools required to complete step. From Step 10 N. Cross Slat x 5 Insert (5) Cross Slats (Part N) as shown.
- Page 16 Step 12 Parts and tools required to complete step. U. M6 x 60 mm Bolt x 2 W. M6x13 mm Barrel Nut x 2 M. Front Side Rail x 1 From Step 11 M4 Allen Wrench Supplied Attach (1) Front Side Rail (Part M) to the assembly from step 11 using (2) M6x60mm Bolts (Part U) and (2) M6x13mm Barrel Nuts (Part W).
- Page 17 Step 13 Parts and tools required to complete step. From Step 9 X. Φ8x40 mm Wood Dowel x 4 P. Center Cross Slat x 1 From Step 12 Insert (1) Center Cross Slat (Part P) in the grooves on the end of the Front Side Rails (Part M). Attach the assembly from step 12 to the assembly from step 9 using (4) Φ8x40 mm Wood Dowels (Part X).
- Page 18 Step 14 Parts and tools required to complete step. U. M6 x 60 mm Bolt x 4 R. Center Leg x 2 W. M6x13 mm Barrel Nut x 4 From Step 13 Y. Mending Plate x 2 M4 Allen Wrench Supplied Attach (2) Center Legs (Part R) to the assembly from step 13 using (2) Mending Plates (Part Y), (4) M6x60mm Bolts (Part U) and (4) M6x13mm Barrel Nuts (Part W).
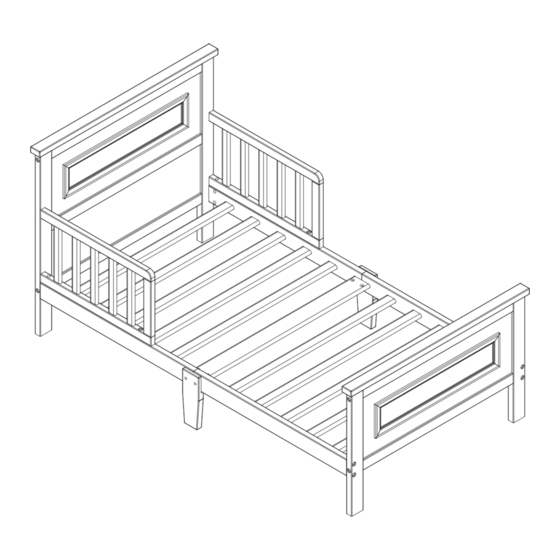
- Page 19 Step 15 Parts and tools required to complete step. U. M6 x 60 mm Bolt x 4 S. Guard Rail x 2 V. M6 x 45 mm Bolt x 2 W. M6x13 mm Barrel Nut x 4 From Step 14 M4 Allen Wrench Supplied Attach (2) Guardrails (Part S) to the assembly from step 14 using (2) M6x45mm Bolts (Part V), (4) M6x60mm Bolts (Part U) and (4) M6x13mm Barrel Nuts (Part W).
-
Page 20: Warranty
Consumer Care: www.DeltaChildren.com Delta Children’s Products 114 West 26th Street New York, NY 10001 Tele.212-645-9033 Warranty: This Delta product is warranted to be free from defects for a period of 90 days from the date of purchase under normal use. This warranty extends only to the original retail purchaser and is valid only when supplied with proof of purchase, or if received as a gift, when the registration is on file with Delta.
Need help?
Do you have a question about the Classic and is the answer not in the manual?
Questions and answers