Table of Contents
Advertisement
Quick Links
Advertisement
Table of Contents

Related Manuals for ferrum OOR


Summary of Contents for ferrum OOR
- Page 1 OOR by Ferrum user’s manual...
- Page 2 OOR by Ferrum user’s manual OOR by Ferrum user’s manual...
- Page 3 He started from the ground up and presented us the early drawings of OOR, a headphone amplifier with part of his soul forged right into it. Our R&D team put their decades of experience in designing and manufacturing audio electronics into OOR.
-
Page 4: Table Of Contents
Back Panel Overwiev Connecting The OOR Getting Started 6.1. Using OOR For The First Time 6.2. Bypass Function 6.3. Using OOR With Amplifiers Or Active Speakers Technical Spec Warranty Contact Ferrum 10. Warninig Information On Disposal OOR by Ferrum user’s manual... -
Page 5: Important Safety Info
If the component is placed in a bookcase or cabinet, there must be ventilation of the cabinet to allow proper cooling. Keep the OOR away from radiators, kettles, heat registers, stoves, or any other appliance that produces heat. Connect the OOR only to a power source that meets its requirements (voltage and amps). We recommend using Ferrum power supplies. -
Page 6: Box Content
Made for HYPSOS - while OOR performs very good right out of the box, it is made to excel above and beyond when used together with HYPSOS. Using the proprietary Ferrum Power Link connection HYPSOS will perform to its absolute maximum, unleashing unheard musicality from the combination with OOR. -
Page 7: Oor Overview
4. OOR OVERVIEW 4.1. Front Panel Overview Ferrum logo - brightness adjustable 4-pin XLR headphones output 6.3 mm jack, TRS headphones output Rotary input selector and on/o switch Rotary gain selector - allows you to match a gain level to your headphones: - for single ended headphones (6.3 mm jack) you can choose (from left to right): -10 dB, 0 dB, +10 dB... -
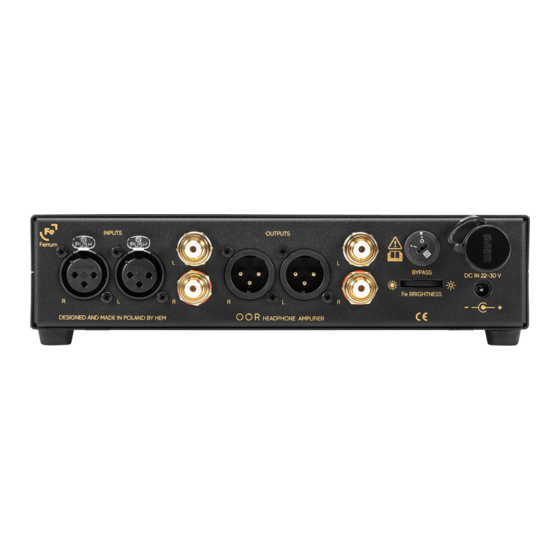
Page 8: Back Panel Overwiev
RCA input XLR output RCA output Bypass rotary switch - allows you to bypass OOR’s internal volume potentiometer. This option is useful when you control volume at the source Note: For more information please look at paragraph “6.2. Bypass Function”. -
Page 9: Connecting The Oor
5. CONNECTING THE OOR Note: Please connect all cables before switching on the OOR. MALE XLR FEMALE SOURCE Figure 3. OOR by Ferrum user’s manual... -
Page 10: Getting Started
The bypass function disables the built-in potentiometer in OOR. As a result, the signal given at the input of OOR will be transmitted to the headphones or RCA or XLR outputs with all its power. This is useful when it is more convenient for the user to control the volume from the sound source. -
Page 11: Technical Spec
In case of need to send the OOR for service please pack the product very carefully, preferable in the original packing, to be sure no damage can be done during shipment. -
Page 12: Contact Ferrum
• EN55103-1: Electromagnetic Interference (Emission) • EN55103-2: Electromagnetic Susceptibility (Immunity) This product is intended for use in the following Electromagnetic Environments: E1 (residential), E2 (commercial and light industrial), E4 (controlled EMC environment, ex. TV studio). OOR by Ferrum user’s manual... -
Page 13: Information On Disposal
To properly dispose harmful substances and recycle the product, the user is obliged to return it at the point of collection of electrical and electronic equipment waste. For more information please contact your local authorities, waste disposal units or retailer. OOR by Ferrum user’s manual...
Need help?
Do you have a question about the OOR and is the answer not in the manual?
Questions and answers