Table of Contents
Advertisement
Available languages
Available languages
Quick Links
INSTALLER: LEAVE THIS MANUAL WITH THE APPLIANCE.
CONSUMER: RETAIN THIS MANUAL FOR FUTURE REFERENCE.
NEVER LEAVE CHILDREN OR OTHER AT RISK INDIVIDUALS ALONE WITH THE APPLIANCE.
CERTIFIED UNDER CANADIAN AND AMERICAN NATIONAL STANDARDS: CSA C22.2 No-46 / UL 2021
CEFB24H, CEFB27H
SAFETY INFORMATION
WARNING
!
If the information in these instructions are
not followed exactly, a fi re or explosion
may result causing property damage,
personal injury or loss of life.
- Do not store or use gasoline or other fl ammable
vapors and liquids in the vicinity of this or any
other appliance.
Phone (705)721-1212 • Fax (705)722-6031 • www.continentalfi replaces.com • ask@continentalfi re.on.ca
$10.00
OPERATING INSTRUCTIONS
& CEFB29H
ELECTRIC FIREPLACE
Wolf Steel Ltd., 24 Napoleon Rd., Barrie, ON, L4M 0G8 Canada /
103 Miller Drive, Crittenden, Kentucky, USA, 41030
INSTALLATION AND
1.42A
W415-1438 / 02.17.15
EN
FR
PG
25
Advertisement
Chapters
Table of Contents

Subscribe to Our Youtube Channel
Related Manuals for Continental Fireplaces CEFB29H


Summary of Contents for Continental Fireplaces CEFB29H
- Page 1 NEVER LEAVE CHILDREN OR OTHER AT RISK INDIVIDUALS ALONE WITH THE APPLIANCE. INSTALLATION AND OPERATING INSTRUCTIONS CERTIFIED UNDER CANADIAN AND AMERICAN NATIONAL STANDARDS: CSA C22.2 No-46 / UL 2021 CEFB24H, CEFB27H & CEFB29H ELECTRIC FIREPLACE SAFETY INFORMATION WARNING If the information in these instructions are not followed exactly, a fi...
-
Page 2: Table Of Contents
OPERATING INSTRUCTIONS OPERATING CONTROL PANEL OPERATING BY REMOTE CONTROL FINISHING GLASS DOOR REMOVAL AND INSTALLATION LOG, GRATE AND EMBER BED ASSEMBLY REMOVAL BRICK PANEL INSTALLATION AND REMOVAL (CEFB29H ONLY) WIRING DIAGRAM REPLACEMENT PARTS CEFB24H OVERVIEW CEFB27H OVERVIEW CEFB29H OVERVIEW TROUBLESHOOTING WARRANTY NOTE: Changes, other than editorial, are denoted by a vertical line in the margin. -
Page 3: Introduction
1.0 INTRODUCTION WARNING • THIS APPLIANCE IS HOT WHEN OPERATED AND CAN CAUSE SEVERE BURNS IF CONTACTED. • Do not operate appliance before reading and understanding operating instructions. Failure to operate appliance according to operating instructions could cause fi re or injury. •... -
Page 4: Dimensions
27 1/4" 691mm 19 1/2" 20 1/8" 19 7/8" 495mm 20 1/8" 510mm 511mm 17 1/4" 505mm 19 1/8" 437mm 26" 660mm 14 1/4" 486mm 18 3/8" 361mm 467mm 9 1/4" 236mm CEFB29H ILLUSTRATED 9 1/2" 241mm W415-1438 / 02.17.15... -
Page 5: Listing Approvals
This appliance has been tested in accordance with the CSA Standards for fi xed and location-dedicated electric room appliances in the United States and Canada. If you need assistance during installation, please contact your local dealer. Model Number CEFB24H CEFB27H CEFB29H NOTE: This appliance must be Description 24" Electric 27" Electric 29" Electric... -
Page 6: Rating Plate Information
APPROPRIE PO MAISON MOBILE. MAISON MOB MAISON MOB MASTER CONTRACT: 161746 CONTRAT-CADRE: 161746 CONTRA MODEL CEFB24H CEFB27H CEFB27H CEFB27H CEFB29H VOLTAGE: 120 VAC 120 VAC 120 VAC TENSION: 120VCA TENSIO TENS FREQUENCY: 60Hz ENCY: Y: 60Hz 60Hz FRÉQUENCE: 60Hz FRÉ... -
Page 7: Locating Appliance
2.0 LOCATING APPLIANCE WARNING DUE TO HIGH TEMPERATURES, THIS ELECTRIC APPLIANCE SHOULD BE LOCATED OUT OF TRAFFIC. KEEP COMBUSTIBLE MATERIALS SUCH AS FURNITURE, PILLOWS, BEDDING, PAPERS, CLOTHES AND CURTAINS AT LEAST 36" FROM THE FRONT OF THE APPLIANCE. NEVER LOCATE THIS ELECTRIC APPLIANCE WHERE IT MAY FALL INTO A BATHTUB OR OTHER WATER CONTAINER. -
Page 8: Installation
3.0 INSTALLATION WARNING RISK OF FIRE! THE POWER CORD MUST NOT BE PINCHED AGAINST A SHARP EDGE. SECURE CORD TO AVOID TRIPPING OR SNAGGING TO REDUCE THE RISK OF FIRE, ELECTRIC SHOCK OR PERSONAL INJURY. DO NOT RUN CORD UNDER CARPETING. DO NOT COVER CORD WITH THROW RUGS, RUNNERS OR THE LIKE. ARRANGE CORD AWAY FROM TRAFFIC AREAS AND WHERE IT WILL NOT BE TRIPPED OVER. -
Page 9: Framing
Fig. 2 Fig. 1 FLOOR (Or mantel base thickness) Once the rough opening has been CEFB24H CEFB27H CEFB29H prepared, and the power has been 9" (229mm) 10" (254mm) 10" (254mm) routed to the right side of the recess, B 23" (584mm) 26"... -
Page 10: Appliance Installation
3.3.1 APPLIANCE INSTALLATION With two people, lift the appliance up and insert into the opening, leave a 3/8" (9.5mm) gap between the appliance and fl oor base. Do not push or slide the bottom of the appliance on the fl oor base, see Figure 1. -
Page 11: Hard Wiring Installation
3.3.2 HARD WIRING INSTALLATION WARNING TURN OFF THE APPLIANCE COMPLETELY AND LET COOL BEFORE SERVICING. ONLY A QUALIFIED SERVICE PERSON SHOULD SERVICE AND REPAIR THIS ELECTRIC APPLIANCE. HARD WIRING CONNECTION If it is necessary to hard wire this appliance, a qualifi ed electrician must remove the cord connection, and wire the appliance directly to the household wiring. - Page 12 Remove the securing screw from the electrical cover plate, located on the right hand side of the fi replace. Add an electrical box connector and feed the supply wires through the 7/8" (22mm) hole. Separate the black, white and green wires that have the wire nuts on them. Remove the wire nuts and secure the black wire (power L1) to the black (power L1) lead of the power supply.
-
Page 13: Operating Instructions
(30mins. minimum to 6hrs maximum). Controls Decorative Light settings. DECORATIVE LIGHT (CEFB29H ONLY) 4 Settings: Decorative Light off (do), white colour (d1), auto-cycle from White / Orange / Blue / Orange-Blue / White-Blue (d2), lock to desired colour (d3). It will take 8.5 seconds to switch between colours (on d2 setting). -
Page 14: Operating By Remote Control
* CEFB29H REMOTE ILLUSTRATED 2h, 3h, 4h, 5h, 6h and off). The fi replace will turn off at the setting time. To activate the decoration light (CEFB29H Only), press the light button .There are three settings to cycle through and then an off setting (d1, d2, d3 and then d0). d1 white colour, d2 colour cycles from White / Orange / Blue / Orange-Blue / White-Blue. -
Page 15: Finishing
For Model CEFB24H and CEFB27H: Remove the 2 screws, as shown. Lift the log, grate and ember bed up from the appliance and remove. For Model CEFB29H: Remove the card board holding the logs, grate and ember bed assembly to the SCREW appliance. -
Page 16: Brick Panel Installation And Removal (Cefb29H Only)
BRICK PANEL INSTALLATION AND REMOVAL (CEFB29H ONLY) Slide the panels into place and secure with the holding bracket. Ensure the brick panels are positioned appropriately in the unit and are not angled or sticking out from the unit. HOLDING BRACKET HOLDING BRACKET W415-1438 / 02.17.15... -
Page 17: Wiring Diagram
6.0 WIRING DIAGRAM WARNING TURN OFF THE APPLIANCE COMPLETELY AND LET COOL BEFORE SERVICING. ONLY A QUALIFIED SERVICE PERSON SHOULD SERVICE AND REPAIR THIS ELECTRIC APPLIANCE. DECORATION / DÉCORATION FLAME / DISPLAY CN3 / FLAMME AFFICHAGE CONTROL PANEL BOARD / PANNEAU DE CONTRÔLÉ... -
Page 18: Replacement Parts
7.0 REPLACEMENT PARTS Contact your dealer or the factory for questions concerning prices and policies on replacement parts. Normally all parts can be ordered through your Authorized dealer / distributor. WARNING FOR WARRANTY REPLACEMENT PARTS, A PHOTOCOPY OF THE ORIGINAL INVOICE WILL BE REQUIRED TO HONOUR THE CLAIM. FAILURE TO POSITION THE PARTS IN ACCORDANCE WITH THIS When ordering replacement parts always give the following information:... -
Page 19: Cefb24H Overview
CEFB24H OVERVIEW NOTE: Care must be taken when removing and disposing of any broken glass or damaged components. Be sure to vacuum up any broken glass from inside the appliance before operation. W415-1438 / 02.17.15... -
Page 20: Cefb27H Overview
CEFB27H OVERVIEW NOTE: Care must be taken when removing and disposing of any broken glass or damaged components. Be sure to vacuum up any broken glass from inside the appliance before operation. W415-1438 / 02.17.15... -
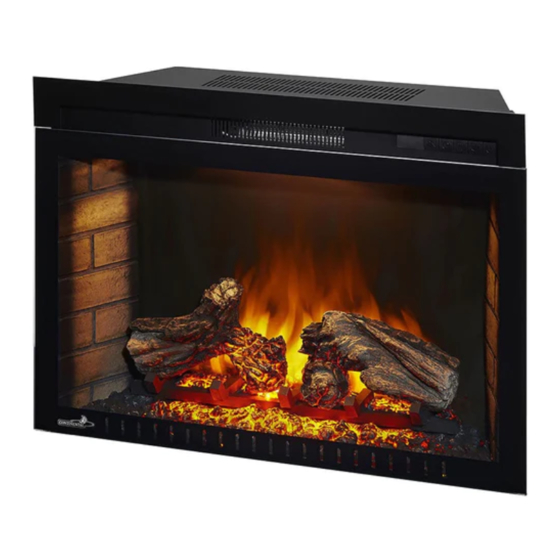
Page 21: Cefb29H Overview
CEFB29H OVERVIEW NOTE: Care must be taken when removing and disposing of any broken glass or damaged components. Be sure to vacuum up any broken glass from inside the appliance before operation. W415-1438 / 02.17.15... -
Page 22: Troubleshooting
8.0 TROUBLESHOOTING WARNING TURN OFF THE APPLIANCE COMPLETELY AND LET COOL BEFORE SERVICING. ONLY A QUALIFIED SERVICE PERSON SHOULD SERVICE AND REPAIR THIS ELECTRIC APPLIANCE. SYMPTOM PROBLEM TEST SOLUTION Dim or no fl ame Flame LED’s are burnt out Inspect the LED and replace them if necessary Main PCB Board burnt out Inspect the Main PCB Board and replace them if necessary Ember bed is not... -
Page 23: Warranty
9.0 WARRANTY CONTINENTAL® electric appliances are manufactured under the strict Standard of the world recognized ISO 9001 : 2008 Quality Assurance Certifi cate. CONTINENTAL® products are designed with superior components and materials, assembled by trained craftsmen who take great pride in their work. Once assembled the complete appliance is thoroughly inspected by a qualifi ed technician before packing to ensure that you, the customer, receive the quality product that you expect from CONTINENTAL®. - Page 25 INSTRUCTIONS D’INSTALLATION ET D’OPÉRATION HOMOLOGUÉ SELON LES NORMES NATIONALES CANADIENNES ET AMÉRICAINES: CSA C22.2 No-46 / UL 1278 CEFB24H, CEFB27H & CEFB29H FOYER ÉLECTRIQUE CONSIGNES DE SÉCURITÉ AVERTISSEMENT Si ces instructions ne sont pas suivies à la lettre, un incendie ou une explosion pourraient s’ensuivre causant des...
- Page 26 SCHÉMA DE CÂBLAGE RECHANGES VUE D'ENSEMBLE CEFB24H VUE D'ENSEMBLE CEFB27H VUE D'ENSEMBLE CEFB29H GUIDE DE DÉPANNAGE GARANTIE NOTE: Les changements autres que de nature éditoriale sont dénotés par une ligne verticale dans la marge. Les piles doivent être mises au rebut conformément aux lois et à la réglementation locales. Certaines piles peuvent être recyclées et acceptées dans votre centre de recyclage local.
-
Page 27: Introduction
1.0 INTRODUCTION AVERTISSEMENT • CET APPAREIL EST CHAUD LORSQU’IL FONCTIONNE ET PEUT CAUSER DE GRAVES BRÛLURES EN CAS DE CONTACT. • Ne faites pas fonctionner l’appareil avant d’avoir lu et compris les instructions d’utilisation. Ne pas respecter les instructions pourrait causer un incendie ou des blessures corporelles. •... -
Page 28: Dimensions
27 1/4" 691mm 19 1/2" 20 1/8" 19 7/8" 495mm 20 1/8" 510mm 511mm 17 1/4" 505mm 19 1/8" 437mm 26" 660mm 14 1/4" 486mm 18 3/8" 361mm 467mm 9 1/4" 236mm CEFB29H ILLUSTRÉE CEFB29H ILLUSTRATED 9 1/2" 241mm W415-1438 / 02.23.15... -
Page 29: Homologations
HOMOLOGATIONS CEFB24H CEFB27H CEFB29H Model Number Cet appareil a été testé selon les 24" Foyers 27" Foyers 29" Foyers Description normes CSA pour foyers électriques électriques électriques électriques installés de façon permanente aux États-Unis et au Canada. Si 120V CA... -
Page 30: Plaque D'homologation
COUC COUC HOME INSTALLATION. APPROPRIE POUR INSTALLATION DANS UNE MAISON MOBILE. MASTER CONTRACT: 161746 CONTRAT-CADRE: 161746 MODEL CEFB24H CEFB27H CEFB29H VOLTAGE: 120 VAC LTAGE: AGE: 120 VA TENSION: 120VCA FREQUENCY: 60Hz FREQUENCY: UENCY: 6 6 FRÉQUENCE: 60Hz POWER: 1500W POWER:... -
Page 31: Emplacement De L'appareil
2.0 EMPLACEMENT DE L'APPAREIL AVERTISSEMENT EN RAISON DES TEMPÉRATURES ÉLEVÉES, L'APPAREIL DEVRAIT ÊTRE PLACÉ LOIN DES ENDROITS PASSANTS. GARDEZ TOUS LES ARTICLES COMBUSTIBLES TELS QUE LES MEUBLES, LES OREILLERS, LA LITERIE, LE PAPIER, LES VÊTEMENTS ET LES RIDEAUX À UNE DISTANCE D’AU MOINS 3 PIEDS (0,9 MÈTRE) DE LA FAÇADE DE L'APPAREIL. -
Page 32: Installation
3.0 INSTALLATION AVERTISSEMENT RISQUE D'INCENDIE! LE CORDON D'ALIMENTATION NE DOIT PAS ÊTRE COINCÉ CONTRE UNE ARÊTE VIVE. FIXEZ LE CORDON POUR ÉVITER LES CHUTES OU LES ACCROCHAGES AFIN DE RÉDUIRE LE RISQUE D'INCENDIE, DE CHOC ÉLECTRIQUE OU DE BLESSURES CORPORELLES. NE PASSEZ PAS LE CORDON D’ALIMENTATION SOUS UN TAPIS. -
Page 33: Ossature
Fig. 1 PLANCHER (ou l'épaisseur de la tablette ) L'appareil peut être installé dès que CEFB24H CEFB27H CEFB29H l'ouverture initiale est préparée et que 9" (229mm) 10" (254mm) 10" (254mm) le câblage a été acheminé du côté B 23" (584mm) 26"... -
Page 34: Installation De L'appareil
3.3.1 INSTALLATION DE L'APPAREIL Ont à deux personnes de soulever l’appareil et insérez dans l’ouverture, en laissant un espace de 1/4 “(6,4 mm) entre l’appareil et la base du plancher. Ne faites pas glissez l’appareil, plancher ou d’autres surfaces peintes peuvent rayer., voir Figure 1. Placez l’appareil vers le bas sur la plancher en place., voir Figure 2. -
Page 35: Branchement Par Cable
BRANCHEMENT PAR CABLE AVERTISSEMENT COUPEZ L’ALIMENTATION ÉLECTRIQUE À L’APPAREIL ET LAISSEZ-LE REFROIDIR AVANT D’EFFECTUER UN ENTRETIEN. SEUL UN TECHNICIEN DE SERVICE QUALIFIÉ PEUT EFFECTUER L’ENTRETIEN OU LA RÉPARATION DE CET APPAREIL ÉLECTRIQUE. BRANCHEMENT PAR CÂBLE: Si c'est nécessaire de faire un branchement par câble, un électricien qualifi é peut retirer le cordon d’alimentation de l'appareil et brancher ce dernier directement au câblage de la maison. - Page 36 Retirez la vis de fi xation de la plaque de recouvrement, située sur le côté droit du foyer. Faites passer les fi ls d’alimentation à travers le trou perforé de 22 mm (7/8 "). Séparez l’un de l’autre les fi ls noir, blanc et vert munis de capuchons de connexion. Retirez les capuchons de connexion et raccordez le fi...
-
Page 37: Instructions De Fonctionnement
(30mins. minimum à 6 h maximum). Contrôle la lumières décoratives. LUMIÈRE DÉCORATIFS (SEULMENT CEFB29H) 4 Réglages: Arrêt lumières décoratives (do), Blanc (D1), Séquence automatique avec Blanc / Orange / Bleu / Orange-Bleu / Blanc-Bleu (d2), pour verrouiller la couleur désirée(d3). Il faudra 8,5 secondes pour passer d’une couleur à... -
Page 38: Utilisation De La Télécommande
4h, 5h, 6h et off) qui s’affi cheront sur l’écran à DEL, chacun représentant la durée de fonctionnement. Le foyer s’éteint à l’heure réglée. Pour activer la lumière de décoration (seulement CEFB29H), appuyez sur le bouton de lumière .Trois niveaux sont offerts pour faire défi ler les différents ainsi qu’un réglage d’arrêt (d1, d2, d3 et d0). -
Page 39: Finitions
Retirez les 2 vis, comme illustré. Soulevez les bûches, grille et lit de braises à partir de l'appareil et enlever. Pour le Modèle CEFB29H: Retirez la carton qui retiennent les bûches, la grille et le lit de braises à l’unité. -
Page 40: Enlèvement Et Installation Des Panneaux De Brique
ENLÈVEMENT ET INSTALLATION DES PANNEAUX DE BRIQUE Glissez les panneaux en place et fi xez avec les support. Assurez-vous que les panneaux de briques sont correctement positionnés, ne sont pas inclinés ou en train de dépasser l’unité. HOLDING BRACKET SUPPORTS HOLDING BRACKET W415-1438 / 02.23.15... -
Page 41: Schéma De Câblage
6.0 SCHÉMA DE CÂBLAGE AVERTISSEMENT COUPEZ L’ALIMENTATION ÉLECTRIQUE À L’APPAREIL ET LAISSEZ-LE REFROIDIR AVANT D’EFFECTUER UN ENTRETIEN. SEUL UN TECHNICIEN DE SERVICE QUALIFIÉ PEUT EFFECTUER L’ENTRETIEN OU LA RÉPARATION DE CET APPAREIL ÉLECTRIQUE. DECORATION / DÉCORATION FLAME / DISPLAY CN3 / FLAMME AFFICHAGE CONTROL PANEL BOARD /... -
Page 42: Rechanges
7.0 RECHANGES Contactez votre détaillant ou le fabricant pour les questions concernant les prix et la disponibilité des pièces de rechange. Normalement, toutes les pièces peuvent être commandées chez votre détaillant autorisé. POUR UN REMPLACEMENT DE PIÈCE SOUS GARANTIE, UNE PHOTOCOPIE DE LA FACTURE ORIGI- NALE SERA REQUISE AFIN DE POUVOIR HONORER LA DEMANDE. -
Page 43: Vue D'ensemble Cefb24H
VUE D'ENSEMBLE CEFB24H NOTE: Usez de prudence lorsque vous enlevez et jetez des débris de verre ou des composants endommagés. Assurez-vous d’aspirer tous les débris de verre à l’intérieur de l'appareil avant de le faire fonctionner. W415-1438 / 02.23.15... -
Page 44: Vue D'ensemble Cefb27H
VUE D'ENSEMBLE CEFB27H NOTE: Usez de prudence lorsque vous enlevez et jetez des débris de verre ou des composants endommagés. Assurez-vous d’aspirer tous les débris de verre à l’intérieur de l'appareil avant de le faire fonctionner. W415-1438 / 02.23.15... -
Page 45: Vue D'ensemble Cefb29H
VUE D'ENSEMBLE CEFB29H NOTE: Usez de prudence lorsque vous enlevez et jetez des débris de verre ou des composants endommagés. Assurez-vous d’aspirer tous les débris de verre à l’intérieur de l'appareil avant de le faire fonctionner. W415-1438 / 02.23.15... -
Page 46: Guide De Dépannage
8.0 GUIDE DE DÉPANNAGE AVERTISSEMENT COUPEZ L’ALIMENTATION ÉLECTRIQUE À L’APPAREIL ET LAISSEZ-LE REFROIDIR AVANT D’EFFECTUER UN ENTRETIEN. SEUL UN TECHNICIEN DE SERVICE QUALIFIÉ PEUT EFFECTUER L’ENTRETIEN OU LA RÉPARATION DE CET APPAREIL. SYMPTÔME PROBLÈME SOLUTIONS La luminosité du Flamme DEL sont brûlées Vérifi... -
Page 47: Garantie
9.0 GARANTIE Les produits CONTINENTAL® sont fabriqués conformément aux normes strictes du Certifi cat d’Assurance de la Qualité mondialement reconnu ISO 9001 : 2008. Les produits CONTINENTAL® sont conçus avec des composants et des matériaux de qualité supérieure, assemblés par des artisans qualifi...
Need help?
Do you have a question about the CEFB29H and is the answer not in the manual?
Questions and answers