Table of Contents
Advertisement
Quick Links
Advertisement
Table of Contents

Subscribe to Our Youtube Channel
Related Manuals for DiaDent D.LUX+


Summary of Contents for DiaDent D.LUX+
-
Page 3: Table Of Contents
Table of Contents ENGLISH 1. Overview 2. Safety Instructions Device Storage 3. Package Contents 4. Product Description 5. Components Names 6. Operation Method 6.1 Preparation before use 6.2 Instruction for use and operation sequence 7. Hand-Piece Function and Set-up Method 7.1 Hand-piece function 7.2 Feature settings 7.3 Battery replacement... -
Page 4: Overview
Overview... -
Page 5: Safety Instructions Device Storage
3. To reduce the risk of electric shock, do not try to open, disassemble or repair the hand-piece, battery pack, or the charger base. Use only the charger and battery pack supplied by DiaDent. 4. Do not modify this equipment without authorization of the manufacturer. - Page 6 Safety Instructions 5. Use disposable sheath to prevent contamination of the Light Probe and dispose it immediately after use, as it is for single use only. 6. When moving the device, remove the hand-piece from the charger and move the hand-piece with the light protector and the charger separately and safely.
-
Page 7: Package Contents
Package Contents 3. Package Contents Before removing the device from the box, check the items listed below and make sure you have everything. If any item is missing or damaged, contact your sales representative immediately. Contents: • 1x D-Lux+ Hand-piece •... -
Page 8: Product Description
Product Description 4. Product Description , the cordless LED visible light curing unit, has a stylish design and excellent cooling performance. Having overcome the overheating problem (which may deteriorate LED performance and even damage the unit) caused while using the visible light curing unit, it is capable of reliably producing high power. -
Page 9: Operation Method
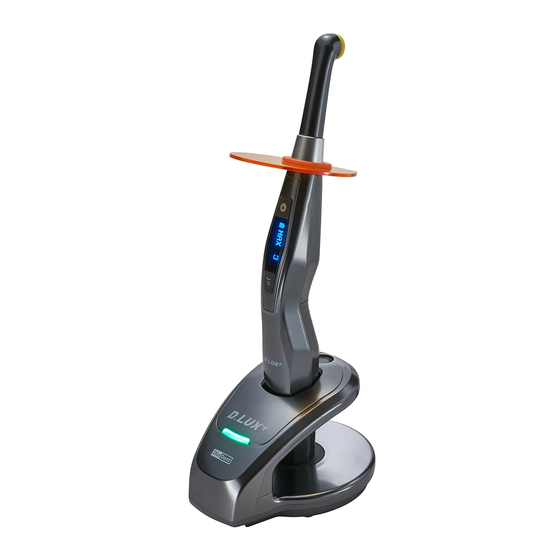
Operation Method <Display> <Light Probe mounting part> Light Probe * This is the Light Probe mounting part. It is removable. Battery Indicator Mode Operation Time (S) Never look at the light output section without Light Protector. It may cause visual impairment. * Replace the Light Probe The light probe is replaceable. -
Page 10: Hand-Piece Function And Set-Up Method
Hand-piece Function and Set-up Method 10) Make sure to discard the Disposable Sheath after use. 11) After using the handpiece, please press and hold the Mode (Power) button for more than 2 seconds to turn off the power. 7. Hand-piece Function and Set-up Method 7.1 Hand-piece function For safety, do not continuously operate in any mode and follow the specified duty cycle. -
Page 11: Feature Settings
Hand-piece Function and Set-up Method 7.2 Feature settings 1) If the hand-piece display window is not turned on, press the Power Button to turn on the power. 2) Pressing and holding the Mode (Power) button for about 1 second changes the mode in the order of STD, SFT, HIG, ORT and MAX in the display window. -
Page 12: Precautions During Charging
In severe case, the sensor part might be broken. 8.2 Precautions during charging 1) Please use only the power adapter supplied by DiaDent Group International. Using a third- party adapter may result in the internal parts being damaged, causing malfunction or fire. -
Page 13: Cleaning And Maintenance
Cleaning and Maintenance 7) If you use an adapter that is not supplied by DiaDent, the buzzer sound may occur while in use. In this case, please disconnect the adapter immediately from the charger and use the recommended adapter (provided by DiaDent) to prevent malfunction and failure of the charger. -
Page 14: Disposal
Disposal Item Codes 4) Light Protector - Remove the Light Protector from the hand-piece. - Wipe the surface of the Light Protector with soft cloth moistened with a pH neutral surface cleansing solution. CAUTION Potential electromagnetic waves or the effects of other medical devices used in hospitals may cause the malfunction of the device or adversely affect of other device. -
Page 15: Troubleshooting
Troubleshooting 12. Troubleshooting Suggested here are some common problems you might encounter and how to fix them. For problems not listed here, please contact your dealer or the A/S center of our head office. Problem Solution • Check the connection between the charger and power adapter. 1. -
Page 16: Technical Specification
3) Products returned for warranty coverage should be securely packed with all components and shipped with postage prepaid. DiaDent does not accept shipments sent collect. DiaDent will be responsible for the shipping of the replacement or repaired product. -
Page 17: Symbols
Symbols 15. Symbols Symbol Description Symbol Description Cautions indicate which, if not observed, Solution Direct current could result in damage to the user and/or device. CE certificate: Product conformance with Authorized EU Representative the applicable European Union Directives Manufacturer Manufacture Date Serial No. -
Page 18: Fcc Warning And Emc Information 19~21
■ Hereby, DiaDent Group International declares that our (RE type : D-Lux+ wireless charger) is in compliance with RED 2014/53/EU. The full text of the EU DoC is available at the following... - Page 19 EMC Information EMC (Electromagnetic Compatibility) Information Basic EMC Phenomenon Port tested Test level/requirement standard or testmethod Mains terminal EN 55011:2016+A1:2017 AC Mains Group1, Class A disturbance voltage CISPR11:2015+A1:2016 EN 55011:2016+A1:2017 Radiated disturbance Enclosure Group1, Class A CISPR11:2015+A1:2016 Harmonic Current EN 61000-3-2:2014 AC Mains Class A Emission...
-
Page 20: Contact Information
EMC Information EMC (Electromagnetic Compatibility) Information Basic EMC Phenomenon Port tested Test level/requirement standard or testmethod Power Frequency EN 61000-4-11:2004 30 A/m Magnetic Field Enclosure IEC 61000-4-11:2004 50 Hz & 60 Hz Immunity 0 % U : 0.5 cycle At 0°,45°,90°,135°,180° 225°,270°and 315°...
Need help?
Do you have a question about the D.LUX+ and is the answer not in the manual?
Questions and answers