
Subscribe to Our Youtube Channel
Related Manuals for DiaDent Dia-Gun


Summary of Contents for DiaDent Dia-Gun
- Page 1 INSTRUCTION M A N U A L Copyright 2009 DiaDent Group International www.diadent.co.kr www.diagun.co.kr...
- Page 2 Page...
-
Page 3: Table Of Contents
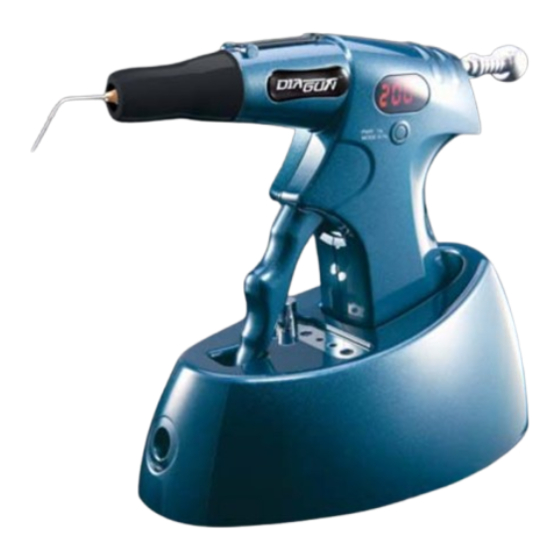
Table of Contents 1. Introduction 2. Safety Instructions 3. Package Contents 4. Product Features - Handpiece - Charger 5. Operation - Charging - Inserting the gun tip - Loading the pellet - Powering On - Placing the safety cap - Obturating - Powering Off 6. - Page 4 Dia-Gun. Dia-Gun offers fast and easy obturation delivery. With this effective obturation system and technique, optimum results are achieved. The high-performance Dia-Gun device has the following features: Wireless and Compact Design allows complete freedom of movement Reliable Gutta Percha Filling to the desired level without delay...
-
Page 5: Handpiece - Charger
Before removing the device from the box, check it against the items described below to make sure you have everything. If any item is missing or damaged, contact your sales representative. Handpiece Charger Safety Caps Plunger Set O-rings Power Adapter & Cord Disposable Gun Tips (23G) Multipurpose Wrench Gutta Percha Obturator (100ea) - Page 7 I. Rechargeable Battery Pack : Inside handpiece. J. Reset Switch : Before using the handpiece of Dia-Gun for the first time, you must press the Reset Switch that is located at the bottom of the handpiece once. When the handpiece is off, its display is blank.
- Page 8 Caution 1. Before using the handpiece, check that charging is complete and the handpiece is ready for use. 2. Check that the disposable gun tips and heat chamber are clean and undamaged before each use. 3. As plunger is completely inserted, do not force to pull trigger which may result in device damage.
- Page 9 CHARGER A. Charge handpiece battery pack when handpiece is placed in the charger and the charger is plugged in. B. Flashes Red when the battery pack is discharged. When the battery pack needs to be re- charged and when battery power is below 20%, Lo. is indicated on the handpiece display. Place the handpiece in the charger as soon as this happens.
-
Page 11: Charging
D. Powering On - Before using the handpiece of Dia-Gun for the first time, you must press the “ Reset” switch that is located at the bottom of the handpiece once. - Press the power button for one (1) second to turn the device on. -
Page 12: Powering Off
- Increase the preset temperature of Dia-Gun, so Gutta Percha Obturator is heated. - Using Dia-Gun s tip, make contact with the upper part of Gutta Percha Point that is already filled in the root canal, transfer heat for 3 to 5 seconds. -
Page 13: Cleaning The Charger
A. Cleaning the charger - Remove the handpiece from the charger. Disconnect the charger from the power adapter and power supply. Clean the outer surface of the charger by wiping with a soft cloth dampened with pH neutral surface disinfection solution or alcohol. - Do not submerge the charger in disinfection liquids of any kind. -
Page 14: Warranty
C. To obtain warranty coverage and to return the device to the manufacturer s service facility, please contact your sales representative. Products returned for warranty coverage should be securely packed and shipped with postage prepaid. DiaDent does not accept shipments sent collect. Manufacturer will be responsible for shipping the repaired or replacement product to you. - Page 15 Problem Action Device will not operate Check charger and power adapter for proper operation and connection Charge the battery pack as soon as possible Check the plug socket Check to ensure Reset switch is on. Handpiece does not work Check battery pack is fully charged before use Replace damaged Gun tips Check charger and power adapter Replace the battery pack...
- Page 16 Product Name Dia-Gun Classification Class II (AC/DC Adapter) Setting Temperature 160, 180, 200 C Charging time Approx. 2 hrs 30 min Operation time per full charge 20 times per four and half (4.5) min Handpiece 180 x 124 x 33mm(W x H x D)
- Page 17 DiaDent Group International (Korea & International) 19-9 Songjung-Dong Heungduk-Gu Cheongju-si Choongchong Buk Do, Rep. Of Korea Tel:82-43-266-2315 Fax:82-43-262-8658 E-mail:diadent@chollian.net DiaDent Group International Inc. (Canada & USA) 11-3871 North Fraser Way, Burnaby B.C, Canada V5J 5G6 Tel:1-604-451-8851 Fax:1-604-451-8865 E-mail:diadent@diadent.com www.diadent.com DiaDent Europe B.V (Europe)
Need help?
Do you have a question about the Dia-Gun and is the answer not in the manual?
Questions and answers