Table of Contents
Advertisement
Quick Links
Advertisement
Table of Contents

Subscribe to Our Youtube Channel
Related Manuals for Cumberland Expert-32P


Summary of Contents for Cumberland Expert-32P
- Page 1 Temperature Controller Expert-32P USER'S MANUAL...
-
Page 2: Table Of Contents
Curtain: based on the static pressure .......... 44 VENT DOORS ................51 AIR INLET CONTROL ..............56 CLOCK OUTPUTS ..............57 ALARM SETTINGS..............59 MONITORING FUNCTIONS ............64 CLEAN MODE ................66 TEST MODE ................68 TECHNICAL SPECIFICATIONS ............ 69 FACTORY SETTINGS ..............70 Expert-32P rev.11... -
Page 3: Precautions
DO NOT SPRAY WATER ON THE CONTROLLER FOR CUSTOMER USE Enter the serial number located on the side of the controller below for future reference. Model number: Expert-32P Serial number: Expert-32P rev.11... -
Page 4: Features
2 clock outputs can be connected to the controller. Fan stages can be configured to activate cooling systems in timer mode. In all, the Expert-32P provides up to 32 relay outputs. In addition, if vent doors are not used, up to 12 PF-6 air inlet controllers can be connected to the unit. - Page 5 CONTROL OF AIR INLET MOVEMENT If the Expert-32P is used in combination with one or more PF-6 control- lers, the movement of air inlets can be coordinated with the operation of the fans using a potentiometer located on the panel drive. This allows the air inlets to be adjusted correctly, without the influence of uncontrol- lable factors such as wind or air from adjoining rooms.
- Page 6 The controller can be connected to a computer, thus making it possible to centralize the management of information and diversify control strate- gies. TEST MODE A test mode allows you to simulate temperature changes and verify controller performance, as well as manually activate each output sequen- tially. Expert-32P rev.11...
-
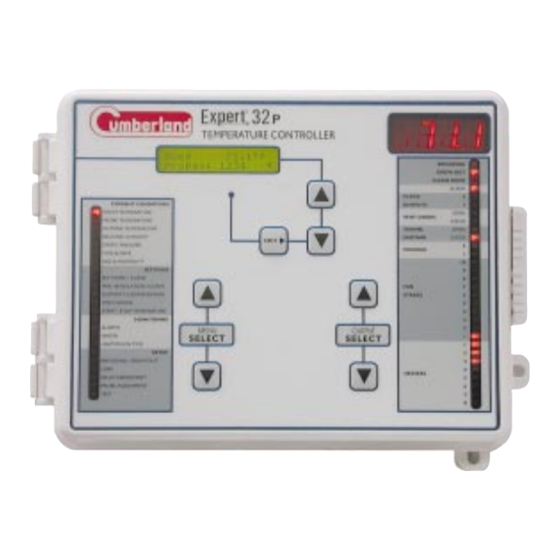
Page 7: Location Of The Controls
LOCATION OF THE CONTROLS Expert-32P rev.11... - Page 8 When the LED is turned on, the output is acti- vated; when the LED is turned off, the output is deactivated. In the case of the fan stages, a flashing LED indicates that the activation of the fan stage is delayed by the opening of the curtain. Expert-32P rev.11...
-
Page 9: Installation
+80,',7< 352%( ALL WIRING MUST BE DONE BY AN AUTHORIZED ELECTRI- CIAN AND MUST COMPLY WITH APPLICABLE CODES, LAWS AND REGULATIONS. BE SURE POWER IS OFF BEFORE DOING ANY WIRING TO AVOID ELECTRICAL SHOCKS AND WARNING EQUIPMENT DAMAGE. Expert-32P rev.11... - Page 10 ONE PAIR ONE PAIR RELAY PANELS Use a shielded cable with two twisted pairs. Connect the shielding to the SH terminal. Use one pair for terminals 1 and 4 and the other pair for terminals 2 and 3. Expert-32P rev.11...
- Page 11 For an alarm of the second type, use the NO terminal. 4. COMMUNICATION HOOKUP If PF-6 air inlet controllers are connected to the Expert-32P, use id numbers within the range 3-15. Id numbers 1 and 2 are reserved for the Expert-32P and the relay panel.
-
Page 12: Controller Setup
Press the Edit key once again to turn the display backlight on or off. Note that the backlight is automatically turned off after 15 minutes of inactivity even if it is turned on. It is turned on again when a key is pressed. Expert-32P rev.11... - Page 13 YES if a water meter is con- meter? nected to the unit. 9. Use Outside Temperature Probe: Use Out T Press the Edit key and set to YES if an sensor? outside temperature sensor is used. Expert-32P rev.11...
- Page 14 Press the Edit key once again to adjust the number of fan stages. 18. Number of Cooling and Clock Outputs: #Cooling Press the Edit key to adjust the number #Clocks of cooling outputs used. Press the Edit Expert-32P rev.11...
- Page 15 24. Brooding / Grow Out Setup: Press Grow out? the Edit key to enable or disable a brood- ing /grow out setup. Use Night 25. Day/Night Set Points: Press the Settings? Edit key to enable or disable separate day and night set points. Expert-32P rev.11...
- Page 16 Press the Edit key to step to the next number. Use the arrow keys to enter the second number, etc. 25. Program Version Number : The pro- Expert 32P gram version number of the controller is displayed. Expert-32P rev.11...
-
Page 17: Relay Assignments
Use the up- and down-arrow keys to step through all the display screens for a given output. The last display screen for all outputs is the relay assignment. Relay Assignments: The Expert-32P Relays 1-8 can control up to 32 output relays. - Page 18 Fan 1 Fan 2 Fan 3 Fan 4 Fan 5 Fan 6 Fan 7 Fan 8 Fan 9 Fan 10 Cool 1 Cool 2 Vent Doors Open Vent Doors Close Tunnel Open Tunnel Close Clock 1 Clock 2 Expert-32P rev.11...
- Page 19 Fan 5 Fan 6 Fan 7 Fan 8 ON ON Fan 9 TIMER Fan 10 TIMER Cool 1 Cool 2 Vent Doors Open Vent Doors Close Tunnel Open Tunnel Close Clock 1 ON ON Clock 2 ON ON Expert-32P rev.11...
-
Page 20: Probe Assignments
Heater 8 Probes to select a heater stage. The probes 123456 assigned to the heater appear flashing on the display. Press the Edit key and use the arrow keys to enable or disable each probe individually for the heater. Expert-32P rev.11... -
Page 21: Temperature Settings
Keep pressing the down-arrow key to display the minimum and maxi- mum temperature values for the previous six days. Use the up-arrow key to return to the previous display screens. Expert-32P rev.11... - Page 22 Once all probes have been displayed, the display shows recorded minimum and maximum probe temperatures for the previous six days. Use the up-arrow key to return to the previous display screens. Expert-32P rev.11...
- Page 23 Keep pressing the down-arrow key to display the minimum and maximum temperature values for the previous six days. Use the up- arrow key to return to the previous display screens. Expert-32P rev.11...
-
Page 24: Temperature Set Points
Press the Edit key. The night set point flashes on the display. Use the arrow keys to adjust the night set point to the desired value. Press the down-arrow key. The Use night time at which the night set point setp at 12:00A comes into effect is displayed. Expert-32P rev.11... - Page 25 Press the Edit key. The hours value flashes. Use the arrow keys to set the hours. Press the Edit key once again. The minutes value flashes. Use the arrow keys to set the minutes. Expert-32P rev.11...
-
Page 26: Temperature Curve
Certain restrictions apply to reduce the risk of errors: - The highest possible day number is 250. - Decreasing day numbers are not allowed. - Increasing temperatures are not allowed. Expert-32P rev.11... - Page 27 The current temperature set point is displayed, as well as the on/off state of the temperature curve. Press the Edit key once or twice until the on/off state of the curve flashes. Use the arrow keys to activate or deactivate the temperature curve. Expert-32P rev.11...
-
Page 28: Time And Date
Press the Edit key. The year flashes. Use the arrow keys to set the year. Press the Edit key. The month flashes. Use the arrow keys to set the month. Press the Edit key. The day flashes. Use the arrow keys to set the day. Press Edit once again to validate. Expert-32P rev.11... -
Page 29: Minimum Ventilation
ON TIME CYCLE TIME Minimum ventilation can also be controlled over time using a curve (see below). Note that the minimum ventilation curve must be turned off to adjust the minimum ventilation settings. Expert-32P rev.11... - Page 30 Press the down-arrow key. The night on time is displayed. Night on time 1m30 Press the Edit key. The night-time on time minutes flash on the display. Use the arrow keys to adjust the night on time minutes to the desired value. Expert-32P rev.11...
-
Page 31: Minimum Ventilation Curve
Press the down-arrow key to display and adjust the other points of the curve. NOTE: All ten points of the curve must be specified. If you don't need ten different points, repeat the step for each unnecessary point of the curve. Expert-32P rev.11... - Page 32 Set the function to AGE using the menu select buttons. The current herd age is displayed. Press the Edit key. The age value flashes on the display. Use the arrow keys to set the age to the desired value. Expert-32P rev.11...
-
Page 33: Humidity Control
HUMIDITY CONTROL If a humidity probe is connected to the controller, the Expert-32P offers two mechanisms for controlling humidity. The humidity level can be decreased by increasing the fans’ running time (or the fan speed) within the minimum ventilation cycles. If the humidity level is too high, the mist units (fan stages with timer-based relays and the mist cooling stages) can be stopped to avoid increasing the humidity level any further. - Page 34 Set the function to HUMIDITY COMPENSATION using the menu select buttons. The humidity level above which the compensation starts (RH Set point) is displayed, as well as the on time increment. Expert-32P rev.11...
- Page 35 The mist shut-off parameter is 90%RH displayed. Press the Edit key. The humidity level above which mist units stop operating flashes on the display. Use the arrow keys to adjust it to the desired value. Expert-32P rev.11...
-
Page 36: Heater Settings
HEATER SETTINGS The Expert-32P has eight independent heater stages. A start and stop temperature is defined by the user for each stage. The stop tempera- ture must be at least 0.5°F greater than the start temperature for a given heater. Start temperatures can be up to 14.5°F greater than the set point. - Page 37 Press Edit key. The start temperature flashes. Use the arrow keys to adjust the start temperature to the desired value. Press Edit key. The stop temperature flashes. Use the arrow keys to adjust the stop temperature to the desired value. Expert-32P rev.11...
-
Page 38: Fan Settings
FAN SETTINGS The Expert-32P controls up to 10 on-off fan stages. These stages operate in a sequence to increase the level of ventilation as the room temperature rises. The user defines a start and stop temperature for each stage. When the room temperature reaches the start temperature, the stage is activated. - Page 39 Press the Edit key. The start temperature flashes. Use the arrow keys to adjust the start temperature to the desired value. Press the Edit key. The stop temperature flashes. Use the arrow keys to adjust the stop temperature to the desired value. Expert-32P rev.11...
- Page 40 Use the arrow keys to adjust the minutes to the desired value. Press the Edit key. The off time seconds value flashes on the display. Use the arrow keys to adjust the seconds to the desired value. Expert-32P rev.11...
-
Page 41: Cooling
COOLING The Expert-32P has two cooling stages used to control mist units. Unlike the fan stages, the cooling stages are independent of one another and can be activated at any temperature level above the set point. The following diagram describes cooling operation:... - Page 42 Press the Edit key. The on time minutes value flashes on the display. Use the arrow keys to adjust the minutes to the desired value. Press the Edit key. The on time seconds value flashes on the display. Use the arrow keys to adjust the seconds to the desired value. Expert-32P rev.11...
-
Page 43: Tunnel Ventilation
THE CURTAIN OPENS DURING STAGE B’S DURING STAGE B’S OPENING TIME OPENING TIME FAN STAGE B THE CURTAIN STARTS OPENING THEN THE FANS OF STAGE A TURN ON FANS OF STAGE A TURN OFF FAN STAGE A ROOM T° Expert-32P rev.11... -
Page 44: Curtain: Based On The Static Pressure
When the static pressure level exceeds the high pressure set point, the curtain opens during the Open Time then stays still during the Off Time . This process is repeated up until the static pressure level goes back to the desired Expert-32P rev.11... - Page 45 This pre-opening is executed when the controller enters in tunnel ventilation mode. *If the outside temperature probe is not used, the controller permanently uses winter's Hi and Lo set points. Expert-32P rev.11...
- Page 46 Set the function to START/STOP TEMPERATURE using the menu se- lect buttons. The start and stop temperatures for Heater 8 are dis- played and the Heater 8 LED on the right flashes. Expert-32P rev.11...
- Page 47 This value is adjusted for each tunnel stage to control static pres- sure changes between tunnel stages*. When the temperature reaches the If you do not want to control static pressure in this way, set the first and fully opened tunnel stages to the same value. Expert-32P rev.11...
- Page 48 Lo and Hi set points can be defined. The set points can be adjusted from 0 to 0.4 inches of water. Set the function to START/STOP TEMPERATURE using the menu select buttons. The start and stop temperatures for Heater 8 are displayed and the Heater 8 LED on the right flashes. Expert-32P rev.11...
- Page 49 The start and stop temperatures for Heater 8 are displayed and the Heater 8 LED on the right flashes. Use the output select buttons to select TUNNEL CURTAIN – OPEN. The corresponding LED on the right of the front panel flashes. Expert-32P rev.11...
- Page 50 Note that this menu only appears if the curtain is controlled by the static pressure level (see Controller Setup). Press the Edit key then use the arrow keys to adjust the tunnel curtain's pre-opening time to the desired value. Press Edit to validate. Expert-32P rev.11...
-
Page 51: Vent Doors
Keep pressing the down-arrow key to display the minimum and maxi- mum pressure values for the past six days. Use the up-arrow key to return to the previous display screens. Expert-32P rev.11... - Page 52 (as defined above). Like- wise, when the outside temperature increases above summer's tempera- ture set point, the controller start using summer's pressure settings (as defined above). The seasonal set points can be adjusted from –40 to 100ºF (-40 to 37.8ºC). Expert-32P rev.11...
- Page 53 Winter's high and low pressure set points are displayed. Press the down-arrow key to select Wind delay: 15 sec the wind delay display. Press the Edit key. The delay flashes on the display. Use the arrow keys to adjust it to the desired value. Expert-32P rev.11...
- Page 54 Press the down-arrow key to select Close vent door the "Close vent door at stage" at stage: menu. Press the Edit key. The stage level flashes on the display. Use the arrow keys to adjust the stage level to the desired value. Expert-32P rev.11...
- Page 55 Press the down-arrow key to select Pressure alarm the "static pressure alarm delay" Delay: 300sec menu. Press the Edit key. The alarm delay flashes on the display. Use the arrow keys to adjust the delay to the desired value. Expert-32P rev.11...
-
Page 56: Air Inlet Control
Each PF-6 module must have its own identification number in order to communicate with the Expert-32P main control. Since ID # 1-2 are reserved, start with ID #3 and set the identification numbers as follows:... -
Page 57: Clock Outputs
CLOCK OUTPUTS The Expert-32P has two timers for controlling various devices using the real-time clock. Each timer has 24 cycles defined using start and stop times or start and running times. Start Time / Stop Time Definition: Stop Time = 9:30... - Page 58 Press the Edit key once, and then the down-arrow key to step to the next clock output, etc. Expert-32P rev.11...
-
Page 59: Alarm Settings
Note that an alarm condition must remain active at least 30 seconds to be considered as an alarm. Note that in the case of an active alarm, the alarm output remains activated even if the alarm is acknowledged. Expert-32P rev.11... - Page 60 A third parameter, called the critical temperature, is defined to continue monitoring the indoor temperature for high temperatures. When the indoor temperature reaches the critical high temperature (defined as an absolute value), an alarm is set off. Expert-32P rev.11...
- Page 61 (see Static Pressure Control). Note that static pressure alarms can only be detected when tunnel curtains are at rest. The Expert-32P also detects water spills by monitoring water consumption levels. Viewing and Acknowledging Alarms Set the function to ALARM using T°...
- Page 62 Adjusting Low and High Alarm Pressures Set the function to START/STOP TEMPERATURE using the menu select buttons. The start and stop temperatures for Heater 8 are displayed and the Heater 8 LED on the right flashes. Expert-32P rev.11...
- Page 63 Press down-arrow key four times. Water Spill The maximum water consumption Limit: 10Gal is displayed. Press Edit key. The maximum water consumption flashes. Use the arrow keys to adjust the water consumption to the desired value. Expert-32P rev.11...
-
Page 64: Monitoring Functions
Use the up-arrow key to return to the previous display screens. HEATER RUN TIMES The Expert-32P monitors heater run times on each heater for the current day and the previous six days. Set the function to HEATER RUN... - Page 65 Press the down-arrow key. The number of new animal deaths is displayed. Press the Edit key. The number of new animal deaths flashes on the display. Use the arrow keys to adjust the new animals deaths to the desired value. Expert-32P rev.11...
-
Page 66: Clean Mode
Set the function to START/STOP TEMPERATURE using the menu select buttons. The start and stop temperatures for Heater 8 are displayed and the Heater 8 LED on the right flashes. Use the output select buttons to select ALARM. The corresponding Expert-32P rev.11... - Page 67 Press down-arrow key twice. The empty zones temperature is Empty zones displayed. minimum: 40.0°F Press Edit key. The empty zones temperature flashes. Use the arrow keys to adjust the empty zones temperature to the desired value. Expert-32P rev.11...
-
Page 68: Test Mode
Edit key. The Heater 8 output is activated and «heater 8» flashes on the display. Use the arrow keys to activate individual outputs in turn. To return to normal operations, press the Edit key or select another function. Expert-32P rev.11... -
Page 69: Technical Specifications
Static Pressure Input: 4 TO 20mA current loop Water Meter Pulse Input: Input pulse width > 12ms. Enclosure: ABS, moisture and dust-tight. The room temperature where the controller is located MUST ALWAYS REMAIN BETWEEN 32 AND 104 F (0 AND 40 Expert-32P rev.11... -
Page 70: Factory Settings
D e l a y C l o c k R u n n i n g T i m e 1 5 h : 5 9 m : 5 9 s O u t p u t s Expert-32P rev.11... - Page 71 C l e a n M o d e E m p t y Z o n e s S e t P o i n t ( 2 3 . 9 ° C ) ( - 4 0 t o 3 7 . 8 Expert-32P rev.11...
- Page 72 Fan 5 Fan 6 Fan 7 Fan 8 Fan 9 Fan 10 Cool 1 Cool 2 V ent Doors O pen V ent Doors C lose T unnel O pen T unnel C lose Clock 1 Clock 2 Expert-32P rev.11...
- Page 73 Fan 3 Fan 4 Fan 5 Fan 6 Fan 7 Fan 8 Fan 9 Fan 10 Cool 1 Cool 2 V ent Doors Open V ent Doors Close T unnel Open T unnel Close Clock 1 Clock 2 Expert-32P rev.11...
- Page 76 M 890-00073 rev. 11 REV. 01...
Need help?
Do you have a question about the Expert-32P and is the answer not in the manual?
Questions and answers