Table of Contents
Advertisement
Advertisement
Table of Contents

Related Manuals for Showlite DMX Master Pro USB


Summary of Contents for Showlite DMX Master Pro USB
- Page 1 DMX Master Pro USB Operators manual 00028353 Version 04-2012...
-
Page 2: Table Of Contents
Contents 1 Features........................1 2.General Instructions……………………………………………………………………..……..2 3. Panel description…………………………………………………………………………..3 3.1. Front view instruction……………………………………………………………………..3 3.2.Back Side View………………………………………………………………………...…..6 4. Operation Guide…………………………………………………………………………….….7 4.1 Program Enable……………………………………………………………………...….…7 4.2 Programming Scenes…………………………………………………………………..…7 4.2.1 Scene Editing………………………………………………………………………..9 4.2.2 Scene Copy……………………………………………………………………...…10 4.2.3 Delete a Scene……………………………………………………………..…..….10 4.2.4 Delete all Scenes………………………………………………………………..…11 4.2.5 Bank Copy……………………………………………………………………..…11 4.2.6 Lamps Copy………………………………………………………………….…….12 4.3 Programming Edit…………………………………………………………………….…..12 4.3.1 Program a bank of scenes into a Program…………………….……………..…12... -
Page 3: Features
Contents 4.8.2 Reading the USB-Stick data by USB….………………………………..………23 4.8.3 Software promotion by USB………………………………………………..……23 4.9 RMD operration……………………………………………………………………….…24 4.10 Set off Operation………………………………………………………………….……26 1. Features 1. 192 DMX512 channels.DMX512 standard singal output 2. Controlled 12 lights,each light 16 channels. 3. 30 banks of 8 programmable scenes 4. -
Page 4: General Instructions
2. General instruction Please read the user manual carefully, as it includes important information regarding details of operation, maintenance, and technical data. Keep this manual with the unit for future consult WARNINGS DO NOT make any inflammable liquids, water or metal objects enter the unit. Should any liquid be spilled on the unit, DISCONNECT the power supply to the unit immediately. -
Page 5: Panel Description
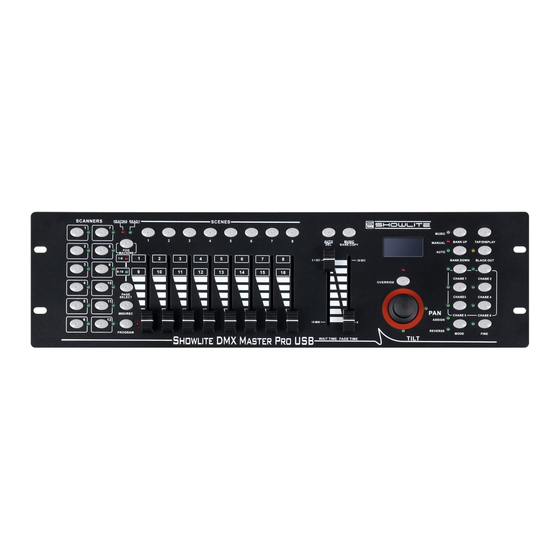
3.Panel description 3.1. Front view instruction 1. Scanner Buttons (1-12) 12 scanners of 16 DMX channels & fader control: Scanners DMX channels Fader control 1-16 On/Off On/Off 17-32 On/Off On/Off 33-48 On/Off On/Off 49-64 On/Off On/Off 65-80 On/Off On/Off 81-96 On/Off On/Off 97-112... - Page 6 Scene Buttons Press the scene buttons to load or stored your scenes. There are a maximum of 240 programmable scenes. Faders These faders are used to control the intensity of channel 1-8 or channel 9-16 depending upon the selected page. Page Select Button Used to select page between Page A(1-8) and Page B(9-16).
-
Page 7: Back Side View
15. Bank Up/Down Press the Up/Down button to select from 30 banks 16. Tap/Display Used to create a standard beat or to change the value mode between 0-255. 17. Blackout Tap to momentarily pause whole output.hold on this button enter Stand alone 18.Chase Buttons(1-6) These buttons are used for activating the chase of programmed scenes. -
Page 8: Operation Guide
3. Fog machine diagram 4. Operation Guide General: This unit allows you to program 12 scanners of 16 DMX channels, 30 banks of 8 programmable scenes, 6 chases of 240 programmed scenes using 8 faders and other function buttons. Data will be dumped on U disk and software promotion by USB port ,also has RDX function ,remote DMX address. -
Page 9: Program Enable
4.1 Program Enable Press the Program button for three seconds to activate Program mode, the LED near to this button lights indicating Program in active. 4.2 Programming Scenes 1. Enter Program mode 2. Press the Scanner button to turn on its fader control 1-12, which is indicated by the lit LED 3. -
Page 10: Scene Editing
EXAMPLE: Program 8 scenes with channel 1-8 at full in sequence into bank 3 and assign these scenes to scanner 1. 1. Program enable; 2. Tap the Scanner 1 button to turn on its fader control; 3. Change the DMX 1-8 or 9-16 channel by PAGE button, and push the scene effect; 4. -
Page 11: Scene Copy
4.2.2 Scene copy Program enable; 2. Tap the Bank Up/Down button to select the bank that contains the scene you wish to edit; 3. Select the scene you want to copy; 4. Tap the Bank Up/Down button to select the bank that contains the scene you wish to copy;... -
Page 12: Delete All Scenes
4. LEDS will flicker ,delete finished. 4.2.4 Delete a scene This should be reset the controller again. 1. Turn off the power; 2. With the power off, press and hold down the Auto/Del and Bank Down buttons at the same time,about 2 seconds ,all the leds will flicker;... -
Page 13: Lamps Copy
Lamps copy 4.2.6 Copy one present lamps manual effect to another Press the copy SCANNER button; Tap the copy SCANNER button again,2 lamps the output effect are the same . 4.3 Editing program Just can edit the program after edit the scene,because program can use 30 scene of the bank,each edit can edit 240 steps at most . - Page 14 3. Select the bank by BANK UP/DOWN; 4. Tap MUSIC/BANK to copy; Tap MID/REC button,all the leds flicker ;8 scenes add to program (if the bank is empty for scene ,otherwise will not ); 4.3.2 Add one step to the program 1.
-
Page 15: Delete A Program
8. Tap the MIDI/REC button,all the leds flicker means the scene add to the program. TIPS: If you want to insert one step between 3 and Switch to the 3 step by BANK UP/DOWN ,press MIDI/REC button ,LED display ‘’STEP 004’’; Notice: Press Tap button ,change LED display mode (BANK mode and Step mode ). -
Page 16: Delete All The Program
4-3.5 Delete all the program. Need to reset the controller. 1.Turn off the power; 2. Press and hold on the AUTO/DEL and BANK DOWN at the same time,turn on the power ,after about 2 seconds all the LEDS flicker; 3. All the LEDS stop to flicker , all the program delete. 4.4 Channel assign and reverse Press Mode and Fine button at the same time can switch assign and revise mode... -
Page 17: Reverse Dmx Channel
Page select channel located page (PAGE A/B); 7. Press and hold on Mode button firstly,then tap the relevant assign SCENE BUTTON 1-8 button,all the indicating flicker ,assign succeed,(this time SCENE 1 BUTTON correspond DMX channel 1 ,SCENE 2 button correspond DMX channel 2 ,and so on ); Repeat operate step 3-7,assign other SCANNER ,under channel 8 mode ,12 lights can assign 48 DMX channel at most ;under channel 16 mode ,12 lights can assign 24... - Page 18 7. Press and hold on Mode button firstly,then tap the relevant assign SCENE BUTTON 1-8 button, all the indicating flicker ,assign succeed,(this time SCENE 1 BUTTON correspond DMX channel 1 ,SCENE 2 button correspond DMX channel 2 ,and so on ); 8.
- Page 19 1.Turn off the power ; 2. Press and hold on AUTO and MODE ; 3. LEDS indicating stop flicker,controller will be auto reset up ,all the assign and reverse will be deleted. 4.4.6 Examine the assign and reverse 1. Press and hold on MODE and FINE ,enter to examine reverse mode;...
- Page 20 4.5 Operate scene 4.5.1 AUTO mode 1. Controller opened will enter Manual condition every time; 2. MANUAL CONDITION indicating light on; 3.Tap BANK UP/DOWN button ,select the bank which the scene located; 4. Tap SCENE 1-8 ,open the scene. 4.5.2 AUTO mode Under AUTO mode ,the scene of the bank will circular flow in turn.
-
Page 21: Manual Mode
1.Tap the MUSIC /BANK COPY button,Music indicating light on enter music mode ; 2. If need to adjust sensitivity of voice control ,can press and hold on:MUSIC/BANK COPY (LCD display voice sensitivity pencentage ); 3. Use FADE TIME pusher to glide time of edit scene; 4. - Page 22 4. Indicating light flicker at the program present,at this time ,adjust the times of cycling (at most 20 times )by BANK UP/DOWN ; 5.Tap the AUTO/DEL button ,AUTO indicating light off,back to the AUTO mode. 4.6.3 Voice mode Tap MUSIC/BANK COPY button, MUSIC indicating light on, enter voice mode;...
- Page 23 2. Set up the address of the MIDI by BANK UP/DOWN; 3.Press and hold on MIDI /REC button,save seting up saved and exit . 4.7.2 MIDI form This unit receives Note On signals, which enables to run 15 banks(01-15) of scenes and 6 chases of scenes.
- Page 24 2. 12 piece button of the SCANNER indicating light on ,means U disk relevant file; Tap the button which needed to save file on the U disk; LCD display the seledted file and the plan; File 6 ||||||| 5. If succeed ,LCD will display FILE SAVE OK (failed will display WRITE FAIL) and AUTO exit . Notice: If don not connect USB-Stick ,LCD will display “NO USB DISK ”,Read ,write on the USB-Stick and disk software development ,please don not turn off the power or insert,move the...
- Page 25 disk (PRO1612J please put the file to pro-1612j , PRO1612W please put the file to pro-1612w ). 1. Put the U disk to USB mouth; 2. Press and hold on scanner1,scanner2 and scene3,turn on the power at the same time ,LCD display,’’...
- Page 26 rotate the rolling wheels; 6. Adjust the new DMX address by BANK UP/DOWN button, or directly tap SCANNER BUTTONS 1-12 and PAGE button AUTO join the DMX address; DMX and SCANNER button: SCANNER DMX 地址 地址 地址 地址 BUTTONS PAGE A/B 1-12 PAGE A DMX001...
- Page 27 DMX033 PAGE A SCANNER 3 PAGE B DMX041 DMX049 PAGE A SCANNER 4 PAGE B DMX057 DMX065 PAGE A SCANNER 5 PAGE B DMX073 DMX081 PAGE A SCANNER 6 PAGE B DMX089 PAGE A DMX097 SCANNER 7 PAGE B DMX105 PAGE A DMX113 SCANNER 8...
- Page 28 RUN SAVE, enter operation condition; RUN SAVE Tap the TAP button, select YES or NO; 3. At this time press and hold on BLACK OUT button ,will not save and exit; 4. Press and hold on AUTO SCENE8 at the same time ,all the LEDs flicker , means setting up succeed.
- Page 29 tell me .Welcome to feedback to us from our website or suppliers les us make the product more perfect. Power Input ........…….DC 9V, 300 mA min. DMX output ...........3 pin male XLR USB …………..............USB-A MIDI Signal ........5 pin standard interface Audio Input ......By built-in microphone or line in Dimensions ..........
Need help?
Do you have a question about the DMX Master Pro USB and is the answer not in the manual?
Questions and answers