
Subscribe to Our Youtube Channel
Related Manuals for WINCODE LP433A


Summary of Contents for WINCODE LP433A
- Page 1 LP423A / LP433A USER MANUAL User Manual:LP4 series Issue Date:2016/11/14 Version 2.0...
- Page 2 The content of this manual is subject to change without prior notice and cannot be altered without written permission obtained from Wincode Technology Co., Ltd (hereinafter referred to as “Wincode”). No part of this manual may be reproduced or transmitted in any form by any means. This manual includes the installation instruction and detailed description of possible questions in the operation.
- Page 3 6. The print head is a thermal part, please do not touch it or its peripherals during printing or after printing. 7. Shut down the printer when connecting or disconnecting interfaces to avoid any damage happened. 8. Please choose designated adapter model of Wincode to connect printer accordingly. - 3 -...
-
Page 4: Table Of Contents
LP4 USER MANUAL Contents Product Introduction....................- 6 - Getting Started ......................- 7 - 2.1 Unpacking and checking................... - 7 - 2.2 Appearance ....................... - 8 - Setup ........................- 10 - 3.1 Setting up the printer ..................- 10 - Ribbon Loading ...................... - Page 5 LP4 USER MANUAL Standalone printing ....................- 42 - 8.1. Feature ......................- 42 - 8.2. Application ....................- 43 - 8.3. Hardware notice ..................- 45 - 8.3.1. Equipment Introduction ..............- 45 - 8.3.2. Printer Ports Introduction .............. - 46 - 8.3.3.
-
Page 6: Product Introduction
LP4 USER MANUAL 1. Product Introduction Thank you for purchasing Wincode’s LP4A series label printer, this desktop label printer with reasonable price has reliable quality to provide user highly-efficient printing performance. The LP4 series printer not only can print label in text or graphic formats, but owns basic function and convenient operation interface. -
Page 7: Getting Started
LP4 USER MANUAL 2. Getting Started 2.1 Unpacking and checking Unpacking the package, and refer to the below packing list to check whether any part is damaged or missing in transit. If this incident has been happened, please contact with local dealer or distributor for further assistance. Label Printer CD Disc Quick Installation Guide... -
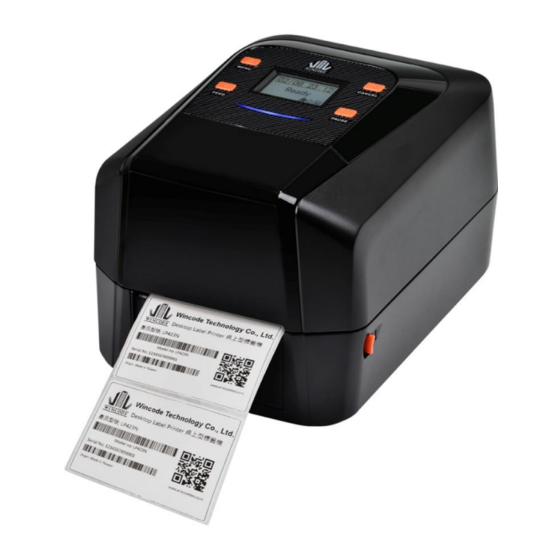
Page 8: Appearance
LP4 USER MANUAL 2.2 Appearance (Figure 1: Front View) (Figure 2: Rear View) - 8 -... - Page 9 LP4 USER MANUAL (Figure 3: Inside View) - 9 -...
-
Page 10: Setup
LP4 USER MANUAL 3. Setup 3.1 Setting up the printer 1.) Place the printer on the flat surface. 2.) Make sure the power switch is OFF. 3.) Choose corresponding cable (RS232 or USB 2.0) to connect printer with computer. 4.) Plug the DC power cord into the power slot and plug the AC power cord into a socket on the wall. -
Page 11: Ribbon Loading
LP4 USER MANUAL 4. Ribbon Loading 1” core (300m length ribbon) Open the ribbon cover and top cover; Install an empty paper core onto the ribbon take-up spindle; Install a ribbon onto the ribbon supply spindle. - 11 -... - Page 12 LP4 USER MANUAL 0.5” core (100m length ribbon) Open the ribbon cover and top cover; load the 0.5” ribbon cap into the right of the top inner cover. - 12 -...
- Page 13 LP4 USER MANUAL Pull back the pressing lever, then load the right side of ribbon first into the ribbon supply mechanism. The left side of ribbon supply spindle needs to be connected with bulge part of left supply mechanism completely (Turn the gear until the bulge part in the notch of spindle).
- Page 14 LP4 USER MANUAL Load the right side of paper core first into the ribbon take-up mechanism. The left side of ribbon take-up spindle needs to be connected with bulge part of take-up mechanism completely. (Turn the gear until the bulge part in the notch of spindle).
- Page 15 LP4 USER MANUAL Pull the ribbon to bypass print head and then attach the ribbon leader on the empty paper core with tapes, then rotate the ribbon rewind wheel until ribbon surface has no wrinkle; Close the ribbon cover to finish ribbon installation. - 15 -...
-
Page 16: Ribbon Installation Path
LP4 USER MANUAL 4.1 Ribbon Installation Path - 16 -... -
Page 17: Label Loading
LP4 USER MANUAL 5. Label Loading 1. Press the label holder button to fit the width of the label, and then place a label roll into the holders. - 17 -... - Page 18 LP4 USER MANUAL 2. Pull the label paper through the rubber roller and push the both sides of label under the label guides. Close the top cover to finish label installation. - 18 -...
-
Page 19: Label Installation Path
LP4 USER MANUAL 5.1 Label installation path - 19 -... -
Page 20: Real Time Clock Battery Installation
1.) Battery is not included in LP423N and LP433N models but is included in LP423A and LP433A models. 2.) For LP423A and LP433A models, an insulating piece is placed with battery to prevent battery consumption and also maintain the lifetime of battery. -
Page 21: Led Indicators And Button Explanation
LP4 USER MANUAL 6. LED indicators and button explanation Button 2 LED 2 Button 1 LED 1 Button 3 Button 4 LED 5 LED status LP4A models has two color LEDs to show the status (red and blue color) and four functional buttons. - Page 22 LP4 USER MANUAL backward Red LED Flash: Refers to all errors, Blue LED Blue LED always on: ready ERROR please see the status on the status LCD screen Blue LED is flash: data transmission - 22 -...
-
Page 23: Lcd Menu Description
LP4 USER MANUAL 6.2 LCD menu description 6.2.1 Menu main framework MENU APPLICATION SETTING DEVICE COMMU. PORT FILE SYSTEM INFORMATION UPGRADE 6.2.2 Application Item Description SD card Need to insert a SD card in the printer firstly, and design the label on the WinLabel and then use“Download”function to download the standalone files to the SD cards PS: Download function will be showed in the “Print”window. -
Page 24: Setting
LP4 USER MANUAL The file in the flash disk will not be deleted if printer turns off the power RAM Disk Design the label on the WinLabel and then use“Download”function to download the standalone files to the RAM Dish of printer. The file in the ram disk will be deleted if printer turns off the power 6.2.3 Setting Item... -
Page 25: Device
LP4 USER MANUAL Contrast: Set up the degree of contrast on the LCD Beep Volume: Adjust the volume of buzzer Emulation Select the emulated printing language WPL-suitable for standalone file only ZPL, EPL, TSPL 6.2.4 Device Item Description Keyboard Keyboard、Scanner connectivity testing status (Suitable for HID... -
Page 26: File System
LP4 USER MANUAL Stop Bits 1 bit (default) or 2 bit RS232 Test When device has been connected, user can transfer the parameters of device to the printer 6.2.6 File System Listing the file details in the SD card or Flash disk or RAM disk 6.2.7 Information Item Description... -
Page 27: Upgrade
LP4 USER MANUAL 6.2.8 Upgrade Place the updated firmware in the WPL_Stuff folder of SD card, and take this SD card inserting to the printer, then use this Upgrade option to click the selected file to confirm the updated procedure. - 27 -... -
Page 28: Winlabel Tool Suite
LP4 USER MANUAL 7. WinLabel tool suite WinLabel tool suit is supported the below platform: Windows XP SP3, Vista, Windows 7, Windows 8, Windows 8.1, Windows10, Server 2003, Server 2008, Server 2012 and Server 2012R2 operation system (32 bit and 64 bit). Note: The monitor resolution needs to have at least 1024 x 768 for normal use. -
Page 29: Software "Winlabel" Installation
LP4 USER MANUAL 7.2 Software “WinLabel” installation Click “WINLABEL_SETUP.EXE” file in the CD disc, and then choose a preferred language (traditional Chinese, simplified Chinese, and English) and input a stored path to finish software installation. 7.3 Driver installation Open WinLabel software and switch the TOOLS page on the upper bar, and then click icon to start driver installation. -
Page 30: Update Settings And Update Check
LP4 USER MANUAL 7.4 Update settings and update check After entering to the WinLabel program, click the “Check for Update” icon in the “TOOLS” page and check if it is the latest version. Then program can be updated automatically. Besides, user can click “Update Settings” icon to adjust update settings (See below figure) - 30 -... -
Page 31: Driver Setup
LP4 USER MANUAL 7.5 Driver Setup 7.5.1 Page Setup Item Description Paper/Layout Name:Choose paper size (4 x 3 inch and 2 x 1 inch); User can also define frequently-used paper size by adding new label format. Directions:Portrait and landscape (rotate 90 degrees); 180 degrees rotation is accepted. - Page 32 LP4 USER MANUAL “Gap Length” is the distance between two labels. “Gap Offset” means label will be moved an offset distance after moving a gap distance (This function is not open). Label with marks: “Black Line” is the thickness in each black line. ...
-
Page 33: Sensor Calibration
LP4 USER MANUAL Sensor Sensor type: settings Use Current Printer Setting (by previous setting) Reflective sensor (Recommend) Transmissive sensor Start Position Offset: (recommend to input number when the printing position has a little bit shift up or shift down) If selected, user can fill up how many dots to adjust the start printing position. -
Page 34: Tools
LP4 USER MANUAL None: The label is stopped after printing last label. Tear off: The label gap is stopped at the tear off position to let user easily tear off label. The tear off position is adjustable as long as ticking “Tear Off Position”... -
Page 35: About:winlabel Driver Version
LP4 USER MANUAL Send to Printer Printer Command: Send commands to the printer, please refer to the Wincode’s Command Manual. Files:Select a command file (*.prn) from the stored space of computer Display Prompt If not ticked, the prompt message will not be showed after Message pressing each button. -
Page 36: Printer Utility
LP4 USER MANUAL 7.6 Printer Utility Item Description Interface port Interface port selection: USB, RS232, LPT (Centronics) Printer While printer has been connected with computer, the program can selection automatically detect printer equipment. Then user can select a printer from a pulldown list. - Page 37 LP4 USER MANUAL Printer Printer Summary Summary Listing printer information Send Command window Sensor and Paper Size Detection Please run the sensor calibration after the label material has been changed Each time of sensor calibration will feed 15 inches long label for usage ...
- Page 38 LP4 USER MANUAL Get Label Size: The detecting value of label size will be showed in the right table Get sensor value: The detecting value of sensors will be showed in the right table Cutter Turning Clockwise: Cutter cuts label from up to down (Fully cut) ...
-
Page 39: Settings Page In The Printer Utility
LP4 USER MANUAL 7.7 Settings page in the Printer Utility Note: This settings page would suggest user for reviewing the current settings in the printer only. Please be noted that if same settings on the driver settings, the printer will use driver’s settings as printing priority. ... - Page 40 LP4 USER MANUAL (After printing) user may use this offset settings. Otherwise, the default is 0) Initial Position Input the required parameters (plus value is feeding more distance; Offset (Before minus value is back feeding more distance) printing) Label Direction Label-out from top or Label-out from bottom Mirror Drawing No effect or mirror reflection (Not available now)
- Page 41 Printer CMD Change printer’s language to be compatible with other printer’s language. After selection, please use “Upload Information” button to change the printer’s language. WPL: Wincode WEPC: EPL (Zebra) WZPC: ZPL (Zebra) WTSPC: TSPL (TSC) Note: Standalone function for advanced model will be only...
-
Page 42: Standalone Printing
LP4 USER MANUAL 8. Standalone printing 8.1. Feature This function provides a standalone operation without use the computer. Eliminating the burden of the PC to complete the requirement to print labels after a simple data input. This function has the following characteristics: ... -
Page 43: Application
LP4 USER MANUAL Provide a string combination from the multiple information (ex. Serial number + data + external input weight…etc.) Provide a variety of dynamic data processing for each variable field (ex. Discard text from left, keep numbers only, to upper case…etc.) ... - Page 44 LP4 USER MANUAL Display the file list when enter the source. User can use keyboard or scanner to search the file name. This is the “keyboard input” standalone operation interface. The black part is the prompt text, it supports multiple language, the input section currently supports English and numbers.
-
Page 45: Hardware Notice
LP4 USER MANUAL 8.3. Hardware notice 8.3.1. Equipment Introduction Equipment Application Label printer: As the reception or internet RS- 232 USB Host interface, so that the operation is no longer using a computer to complete the data collection, and print the label after edit the data. -
Page 46: Printer Ports Introduction
LP4 USER MANUAL 8.3.2. Printer Ports Introduction USB Host: Connecting USB keyboard and scanner RS-232: Connecting USB scanner or other device have RS-232 port 8.3.3. RS-232 pin assignment Define Description Data Carrier Detected Receive Data Transmit Data Data Terminal Ready Signal Ground Data Set Ready Request to Send... -
Page 47: Printer Serial Port With Electronic Scales Pin Assignment
LP4 USER MANUAL 8.3.4. Printer serial port with electronic scales pin assignment Printer Electronic Scale Printer connect to external device is RXD and TXD connect each other and have the same Baud Rate in generally. 8.3.5. Printer serial port with RS-232 scanner pin assignment The scanner power connector The scanner’s serial port... -
Page 48: External Device
LP4 USER MANUAL 8.4. External device Keyboard Numeric keyboard Scanner Counter Length measuring meter Mechanical arm Pricing scale Scale on the ground Table Scale Paint tinting machine Chromatic aberration machine - 48 -... -
Page 49: How To Contact Printer Electronic Scales
LP4 USER MANUAL 8.5. How to contact printer electronic scales Prepare the printer, electronic scale, cable, and null model. The electronic scale connected to printer by cable and null model. - 49 -... - Page 50 LP4 USER MANUAL Enter printer menu, select “COMMU. PORT ” to perform data transmission test. The preset Baud Rate of printer is 115200 bps; electronic scale is 9600 bps. Please change printer baud rate to 9600 bps. This is the information from electronic scales ...
-
Page 51: Operating Procedures
LP4 USER MANUAL 8.5.1. Operating procedures Standalone operating procedures diagram - 51 -... -
Page 52: How To Make A Standalone File
LP4 USER MANUAL 8.5.2. How to make a standalone file Please install the new Winlabel software and driver. Then open Winlabel program. Click the new label, then select a printing method and WLP format. Measure the label size first, and setup in “page setup”. Please note the size of gap and black mark. - Page 53 LP4 USER MANUAL Then appears operating interface. Set up the size of label size Data source list Label design area Object list The variable data, we use in standalone operation will show in the “Data Source”. - 53 -...
- Page 54 LP4 USER MANUAL We demonstrate an external input device example. Click here to add an external source device Click “External Device” and then appear the dialog as below. Prompt Text: It will display on the LCD screen when use standalone operation and can be any language.
- Page 55 LP4 USER MANUAL For example, RS-232data input’s 3.45 kg”, LCD screen display ”Wait Scale”。 Then make typesetting object to take the data source. Object list as below Currently only supports “Single-line Text”, “Barcode”, and”2DBar”. - 55 -...
- Page 56 LP4 USER MANUAL User can produce the object by using functional zone. First select “Single-line Text” - 56 -...
- Page 57 LP4 USER MANUAL Click the object twice to enter the dialog as below. Select “Variable Data” and choose variable to add to data list. Data list can add multiple source as a result of a string of sequential combination. Can generate new sources of information ...
- Page 58 LP4 USER MANUAL Click object twice, enter the dialog as below. Select the item in a “Data List” and then click the “Advanced” button. Click the item first and appear the button beneath the dialog. This is “Advanced Option” dialog as below. We will add two truncation order, respectively “Discard texts from left:4”...
- Page 59 LP4 USER MANUAL Finish setting “Advanced Option” and then see the “Advance settings” list the item. It is easy to use with queries; it will be based on the contents of the source object transformation. Click item and “Advance settings” will automatic replacement content ...
- Page 60 LP4 USER MANUAL Then we make “keyboard input” variable. Enter the string displayed on the LCD screen previously. Prompt text displayed on the LCD screen. Then we make the “serial number” variable. Prompt text displayed on the LCD screen.
- Page 61 LP4 USER MANUAL We make a “Barcode” object, the data source is “keyboard input” and” serial number”. It is “barcode” setting as below. It can combine multiple variable source into a string. It can adjust the item order. Follow the above procedure and finish the below example.
-
Page 62: How To Download The File To The Printer
LP4 USER MANUAL 8.5.3. How to download the file to the printer Click “Print” in the print function. The dialog set forth various information needs to be set, and the way which is downloaded to the printer. This figure is representative of the connection in green Select here will ask the user to input the number... - Page 63 LP4 USER MANUAL File name: set the output file name. There are three types of file name, first is specify the name, second is automatically perform the name after boot up, the last is if the objection have database, you can output files through the database, and as a file name basis.
- Page 64 LP4 USER MANUAL Records: printing information can be saved in the SD card, and the information can be used as Big Data Analysis. Check “Enable record” and select item which you want to be record in the left column “Available Records”.
- Page 65 LP4 USER MANUAL Options: Provide stand-alone execution period will demand function. After printing, no longer return to the file list, it returns to the beginning of this file to continue. Printer Settings: Users can set the printer depend on practical needs. The setting will save in the file.
- Page 66 LP4 USER MANUAL Click the “download” button, it will ask users where the file output to the printer. RAM Disk: Typically used for testing. When the power off, the file will disappear. Flash ROM: The file won’t disappear when the power off. Typically used for small file and no need to use SD card.
- Page 67 LP4 USER MANUAL When the output or download is finished, it will be appeared the below dialog, to let the users know the output file destination information and queries. Searching SD card after processed by the printer. You can find a folder "WPL Stuff", this folder stores all the standalone files where all the stand-alone operation will be listed.
-
Page 68: How To Execute Standalone File
LP4 USER MANUAL 8.5.4. How to execute standalone file The device is ready SD card into the printer Main menu: Check built-in Press menu button, enter clock, USB keyboard, and “APPLICATION”. SD card. Select SD card. Select the file to execute. “Keyboard input”... - Page 69 LP4 USER MANUAL Label copies setting: It will display before the software download the file, select “prompt to enter quantity when print Print results - 69 -...
-
Page 70: Actual Cases Using Standalone Operation
LP4 USER MANUAL 8.6. Actual cases using standalone operation Connect to keyboard: For baking industry, north-south goods… etc. Connect to keyboard and RS-232 scanner: For library complement label, online job labeling… etc. Connect numeric keyboard and electronic scale: For Agriculture, Fisheries and Livestock, Metal manufacturing…etc. -
Page 71: Maintenance
LP4 USER MANUAL 9. Maintenance The followings are some steps and methods to suggest user to proceed simple maintenance on the printer. 1. Turn off the power firstly, and then open the top cover of printer. 2. Take out the ribbon and locate the print head. (If printing process is just finished, user needs to wait print head cooling before proceeding maintenance procedure) 3. -
Page 72: Appendix - Lp4A Series Specification
LP4 USER MANUAL 10. Appendix – LP4A series specification LP423A LP433A Model Printing method Thermal Transfer / Direct Thermal 203 DPI 300 DPI Resolution 127 mm (5”) / second 102 mm (4”) / second Max. print speed 108 mm (4.25”) 110mm (4.32”)
Need help?
Do you have a question about the LP433A and is the answer not in the manual?
Questions and answers