Table of Contents
Advertisement
Quick Links
Advertisement
Table of Contents

Related Manuals for Divesoft LIBERTY HEAVY


Summary of Contents for Divesoft LIBERTY HEAVY
- Page 1 LIBERTY HEAVY MANUAL...
-
Page 2: Table Of Contents
Responsibility of the Liberty Heavy user . . . . . . . . . . . . . . . . . - Page 3 Location of additional equipment . . . . . . . . . . . . . . . . . . . . . . . . . . . . . . . . . . 24 Assembly of the loop and Dive checks .
-
Page 4: Introduction
. A number of systems have multiple backups . The logic of the Liberty Heavy’s control never prohibits the start of a dive even in the event that malfunctions are detected; it only indicates the status if able to do so in light of the damage . -
Page 5: Notice
If you do not accept the risk and you are not a trained, careful and disciplined diver, do not dive with the Liberty Heavy . The manufacturer does not bear any responsibility for use of the Liberty Heavy if the apparatus has been modified in any way that is not stated in this manual or in the technical guidelines issued by the manufacturer. -
Page 6: System Of Documentation
System of documentation Version The technical documentation is subjected to a process of continual development and improvement .Therefore, please regularly check the website at www .CCRLiberty .com updates . Technical guidelines The manufacturer can issue technical guidelines . It is strongly recommended that the user regularly checks www .CCRLiberty .com for new guidelines . -
Page 7: Use
Heavy Liberty Rebreather is a modification of the original Liberty Rebreather . Liberty Heavy retains the complete head of the device including electronics, handsets and all sensors . However, Liberty Heavy requires a different mounting than the classic Liberty . This procedure is included in this manual and assembly checklist . -
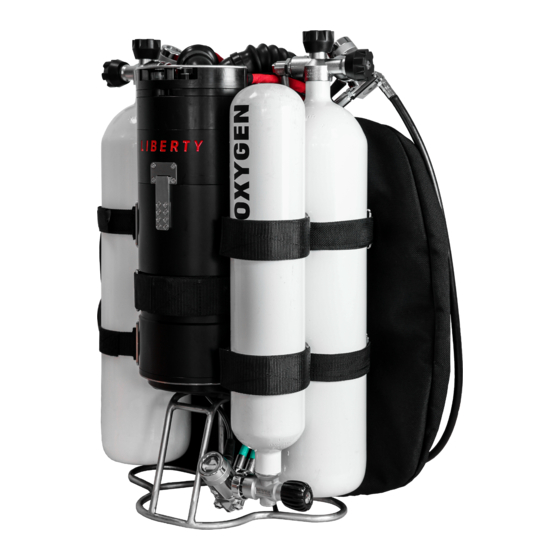
Page 8: Description
. The Liberty Heavy configuration has a 20 l wing in the base, but any other rebreather wing (with holes for hose passages) can be used according to the required volume to your chosen size and number of cylinders . - Page 9 .This version is not a standard part of the conversion kit, and needs to be requested separately . By purchasing the conversion kit to the back unit, Liberty Heavy can be rebuilt to classic CCR Liberty .
-
Page 10: Assembly
Assembly WARNING: ALWAYS USE THE OFFICIAL CHECKLIST OR DIVESOFT.APP TO BUILD LIBERTY HEAVY Android Apple Checklists for CCR Liberty in .pdf format are available at https://www .divesoft .com/en/products/ccr-liberty/documents... -
Page 11: Canister Preparation
Canister preparation Since the Liberty Heavy has a different system of attaching the canister and head to the frame and backplate, it is imperative to always connect the head and canister with a clip . WARNING: FAILURE TO USE THE BUCKLE WILL RESULT IN SEPARATION OF THE HEAD FROM... - Page 12 Step 1 Step 2 Open all the levers on the buckle and insert Secure the buckle position on the canister the tooth of the buckle into the lock on the with the buckle locking levers scrubber canister . Step 3 The closed buckle on the canister and head Insert the beak of the buckle into the head looks like this .
- Page 13 . The Liberty Heavy system is based on a frame that carries both the bottles and the canister . The frame is always the same for all versions of Liberty Heavy . The only difference between the...
- Page 14 For the 2–3 liter bottle configuration we use the small brackets . If we want to use the so- called GUE configuration with 7 liter bottles, we use large brackets . In both cases, it is still possible to attach a second set of bottles via the additional holes for the attachment straps . Stand for 2×3 litre configuration .
- Page 15 Each configuration comes with just one set of brackets suitable for that configuration . In case of combining different configurations, it is possible to purchase separately brackets for the given configuration .
-
Page 16: Assembly
Assembly The Liberty Heavy frame is designed so that any wing and backplate can be used as long as they have standard bolt hole spacing . Assemble the Liberty Heavy by installing the wing, counterlung assembly and backplate onto the bolts in the frame one at a time . -
Page 17: Fixing The Tanks
Fixing the Tanks Attach the tanks to the frame using straps with an buckle . The height of the tanks affects the reach of the low pressure hoses, so choose a height that will allow the hoses to reach the intended position . In particular, the position of the oxygen hose connection to the solenoid is critical Close the strap with the buckle and make sure... -
Page 18: Hose Routing 2×3 Litre Version
Hose routing 2×3 litre version Two 3l tanks are mounted in the unit with the valves down . Diluent on the left, oxygen on the right . Both tanks have classic Nautec rebreather valves and are fitted with APEKS DST first stages with technical connections . -
Page 19: Diluent Routing
Diluent routing The three upper ports have hoses in order from left to right 1 . BOV+DIL MAV; 2 . ADV; 3 . Inflator . • H HP hose runs upwards along the frame attached with velcro straps on the side of the tank, then passes through a hole in the handle over the diver’s shoulder and the gauge is attached to the chest D-ring or... -
Page 20: Hose Routing 2×7 Litre Version
Hose routing 2×7 litre version Two 7 litre diluent tanks are clamped in the frame with valves upwards, connected to each other by a flexible manifold . The two first stages of the Apeks DST are fitted with technical connections, and are positioned vertically, connections downwards . Right post diluent first stage •... -
Page 21: Left Post Diluent First Stage
Left post diluent first stage • 580 mm long hose for MAV diluent, which runs along the inspiratory hose to the single hose adapter on the BOV . • Dry suit hose leading directly down from the bottom port . This hose is not supplied with the unit . -
Page 22: Adjusting The Counterlung Position
. This allows the counterlungs to be positioned one level higher or lower . Adjusting the trim At Divesoft, we have tried to make the unit as balanced as possible . Yet, of course, it cannot be guaranteed that the trim will be tuned for everyone . Fine adjustment of the horizontal balance is achieved by moving the on-board cylinders relative to the unit . -
Page 23: Location Of Tanks For Dry Suit
Location of tanks for dry suit The dry suit filling tank can be positioned in two ways: 1 . The standard way on the backplate . In this position, the tank may interfere with proper counterlung filling and thus impair work of breathing . 2 . - Page 24 Location of additional equipment The positioning of the light canister or heating system can be either classically on the belt, or if you have space left, the battery can be placed in the position of the second set of cylinders . Assembly of the loop and Dive checks USE THE MAIN LIBERTY USER MANUAL FOR THE REST OF THE REBREATHER INSTALLATION.
- Page 25 Maintenance After each dive in salty or polluted water, the device must be washed with clean, fresh water . After each day of diving, disassemble the device . For dismantling, use the reverse assembly procedure . Put caps on the MAV and ADV connectors and disinfect the entire loop, including the counterlungs, and rinse with drinking water .
- Page 26 LIBERTY HEAVY USER MANUAL Date of issue: 1 . 9 . 2021 Author: Jakub Šimánek Published by Divesoft s .r .o . www .divesoft .com...
Need help?
Do you have a question about the LIBERTY HEAVY and is the answer not in the manual?
Questions and answers