
Related Manuals for Garbin 523M


Summary of Contents for Garbin 523M
- Page 1 FORNI ELETTRICI A CONVEZIONE ELECTRIC CONVECTION OVENS 523 - 5-4-7-6-12-10-20-16 M- A -D MANUALE D’ISTRUZIONE OPERATING INSTRUCTIONS...
-
Page 3: Table Of Contents
3.1 - Avvertenze preliminari 3.2.1 - Pannello di controllo meccanico 3.2.2 - Modelli: 523M / 5M / 4M / 7M / 6M / 12M / 10M / 16M / 20M 3.3.1 - Pannello di controllo analogico 3.3.2 - Modelli: 523A / 5A / 4A / 7A / 6A / 12A / 10A / 16A / 20A 3.4.1 - Pannello di controllo digitale... -
Page 4: Parte Prima
1 -Parte Prima 1.1 Introduzione 1.2 Guida alla consultazione • Porre poi attenzione particolare ai testi evidenziati in grassetto, Nel ringraziare per la fiducia accordataci nell’acquisto di un nostro con un carattere più GRANDE o sottolineati, poiché si riferiscono prodotto, raccomandiamo prima di mettere in funzione i forni, di leggere attentamente questo manuale. - Page 5 1 - Parte Prima • Per questo motivo Vi raccomandiamo di rivolgerVi sempre • Prima di mettere in funzione il forno per la prima volta, è necessario al Concessionario che ha effettuato la vendita, specificando eseguire un’accurata pulizia dello stesso: - esternamente deve essere pulito solo con un panno umido;...
-
Page 6: Caratteristiche Tecniche E Targhetta Dati
1 -Parte PrIma 1.4 - Caratteristiche tecniche e targhetta dati Modello 523 M-A-D 5 M-A-D 4 M-A-D Potenza 3500 W 7000 W 7000 W elettrica Alimentazione 400V~ 3N; 50/60 400V~ 3N; 50/60 230V~;50/60 Hz Connessione tipo "X" tipo "X" tipo "X" elettrica Peso 56 Kg... - Page 7 1 - Parte PrIma 1.4 - Caratteristiche tecniche e targhetta dati Modello 7 M-A-D 6 M-A-D Modello 12 M-A-D 10 M-A-D Modello 16 M-A-D 20 M-A-D Potenza Potenza Potenza 9400 W 9400 W 14100 W 14100 W 24.000 W 14200 W elettrica elettrica elettrica...
-
Page 8: Movimentazione, Trasporto E Scarico
1 -Parte PrIma 1.5 - Movimentazione, trasporto e scarico • Al ricevimento del forno, accertarsi che lo stesso non abbia subito danni durante il trasporto o che l’eventuale imballo non sia stato manomesso con conseguente asportazione di parti dall’interno. • L’imballo del forno è realizzato dall’azienda conformemente agli •... -
Page 9: Parte Seconda_Istruzioni Per L'installazione E La Manutenzione
2 - Parte SeCONDa_Istruzioni per l’installazione e la manutenzione 2.1 - Luogo d’installazione e posizionamento • Per consentire l’installazione e le operazioni di manutenzione, mantenere una distanza di almeno 500 mm. (vedere fig. 3) tra il fianco sinistro del forno e la parete o apparecchiature attigue. AVVERTENZA L’installazione e la manutenzione ordinaria o straordinaria del Garantire una distanza di almeno 300 mm dal soffitto se di... -
Page 10: Collegamento Elettrico
2 - Parte SeCONDa_Istruzioni per l’installazione e la manutenzione 2.2 - Collegamento elettrico • Il filo giallo/verde del cavo d’alimentazione, deve essere fissato al morsetto contrassegnato con il simbolo di terra (vedi fig. 5). Collegamento alla rete elettrica • Il forno deve essere incluso in un sistema equipotenziale il cui •... -
Page 11: Smaltimento Di Vecchi Prodotti
2 - Parte SeCONDa_Istruzioni per l’installazione e la manutenzione 2.5 - Smaltimento di vecchi prodotti 2.7 - Dispositivi di sicurezza Il forno è dotato delle seguenti protezioni e sicurezze: • Il prodotto è stato progettato e assemblato • Termostato di sicurezza della cella: in caso di surriscaldamento con materiali e componenti di alta qualità... -
Page 12: Sostituzione Di Alcuni Componenti
2 - Parte SeCONDa_Istruzioni per l’installazione e la manutenzione 2.9 - Sostituzione e regolazione di alcuni componenti AVVERTENZA! La sostituzione di componenti e la regolazione degli stessi sono operazioni di manutenzione straordinaria per cui vanno eseguite da un installatore autorizzato. Prima di iniziare qualunque operazione di riparazione o manutenzione si deve provvedere a disinserire l’interruttore generale, in modo da togliere l’alimentazione elettrica all’apparecchio. -
Page 13: Parte Terza_Istruzioni Per L'uso
3 - Parte terZa_Istruzioni per l’uso 2.9.5 - Maniglia e gancio 3.1 - Avvertenze preliminari Operare come segue: 1) Aprire la porta del forno • L’apparecchiatura è destinata ad un uso professionale e deve 2) Svitare le viti (A - fig. 11). essere utilizzata da personale addestrato. -
Page 14: Pannello Di Controllo Meccanico
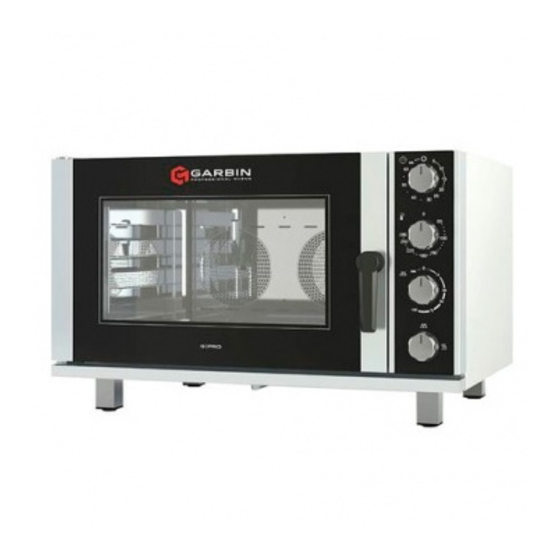
3 - Parte terZa_Istruzioni per l’uso 3.2.1 Pannello di controllo meccanico 523 M 5-4-7-6-12-10-20-16 M Interruttore generale Interruttore generale ∞ ∞ manopola tempo manopola tempo Manopola temperatura Manopola temperatura ∞ ∞ Manopola umidificazione Manopola umidificazione CHIUSO manopola essiccazione/umidificazione APERTO fig. 12 FORNI ELETTRICI VENTILATI... - Page 15 3.2.2 Preriscaldamento camera di cottura ACCENSIONE DEL FORNO E TEMPO DI COTTURA L’attivazione del temporizzatore A avvia il funzionamento del forno. • Prima di iniziare il lavoro è necessario preriscaldare la camera di Si accende la lampada della cella di cottura. ∞...
-
Page 16: Pannello Di Controllo Analogico
3 - Parte terZa_Istruzioni per l’uso 3.3.1. Pannello di controllo analogico 523 A 5-7-12-20 A 4-6-10-16 A Display temperatura Display temperatura Manopola temperatura Manopola temperatura Display tempo Display tempo Display Manopola tempo Manopola tempo umidificazione Display Display essiccazione/umidificazione essiccazione/umidificazione Manopola Manopola Manopola umidificazione... - Page 17 3 - Parte terZa_Istruzioni per l’uso ON/OFF ACCENSIONE E SPEGNIMENTO Durante il ciclo di cottura è possibile, in fase di Quando viene collegata la tensione, la scheda per variazione dei parametri impostati, ruotando la relativa alcuni secondi mostra la scritta versione del software. manopola (temperatura, tempo, umidità) modificare i parametri aspettando per attesa 15 sec.
- Page 18 3 - Parte terZa_Istruzioni per l’uso PRERISCALDO Il display umidità resta fisso al valore impostato e il relativo led si accende quando si attiva l’umidificazione. Ruotando la manopola tempo in senso antiorario al di sotto Il display sonda al cuore se non attivato resta in di 0.00 si attiva la funzione preriscaldo.
- Page 19 3 - Parte terZa_Istruzioni per l’uso TASTO TEMPERATURA SONDA AL CUORE TASTO MULTIVELOCITà Premendo il tasto sonda al cuore: Per selezionare la velocità del motore premere il tasto Si accende il led rosso fisso multivelocità, su display tempo vengono mostrati gli Il display tempo passa da tre cifre a due cifre (00) step di velocità.
-
Page 20: Pannello Di Controllo Digitale
3 - Parte terZa_Istruzioni per l’uso 3.4.1 Pannello di controllo digitale 523D Interruttore generale Display temperatura LED temperatura Tasto temperatura Display LED tempo tempo/ sonda al cuore LED sonda al cuore Tasto tempo Display umidificazione LED umidificazione Tasto essiccazione/umidificazione Display programmi e fasi Tasto programmi Tasto fasi Tasto incremento... - Page 21 3 - Parte terZa_Istruzioni per l’uso 3.4.1 Pannello di controllo digitale 5-7-12-20 D 4-6-10-16 D Interruttore generale Interruttore generale Display temperatura Display temperatura LED temperatura LED temperatura Tasto temperatura Tasto temperatura Display LED tempo Display LED tempo tempo/ sonda al cuore tempo/ sonda al cuore LED sonda al cuore LED multivelocità...
- Page 22 3 - Parte terZa_Istruzioni per l’uso ACCENSIONE E SPEGNIMENTO dato inserito oppure premendo il tasto umidità accetta Quando viene collegata la tensione, la scheda per subito il dato inserito. alcuni secondi mostra la scritta versione del software. A questo punto tutti i display sono fissi con visualizzati Quindi il forno si porta in stato di OFF e si accende sul i dati impostati.
- Page 23 3 - Parte terZa_Istruzioni per l’uso TASTO START/STOP Premendo START/STOP: Ripremendo START/STOP riprende il ciclo di cottura Parte il ciclo di cottura, si attiva la luce interna, (la mantenendo i parametri settati (eventualmente partenza non avviene mai né durante il settaggio modificati) al momento.
- Page 24 3 - Parte terZa_Istruzioni per l’uso TASTO TEMPERATURA temperatura impostata, il forno suona fino all’apertura della porta. Impostabile da 0 °C a 270 °C Quando la porta viene richiusa, se si trattava di un Valore di default per temperatura: 100 °C programma viene automaticamente avviata la fase Durante un ciclo di cottura si possono variare i dati successiva del programma stesso, se invece il forno...
- Page 25 3 - Parte terZa_Istruzioni per l’uso TASTO TEMPERATURA SONDA TASTO SELEZIONE MULTIVELOCITà AL CUORE 1.20 Per selezionare la velocità del motore premere Premendo il tasto sonda al cuore: il tasto multivelocità, su display tempo vengono - Si accende il led giallo fisso. mostrati i step di velocità, e viene accesa anche - Il display tempo passa da tre cifre a due l’icona velocità.
- Page 26 3 - Parte terZa_Istruzioni per l’uso PROGRAMMI (FASE) memorizzare un programma. Per memorizzare un Il forno deve trovarsi nella posizione di scheda accesa programma tenere premuto a lungo il tasto P. con il display temperatura che lampeggia (fase iniziale). - Variazione temporanea: Premendo il tasto P si entra in programmazione ed il anche in ciclo programmi, premendo i tasti temperatura, relativo display lampeggia in attesa di inserimento dati.
-
Page 27: Operazioni Dopo L'uso
3 - Parte terZa_Istruzioni per l’uso 3.5 - Operazioni dopo l’uso 3.6.1 - Pulizia della camera di cottura • A fine giornata e con la camera a temperature non superiori a 50-60 °C procedere alla pulizia con le seguenti modalità: 1) Spegnere il forno. - Page 29 3.1 - Preliminary warnings 3.2.1 - Mechanic control panel 3.2.2 - Models: 523M / 5M / 4M / 7M / 6M / 12M / 10M / 16M / 20M 3.3.1 - Analogic control panel 3.3.2 - Models: 523A / 5A / 4A / 7A / 6A / 12A / 10A / 16A / 20A 3.4.1 - Digital control panel...
- Page 30 1 - First Part 1.1 Introduction 1.2 Tips on reading this manual Congratulations on your purchase of this product. We thank you for • Pay particular attention to words in bold print , with LARGER characters, or UNDERLINED, as they refer to particularly important operations or your patronage whilst reminding you to read this manual carefully information.
- Page 31 1 - First Part always contact the Dealer who sold the appliance, specifying the Failure to comply with these rules may compromise safety of both problem, the model and serial number of the appliance you have. the appliance and user. Should either the user or technical personnel given the task of •...
- Page 32 1 - First Part 1.4 - Technical specifications and rating plate Model 523 M-A-D 5 M-A-D 4 M-A-D Power 3500 W 7000 W 7000 W Power supply 400V~ 3N; 50/60 400V~ 3N; 50/60 230V~;50/60 Hz Electrical type "X" type "X" type "X"...
- Page 33 1 - First Part 1.4 - Technical specifications and rating plate Model 7 M-A-D 6 M-A-D Model 12 M-A-D 10 M-A-D Model 16 M-A-D 20 M-A-D Power Power 9400 W 9400 W 14100 W 14100 W Power 24.000 W 14200 W Power supply Power supply 400V~(3N);...
- Page 34 1 - First Part 1.5 - Handling, transportation and unloading • On receiving the oven, make sure it has not been damaged during transit, and that packaging has not been tampered with, and hence contents removed. • The appliances’ packaging is produced by the company in •...
- Page 35 2 - Second Part_Installation instructions and maintenance 2.1 - Installation site and positioning • To enable installation and maintenance operations, ensure a distance of at least 50 cm (see pict. 3) between the left side of the oven and the adjacent wall or appliances. WARNING oven’s installation,...
- Page 36 2 - Second Part_Installation instructions and maintenance 2.2 - Wiring • The oven must be included in an equipotential system. Connection must be made with a wire featuring 2 a cross-section of at least 10 mm 2 connected to the terminal (A - pict. 5) marked located on Connection to the power main the bottom of the oven.
- Page 37 2 - Second Part_Installation instructions and maintenance 2.5 - Disposal of your product 2.7 - Safety devices The oven features the following safety and protection devices: • Your product is designed and manufactured with high quality materials and components, • Oven cooking chamber safety thermostat: if the oven cooking which can be recycled and reused.
- Page 38 2 - Second Part_Installation instructions and maintenance 2.9 - Replacing and adjusting various parts 2) Turn the plastic clamps (B - pict. 9) which lock the internal glass and open it up like a book. 3) Replace the bulb (C - pict. 9). WARNING! 4) Reassemble everything in reverse order.
- Page 39 3 - THIRD PART_Operating instructions 2.9.5 - Handle and hook 3.1 - Preliminary warnings Proceed as follows: 1) Open the oven door • The appliance is designed for professional use and must be used 2) Unscrew the screws (A - pict. 11). by trained personnel.
- Page 40 3 - THIRD PART_Operating instructions 3.2.1 Mechanical panel control 523 M 5-4-7-6-12-10-20-16 M Main switch Main switch ∞ ∞ Timer knob Timer knob Temperature knob Temperature knob ∞ ∞ Humidification knob Humidification knob OPEN Drying/humidification knob CLOSED ELECTRIC CONVECTION OVENS...
- Page 41 3 - THIRD PART_Operating instructions 3.2.2 Pre-heating the cooking chamber TURNING ON THE OVEN AND COOKING TIME Activating timer A starts oven operation. • Before starting work, it is necessary to pre-heat the cooking chamber. Proceed as follows. The lamp in the cooking chamber comes on. ∞...
- Page 42 3 - THIRD PART_Operating instructions 3.3.1. Analogic panel control 523 A 5-7-12-20 A 4-6-10-16 A Temperature display Temperature display Temperature knob Temperature knob Timer display Timer display Humidifi cation Timer knob Timer knob display Drying/humidification Drying/humidification display display Humidification Drying/humidification Drying/humidification knob knob...
- Page 43 3 - THIRD PART_Operating instructions parameters, waiting for 15 seconds or turning a knob. SWITCHING ON/OFF If the oven is in stop mode and no operation is performed for more than 15 minutes, the oven When power is connected, the panel shows the automatically switches off as if the OFF button had software version message for a few seconds.
- Page 44 3 - THIRD PART_Operating instructions PRE-HEATING Pressing the STOP button again during the cooking cycle: suspends the cooking cycle. All the parameters set Turning the time knob anti-clockwise under 0.00 are maintained. The cooking time will resume from the activates the pre-heating function. suspended time.
- Page 45 3 - THIRD PART_Operating instructions CORE PROBE TEMPERATURE BUTTON MULTISPEED KEY To select the speed of the motor-fan, press the Pressing the core probe button: multispeed key, the speed selection will appear on the the yellow LED lights up and does not flash. display and the speed icon will light up.
- Page 46 3 - THIRD PART_Operating instructions 3.4.1 Digital Control Panel 523D Main switch Temperature display temperature LED Temperature button Timer / Core probe Timer LED display Core Probe LED Tasto essiccazione/umidificazione Timer button Humidification display Humidification Humidification button Programs and phases display Programs button Phases button...
- Page 47 3 - THIRD PART_Operating instructions 3.4.1 Digital Control Panel 5-7-12-20 D 4-6-10-16 D Main switch Main switch Temperature display Temperature display Temperature LED Temperature LED Temperature button Temperature button Timer / Core probe Timer LED Timer / Core probe Timer LED display display Core Probe LED...
- Page 48 3 - THIRD PART_Operating instructions humidity button, the data is accepted immediately. SWITCHING ON/OFF At this point, all the displays are fixed, showing the When power is connected, the panel shows the data set. software version message for a few seconds. Then The programs display remains fixed in the MA position the oven switches it self OFF, the LED on the time and does not flash unless the P button is pressed to...
- Page 49 3 - THIRD PART_Operating instructions START/STOP BUTTON Pressing START/STOP: At the end of the cooking cycle: starts the cooking cycle. The internal light comes on, The tune will sound for 10 seconds or until the door is (the cycle never starts during or at the end of setting opened and the oven switches to OFF.
- Page 50 3 - THIRD PART_Operating instructions TEMPERATURE BUTTON temperature, the oven sounds until the door is opened. When the door is closed again, if a program was in place, the next phase of the program is automatically Can be set from 0 °C to 270 °C started.
- Page 51 3 - THIRD PART_Operating instructions CORE PROBE TEMPERATURE BUTTON MULTISPEED KEY 1.20 Pressing the core probe button: To select the motor-fan speed, press the multispeed the yellow LED lights up and does not flash. key, the speed number will appear on the display. The display time is changed from three digits to two The time display will start blinking and if you don’t digits (00).
- Page 52 3 - THIRD PART_Operating instructions store a program. PROGRAMS (PHASE) To store a program, hold down the P button. The oven must have the panel on with the temperature Temporary variation: display flashing (initial phase). Pressing the P button also in the programs cycle, by pressing the gives access to programming and the corresponding temperature, time and humidity buttons, it is possible display flashes, waiting for data entry.
- Page 53 3 - THIRD PART_Operating instructions 3.5 - Operations after use 3.6.1 - Cleaning the cooking chamber Clean at the end of the day, with chamber temperature below 50-60 °C, proceeding as follows: 1) Switches off the oven. • if necessary, remove the baking-pan supports without knocking the 2) Turn off the water supply taps.
- Page 56 © 2011 Garbin srl . Printed in Italy Garbin srl reserves the right to modify any of its products without notice. The company is the registered owner of all trademarks, patents and models. Data and images are indicative and may be changed in any time without notice.
Need help?
Do you have a question about the 523M and is the answer not in the manual?
Questions and answers