Table of Contents
Advertisement
Quick Links
Advertisement
Table of Contents

Related Manuals for KeCheng KC-200


Summary of Contents for KeCheng KC-200
- Page 1 Bidirectional Ultrasonic Distance Measurement Model: KC-200 Operation Manual...
-
Page 2: Safety Instructions
And it is easy to operate and clear to display. It is an ideal tool for building, decoration industries (for example, land agents, upholstery designers and craftsmen, etc) KC-200 bidirectional ultrasonic distance measurement is the Class II laser tool conforming to EN60825-1 safety rule. SAFETY INSTRUCTIONS Failure to follow the instructions listed below may cause personal injury. -
Page 3: Battery Safety Instructions
Battery Safety Instructions ●Please remove the batteries when clean the product. ●Remove the batteries before long term storage ●Please install the batteries properly as the instructions of the positive and negative charges ●Please dispose the batteries properly. High temperature will cause explosions and do not burn the batteries. -
Page 4: Battery Installation
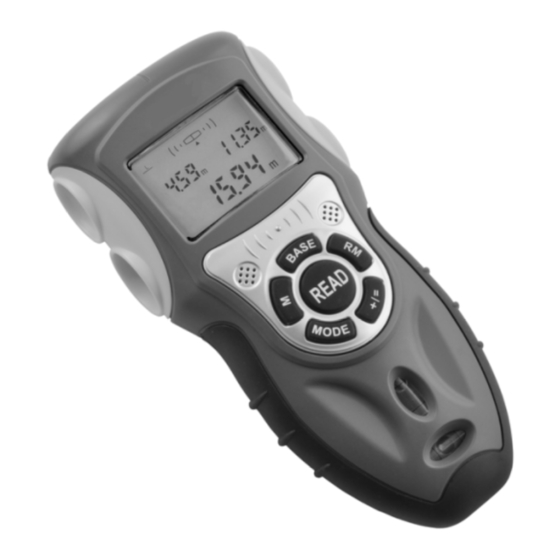
A.Length/area/volume mode indication (L=length;W=width;H=height) B.Plus C.Measuring base D.Memory E.Left measuring result F.Memory、compute result G.Display when lack of electric quantity H.Right measuring result I.Square foot J.Cubic foot K. Meter/square meter/cubic meter OPERATION GUIDE Battery installation Open the battery compartment door on the back of the tool, and plug one 9 Volt block battery onto the battery connector and put the battery back to the compartment and close the door. - Page 5 Keep pressing the READ key and move the tool to get the dynamical readings, and the measured distance will be displayed on upper portion of the screen Press the BASE key once to transform measurement base. Press the key every time and the base point are the following five ways in turn: starting from the middle then do bidirectional measurement、...
- Page 6 Notes: 1. When enter “+” operation for the first time, the primary data will be seemed as “0” to do addition. 2. Pressing +/= key will be of no effect, when the tool with no any measurement (the data is 0.00m on the upper portion). 3.
- Page 7 Press+/= key for accumulation, the result of memory data and measurement data will display on the lower portion of the screen. At the same time, “+”icon will display on the upper portion of the screen. Notes: 1. If continuously press the +/= key twice, the addition operation will be canceled, all the anterior computation result will clear away.
- Page 8 Then the area character" "on the display will blink, Pressing READ key to take the area result and display on the lower portion of the screen. At this moment, the " " icon won’t blink again. (Step 3); Press the READ key again will toggle back and forth between the length and width, area measurement result and corresponding icon "...
- Page 9 shortly for two times will cancel the operation. Then press again will toggle back and forth between: add----cancel----add). Press RM key to recall the first calculated area and display on the lower portion of the screen for the addition. The “M+” icon will disappear and the stored memory will be automatically cleared; Press +/= key again, the sum of both areas is shown on the lower portion of the screen;...
- Page 10 The height character “H” on the screen will blink showing the next measurement to take. Press READ key to take height measurement, the result will be displayed on the screen. (Step 3); The volume character " "on the display will blink, Pressing READ key to take the volume result and display on the lower portion of the screen.
-
Page 11: Temperature Display
“+” icon would appear on LCD; Note: If continuously press the +/= key for 2 times, the addition operation will be canceled and the icon +/= will disappear (Press+/= key shortly for one time will enter into addition, Press+/= key shortly for two times will cancel the operation. - Page 12 When the battery runs out: at this time, the “ ” icon will continuously appear on LCD to remind you to replace the battery. When the measured distance is out of the specified range: the effective range is 2′~53′ (0.5~16m). When the calculated result is out of the specified range: at this time, an error message “Err”...
-
Page 13: Technical Specifications
TECHNICAL SPECIFICATIONS Name Bidirectional ultrasonic distance measurement Type KC-200 Recommended use Indoor Range Measurement 0.5~16m effective single direction measurement Measurement 1~32m bidirectional direction Distance of limit measurement 40m (under the standard test environment) Accuracy ±1%±1digit Basement select Left edge, midpoint, right edge...
Need help?
Do you have a question about the KC-200 and is the answer not in the manual?
Questions and answers