Table of Contents

Related Manuals for StarTech.com WKSTNCART


Summary of Contents for StarTech.com WKSTNCART
- Page 1 Height Adjustable Mobile Workstation - Single Monitor Actual product may vary from photos User Manual SKU#: WKSTNCART For the latest information and specifications visit www.startech.com/WKSTNCART Manual Revision: 05/07/2021...
- Page 2 This manual may make reference to trademarks, registered trademarks, and other protected names and/or symbols of third-party companies not related in any way to StarTech.com. Where they occur these references are for illustrative purposes only and do not represent an endorsement of a product or service by StarTech.com, or an endorsement of the product(s) to which this manual...
-
Page 3: Safety Statements
Säkerhetsåtgärder • Installation och/eller montering får endast göras av behöriga yrkespersoner och enligt gällande lokala förordningar för säkerhet och byggnormer. To view manuals, videos, drivers, downloads, technical drawings, and more visit www.startech.com/support... -
Page 4: Warning Statements
• Skärmfästets viktkapacitet: 8 kg (17,6 lb.) • Tangentbordslådans viktkapacitet: 2 kg (4,4 lb.) • Viktkapacitet för CPU-fästet: 5 kg (11 lb.) • Låt inte barn klättra på produkten eller använda produkten utan uppsikt. To view manuals, videos, drivers, downloads, technical drawings, and more visit www.startech.com/support... - Page 5 • Zorg dat u de apparatuur goed installeert voordat u met het aanpassen van dit product begint. • Rijd de wagen niet over snoeren, kabels of ongelijke oppervlakken. • Voordat u de wagen gaat verplaatsen, moet u de zwenkwielen ontgrendelen. To view manuals, videos, drivers, downloads, technical drawings, and more visit www.startech.com/support...
- Page 6 • Non consentire ai bambini di arrampicarsi sul prodotto o di utilizzarlo senza un’adeguata supervisione. • Il prodotto è destinato all’uso in ambienti interni. Se ne sconsiglia l’impiego in ambienti esterni. To view manuals, videos, drivers, downloads, technical drawings, and more visit www.startech.com/support...
- Page 7 • Ne faites pas rouler le meuble sur des cordons, des câbles ou des surfaces inégales. • Avant de déplacer le meuble, veillez à débloquer les roulettes. To view manuals, videos, drivers, downloads, technical drawings, and more visit www.startech.com/support...
- Page 8 • No permita que los niños se suban a este producto o que lo utilicen sin la debida supervisión de un adulto. • El uso de este producto es solo para interiores y no debe utilizarse en exteriores. To view manuals, videos, drivers, downloads, technical drawings, and more visit www.startech.com/support...
- Page 9 Sie es ordnungsgemäß montiert und installiert haben und dass das Produkt das Gewicht der Geräte, die Sie hinzufügen möchten, tragen kann. • Sorgen Sie dafür, dass all Ihre Geräte ordentlich installiert sind, bevor Sie dieses Produkt justieren. To view manuals, videos, drivers, downloads, technical drawings, and more visit www.startech.com/support viii...
- Page 10 • Bewegen Sie den Wagen nicht über Leitungen, Kabel oder unebenes Gelände. • Stellen Sie sicher, dass die Rollen entriegelt sind, bevor Sie den Wagen in Bewegung setzen. To view manuals, videos, drivers, downloads, technical drawings, and more visit www.startech.com/support...
-
Page 11: Table Of Contents
Attach and Adjust the Keyboard Platform (F) ................. 13 Attach the VESA Mount (H) ........................14 Remove the VESA Plate from the VESA Mount (H) ................ 15 Attach the VESA Plate to the Monitor ....................16 To view manuals, videos, drivers, downloads, technical drawings, and more visit www.startech.com/support... - Page 12 Cable Management ..........................23 Store the 5 mm (M) / 6 mm (N) Hex Keys ..................23 Operation ....................23 Move the Mobile Workstation Assembly ..................23 Warranty Information ................25 To view manuals, videos, drivers, downloads, technical drawings, and more visit www.startech.com/support...
-
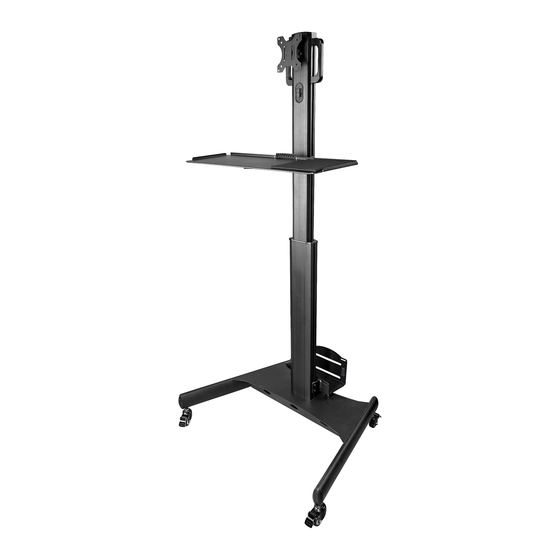
Page 13: Product Diagram
Product Diagram Front View Column Cap (G) VESA Mount (H) Cable Management Slot Handles Keyboard Platform (F) Column (B) CPU Holder (D) Base (A) Casters (C) To view manuals, videos, drivers, downloads, technical drawings, and more visit www.startech.com/support... -
Page 14: Product Dimensions
Product Dimensions Front View To view manuals, videos, drivers, downloads, technical drawings, and more visit www.startech.com/support... -
Page 15: Keyboard Platform (F) View
Keyboard Platform (F) View To view manuals, videos, drivers, downloads, technical drawings, and more visit www.startech.com/support... -
Page 16: Cpu Holder (D) And Cpu Straps (E) View
CPU Holder (D) and CPU Straps (E) View Note: The CPU Straps (E) are not pre-installed. To view manuals, videos, drivers, downloads, technical drawings, and more visit www.startech.com/support... -
Page 17: Product Information
Qty: 1 Qty: 1 M8 x 30 mm Washers (Small) M6 x 6 mm Screws (I) Screws (K) Mouse Pad (L) To view manuals, videos, drivers, downloads, technical drawings, and more visit www.startech.com/support Qty: 6 Qty: 4 Qty: 6 Qty: 1... - Page 18 5 mm Hex Key M4 x 12 mm 6 mm Hex Key (N) Screws (M-A) Wrench (O) Qty: 1 Qty: 4 Qty: 1 Qty: 1 M5 x 12 mm M5 x 16 mm Washers (Large) M4 x 16 mm Screws(M-C) Screws (M-D) (M-E) Screws (M-B)
-
Page 19: Technical Specifications
Monitor -- Up to 17.6 lb. (8 Keyboard Platform -- Up to 4.4 lb. (2 kg) CPU mount: 11 lb. (5 kg) VESA Compatible 75 x 75 mm 100 x 100 mm To view manuals, videos, drivers, downloads, technical drawings, and more visit www.startech.com/support... - Page 20 Monitor Tilt Range +30° to -30° Monitor Rotation +180° to -180° Cable Management To view manuals, videos, drivers, downloads, technical drawings, and more visit www.startech.com/support...
-
Page 21: Requirements
(For uneven surfaces - adjust the height of the Caster (C)) Flip the Base (A) upside down and use the Wrench (O) to adjust the Nuts located on each Caster (C). To view manuals, videos, drivers, downloads, technical drawings, and more visit www.startech.com/support... -
Page 22: Attach The Column (B) To The Base (A)
Insert the four M8 x 30 mm Screws (I) through the bottom of the Base (A) and into the Column (B) and tighten, using the 5 mm Hex Key (M). To view manuals, videos, drivers, downloads, technical drawings, and more visit www.startech.com/support... -
Page 23: Adjust The Height Of The Column (B)
Pull the Column (B) up to the desired height, using the attached Handles. Tighten the Locking Knob, located on the back of the Column (B), by twisting clockwise. To view manuals, videos, drivers, downloads, technical drawings, and more visit www.startech.com/support... -
Page 24: Adjust The Height Of The Keyboard Platform (F) And Handles
Tighten the Locking Knob, located on the back of the Column (B), by twisting clockwise. Adjust the Height of the Keyboard Platform (F) and Handles Figure 5 To view manuals, videos, drivers, downloads, technical drawings, and more visit www.startech.com/support... -
Page 25: Attach And Adjust The Keyboard Platform (F)
Platform (F) and into the Keyboard Platform Attachment Plate then tighten, using a Phillips Head Screwdriver. Insert the Mouse Pad (L) into the desired side of the Keyboard Platform (F). To view manuals, videos, drivers, downloads, technical drawings, and more visit www.startech.com/support... -
Page 26: Attach The Vesa Mount (H)
M6 Nuts (Q), and tighten, using the (Optional) Replace the Wing Nuts with the two M6 Nuts (Q) and tighten, using the M6 Wrench (P). Attach the VESA Mount (H) Figure 7 To view manuals, videos, drivers, downloads, technical drawings, and more visit www.startech.com/support... -
Page 27: Remove The Vesa Plate From The Vesa Mount (H)
Mount (H), using the 6 mm Hex Key (N) and press the Column Cap (G) onto the top of the Column (B). Remove the VESA Plate from the VESA Mount (H) Figure 8 To view manuals, videos, drivers, downloads, technical drawings, and more visit www.startech.com/support... -
Page 28: Attach The Vesa Plate To The Monitor
Note: Not all Monitors will have placeholder VESA Hard- ware. Only remove the Screws for the VESA Mount. Do not remove any of the screws from the Video Display Device’s structural assembly. To view manuals, videos, drivers, downloads, technical drawings, and more visit www.startech.com/support... - Page 29 Warning! Do not overtighten the M-Type Screws. If any unexpected resistance is encountered while fastening these Screws, immediately stop and attempt to use a different length of M-Type Screw. To view manuals, videos, drivers, downloads, technical drawings, and more visit www.startech.com/support...
-
Page 30: Mount The Monitor To The Column (B)
(H), into the screw hole located on the left side of the VESA Plate and into the VESA Mount (H) then tighten, using the 6 mm Hex Key (N). To view manuals, videos, drivers, downloads, technical drawings, and more visit www.startech.com/support... -
Page 31: Adjust The Height Of The Cpu Holder Bracket
Tighten the four Hex Screws located on the sides of the CPU Holder Bracket, using the 5 mm Hex Key (M). Ensure the Hex Screws are fastened enough to support the weight of the CPU. To view manuals, videos, drivers, downloads, technical drawings, and more visit www.startech.com/support... -
Page 32: Adjust The Width Of The Cpu Holder (D)
Twist the Knobs located on the bottom of the CPU Holder (D) in a clockwise direction to tighten. Attach the CPU Holder (D) to the CPU Holder Bracket on the Column (B) Figure 13 To view manuals, videos, drivers, downloads, technical drawings, and more visit www.startech.com/support... -
Page 33: Attach The Cpu Straps (E) To The Cpu Holder (D)
Attach the CPU Straps (E) to the CPU Holder (D) Figure 14 Push the t-shaped end of the CPU Straps (E) through the slots on the back of the CPU Holder (D). (Figure 14) To view manuals, videos, drivers, downloads, technical drawings, and more visit www.startech.com/support... -
Page 34: Install/Secure The Cpu Into The Cpu Holder (D)
Unfold the Folding Plastic Clips and adjust the tension of the CPU Straps (E). After completing any necessary adjustments, fold the Folding Plastic Clip to lock the CPU Straps (E). To view manuals, videos, drivers, downloads, technical drawings, and more visit www.startech.com/support... -
Page 35: Cable Management
Move the Mobile Workstation Assembly Unplug all the Cables connecting the Mobile Workstation to any Stationary Object (e.g. the wall, a media device, etc.). Disengage the Brakes on the Casters (C). To view manuals, videos, drivers, downloads, technical drawings, and more visit www.startech.com/support... - Page 36 Mobile Workstation Assembly, using two people. Ensure caution is exercised around corners or when navigating over bumps and/or uneven ground. Lock the Brakes on the Casters (C). To view manuals, videos, drivers, downloads, technical drawings, and more visit www.startech.com/support...
-
Page 37: Warranty Information
Limitation of Liability In no event shall the liability of StarTech.com Ltd. and StarTech.com USA LLP (or their officers, directors, employees or agents) for any damages (whether direct or indirect, special, punitive, incidental, consequential, or otherwise), loss of profits, loss of business, or any pecuniary loss, arising out of or related to the use of the product exceed the actual price paid for the product. - Page 38 Hard-to-find made easy. At StarTech.com, that isn’t a slogan. It’s a promise. StarTech.com is your one-stop source for every connectivity part you need. From the latest technology to legacy products — and all the parts that bridge the old and new — we can help you find the parts that connect your solutions.
Need help?
Do you have a question about the WKSTNCART and is the answer not in the manual?
Questions and answers