Atag KD85178AF Instructions For Use Manual
Hide thumbs
Also See for KD85178AF:
- Instructions for use manual (144 pages) ,
- Instructions for use manual (144 pages) ,
- Instructions for use manual (144 pages)
Table of Contents
Advertisement
Quick Links
Advertisement
Table of Contents

Related Manuals for Atag KD85178AF


Summary of Contents for Atag KD85178AF
- Page 1 Instructions for use Refrigerator KD85178AF KD85178AFC KD84178AFC...
-
Page 2: Table Of Contents
CONTENTS Your refrigerator Introduction Safety instructions Installation and connection Selecting the location Connecting the appliance Changing the side on which the door opens / building the appliance into a cupboard Before using the appliance for the first time Before you use the appliance for the first time Energy-saving advice Description of the appliance Appliance... - Page 3 CONTENTS Storing food Recommended distribution Avoid contamination of food Storing fresh food in the refrigerator Maintenance Defrosting the appliance Cleaning the appliance Faults Faults table Environmental aspects Disposal of packaging and appliance Pictograms used Important information Warning; risk of fire / flammable materials EN 3...
-
Page 4: Your Refrigerator
YOUR REFRIGERATOR Introduction Congratulations on choosing this Atag refrigerator. This product is designed with simple operation and optimum comfort in mind. These instructions for use explain how you can make best use of this appliance. These instructions contain information about the operation of the appliance and background information that may be of help to you during its use. -
Page 5: Safety Instructions
SAFETY INSTRUCTIONS Before the installation and use of the appliance, carefully read the supplied instructions. The manufacturer is not responsible if an incorrect installation and use causes injuries and damages. Always keep the instructions with the appliance for future reference. Safety of children and vulnerable people •... - Page 6 SAFETY INSTRUCTIONS General safety • The lamp in this household appliance is only suitable for illumination of this appliance. The lamp is not suitable for household room illumination. • WARNING! This appliance is intended to be used in household and similar applications such as: –...
- Page 7 SAFETY INSTRUCTIONS Installation • WARNING! This appliance should only be connected by a registered installer. • Remove all the packaging. • Do not install or use a damaged appliance. • Obey the installation instruction supplied with the appliance. • Always be careful when you move the appliance because it is heavy.
- Page 8 SAFETY INSTRUCTIONS Electrical connection • WARNING! Risk of fire and electrical shock. • The appliance must be earthed. • All electrical connections should be made by a qualified electrician. • Make sure that the electrical information on the rating plate agrees with the power supply.
- Page 9 SAFETY INSTRUCTIONS • WARNING! Risk of injury, burns, electrical shock or fire. • Do not change the specification of this appliance. • Do not put electrical appliances (e.g. ice cream makers) in the appliance unless they are stated applicable by the manufacturer.
- Page 10 SAFETY INSTRUCTIONS Disposal • WARNING! Risk of injury or suffocation • Disconnect the appliance from the mains supply. • Cut off the mains cable and discard it. • Remove the door to prevent children and pets to be closed inside of the appliance. •...
-
Page 11: Installation And Connection
INSTALLATION AND CONNECTION Selecting the location • Place the appliance in a dry and well aired room. The permitted ambient temperature range for the appliance depends on the appliance's climate class, which is shown on the type plate. • Do not place the appliance near a source of heat, such as a gas cooker, radiator or boiler, etc., and do not expose it to direct sunlight. -
Page 12: Connecting The Appliance
INSTALLATION AND CONNECTION • The appliance must be placed at a distance of about 5 cm from the wall, back and sides of a cupboard. A kitchen cupboard above the refrigerator must have a gap of at least 5 cm between the back of the cupboard and the wall. -
Page 13: Changing The Side On Which The Door Opens / Building The Appliance Into A Cupboard
INSTALLATION AND CONNECTION Freeze burn hazard To avoid freeze burn, never put frozen food in your mouth and do not touch frozen food. In the event of a defect or power cut, do not open the freezer compartment unless the appliance has been out of operation for more than the hours indicated on the appliance’s type plate (temperature rise time). -
Page 14: Before Using The Appliance For The First Time
BEFORE USING THE APPLIANCE FOR THE FIRST TIME Before you use the appliance for the first time Do not connect the appliance to the mains until you have carefully read the instructions for the correct and safe use of the appliance. As these instructions are for various types and models, it is possible that the instructions for use refer to settings or parts that are not available on your appliance. -
Page 15: Description Of The Appliance
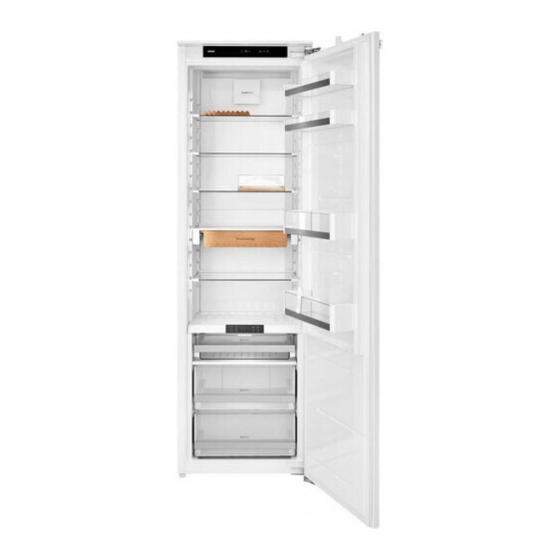
DESCRIPTION OF THE APPLIANCE Appliance 1. Control panel 2. CoolFlow+ 3. Glass shelves 4. Wooden bottle rack (BottleTray) 5. Wooden breakfast tray (BreakfastTray) 6. DuraFresh control panel 7. DuraFresh drawers 8. Door compartments CoolFlow+ This system creates optimal air circulation to keep the temperature constant throughout the entire refrigerator compartment. - Page 16 DESCRIPTION OF THE APPLIANCE Drawers A number of drawers are mounted on fully extending telescopic rails and are fitted with a soft-close system. To remove a drawer from the rails, pull the drawer fully out. Lift the back of the drawer (1). Pull the drawer to you (2) and then lift the drawer from the rails.
- Page 17 DESCRIPTION OF THE APPLIANCE Wooden bottle rack (BottleTray) Lay the bottle rack on one of the glass shelves and put the bottles on the rack. The rack is shaped to stop the bottles rolling sideways. The rack holds a maximum of three bottles or six cans. MultiBox The MultiBox offers a handy option for storing foods with a strong odour, such as ripe or blue cheese, smoked sausages and onions, etc.
-
Page 18: Control Panel
DESCRIPTION OF THE APPLIANCE Control panel For best results, touch the keys with as much of the fingertip as possible. A. Alarm key / WiFi key (see ‘Atag Connect Life’) B. Temperature adjustment keys C. Display of the set temperature D. -
Page 19: Durafresh Control Panel
DESCRIPTION OF THE APPLIANCE DuraFresh control panel DuraFresh G. –2 °C adjustment key The temperature of the top drawer is set to –2 °C. ▷ H. 0 °C adjustment key The temperature of the top drawer is set to 0 °C. ▷... -
Page 20: Operating The Appliance
OPERATING THE APPLIANCE Switching on the refrigerator and setting the temperature 1. Touch the On/Off key. The refrigerator turns on. ▷ 2. Use the adjustment keys to adjust the temperature. The temperature of the refrigerator compartment can be set to between +3 °C and +8 °C. The temperature of the top DuraFresh drawer can be set to -2, 0, 2 or 5 °C. - Page 21 OPERATING THE APPLIANCE Recommended DuraFresh Type of food drawer Meat Fish, molluscs and crustaceans Herbs / Dairy Vegetables / Dairy Middle / Bottom Fruit / Dairy Middle / Bottom Tropical fruit Middle / Bottom After you have switched on the appliance it will take several hours for the temperature to decrease to the set temperature.
- Page 22 OPERATING THE APPLIANCE Note! The adjusted temperatures of the refrigeration and DuraFresh compartments are linked to each other. Some combinations of settings are not possible (see table). It is also possible that the temperature setting of the refrigeration compartment is adjusted automatically. In this case a warning signal will sound.
- Page 23 OPERATING THE APPLIANCE Storing food in the DuraFresh drawers Meat Temperature, °C Storage life Beef 0 to 4 to 3 weeks Pork -1 to 4 3 days Poultry 0 to 4 3 days Lamb 0 to 4 14 days Fish 0 to 4 3 to 10 days Fish, molluscs and crustaceans...
-
Page 24: Intensive Cooling (Supercool)
OPERATING THE APPLIANCE Intensive cooling (SuperCool) This appliance has an intensive cooling function. This function decreases the temperatures in the refrigeration compartment and DuraFresh compartment as quickly as possible. This is ideal for cooling products that have just been put into the refrigerator. Use this function when you put a large quantity of food in the appliance. -
Page 25: Eco Function
OPERATING THE APPLIANCE ECO function This appliance has an ECO function. When the ECO function is selected, the appliance works with the optimum settings. The ECO function has no time limit and remains activated until the function is disabled. Activating/disabling the ECO function 1. -
Page 26: Open Door Alarm
OPERATING THE APPLIANCE Open door alarm An alarm signal sounds when a door is open for too long. The alarm key flashes in the display. The lighting will begin to flash after a few minutes. Stopping the alarm 1. Close the door. The alarm will stop sounding. -
Page 27: Power Failure Alarm
OPERATING THE APPLIANCE Power failure alarm The appliance cannot cool/freeze during a power failure. Once the power has been restored, the temperature in the appliance will be measured. A signal will sound when the temperature in the appliance is too high. The alarm key will flash and ‘PF’ (Power Failure) will be shown in the display. -
Page 28: Storing Food
STORING FOOD Recommended distribution Sections of the refrigeration compartment • Upper section: canned food, bread, wine and pastas, etc. • Middle section: dairy products, ready-to-cook meals, desserts, soft drinks, beer and cooked food, etc. • DuraFresh drawers: meat, meat products, dairy products, delicatessen products, fresh fruit, vegetables, root vegetables, salads, onions, garlic, cabbage and swedes/turnips, etc. -
Page 29: Storing Fresh Food In The Refrigerator
STORING FOOD Storing fresh food in the refrigerator Important recommendations for storing fresh food • To ensure the quality of fresh food, it is important that: ▷ the food is well-packaged; ▷ the appliance is at the correct temperature; the appliance is clean. ▷... -
Page 30: Maintenance
MAINTENANCE Defrosting the appliance Automatic defrost of the refrigeration compartment The refrigeration compartment defrosts automatically from time to time. Cleaning the appliance Switch off the appliance and remove the plug from the socket before you start cleaning it. Do not use abrasive cleaning agents, as they can damage the surface. •... -
Page 31: Faults
FAULTS Faults table When you have any doubts about whether your appliance is working properly you should not immediately assume that it is defective. We recommend that you should in any case check the points in the following table. Problem Cause/Solution Appliance is Check that the socket is live and that the appliance is switched on. - Page 32 FAULTS Problem Cause/Solution Door does not You are trying to open the appliance's door just after you have closed open easily. the door. Then opening the door is difficult. When you open the door, cold air escapes from the appliance and is replaced by warm air from the surroundings.
- Page 33 FAULTS Problem Cause/Solution Error code E9 • A door has been open for too long: close the door. shown in the • If the lighting in the compartment has also stopped working then display. the door sensor is defective. Call the service centre to make an appointment for repair work.
-
Page 34: Environmental Aspects
ENVIRONMENTAL ASPECTS Disposal of packaging and appliance This appliance is made from sustainable materials. This appliance must be disposed of in a responsible manner at the end of its service life. Contact the local authorities for information about the method. See also the chapter ‘Disposal’... - Page 35 EN 35...
- Page 36 The instructions for use can also be found on our website: www.atag.nl www.atag.be *614177* 614177...
Need help?
Do you have a question about the KD85178AF and is the answer not in the manual?
Questions and answers