Table of Contents
Advertisement
AVM10BH
INSTALLATION/OWNER'S MANUAL
DVD Multimedia Receiver with Bluetooth
featuring a
10.1"
Touch Screen Display
Safety Notes:
The DVD video display of the in-dash unit will not operate while the vehicle is moving. This is a safety feature
to prevent driver distraction. In-dash DVD video functions will only operate when vehicle is in Park and the
parking brake is engaged. It is illegal in most states for the driver to view video while the vehicle is in motion.
Advertisement
Table of Contents

Related Manuals for Axxera AVM10BH


Summary of Contents for Axxera AVM10BH
- Page 1 AVM10BH INSTALLATION/OWNER’S MANUAL DVD Multimedia Receiver with Bluetooth featuring a 10.1" Touch Screen Display Safety Notes: The DVD video display of the in-dash unit will not operate while the vehicle is moving. This is a safety feature to prevent driver distraction. In-dash DVD video functions will only operate when vehicle is in Park and the...
- Page 2 Copyright Notes This product incorporates copyright protection technology that is protected by method claims of certain U.S. patents and other intellectual property rights owned by Macrovision Corporation and other rights owners. Use of this copyright protection technology must be authorized by Macrovision Corporation, and is intended for home and other limited viewing uses only unless otherwise authorized by Macrovision Corporation.
-
Page 3: Table Of Contents
AVM10BH PREPARATION Table of Contents Page Warning Statement .......... -
Page 4: Warning Statement
AVM10BH PREPARATION WARNING Upon installation of this Monitor/DVD player (“unit”) into a vehicle, the driver of the vehicle must not operate this unit by watching videos or playing video games while driving. Failure to follow this instruction could lead to driver distraction which could result in serious injury or death to the vehicle’s occupants or persons outside... -
Page 5: Safety Information/Precautions
Please read all instructions carefully before attempting to install or operate. Due to its technical nature, it is highly recommended that your AVM10BH is installed by a professional installer or an authorized dealer. This product is only for use in vehicles with 12VDC negative ground only. -
Page 6: Preparation/Mounting
AVM10BH INSTALLATION Preparation Before You Start • Disconnect negative battery terminal. Consult a qualified technician for instructions. • Avoid installing the unit where it would be subject to high temperatures, such as from direct sunlight, or where it would be subject to dust, dirt or excessive vibration. -
Page 7: Wiring Diagram
AVM10BH INSTALLATION Wiring Diagram - Inputs/Outputs USB CONNECTOR (Charging only) RADIO ANTENNA POWER HARNESS DualMirror Input BT MIC FL OUT VIDEO OUT FR OUT CAMERA RL OUT AUX IN L RR OUT YELLOW AUX IN R SUB WOOFER BLUE VIDEO IN... -
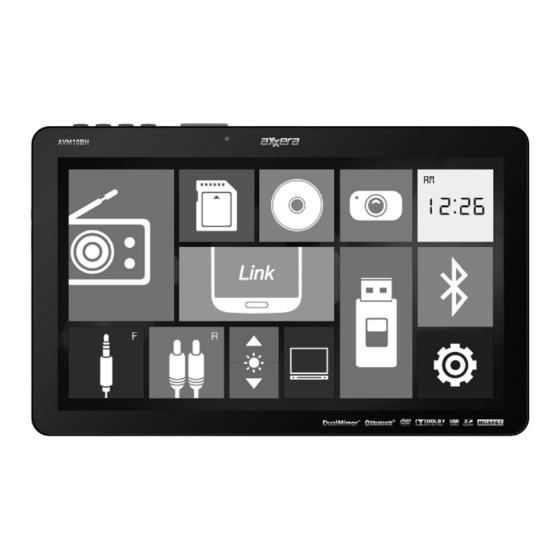
Page 8: Control Locations
AVM10BH OPERATION Control Locations 1 2 3 4 Power / Source SD Card Icon Bluetooth Icon Rear Auxiliary Input Icon Volume Down DualMirror Icon Setup Icon Front Auxiliary Input Icon Volume Up Disc Icon USB Icon Tuner Icon Eject / Camera... -
Page 9: Remote Preparation
AVM10BH OPERATION Remote Control Preparation Remove battery insulation tape . Notes: • The remote control uses one 3 volt Lithium CR2025 battery. Remove the battery if the remote will not be used for a month or longer. • Remove and dispose of battery properly. -
Page 10: General Operation
AVM10BH OPERATION General Operation Installing the Monitor To install the 10. 1 " touch screen monitor align the pins on the back of the monitor with the pins on the front of the unit, and press until it clicks in place. - Page 11 AVM10BH OPERATION General Operation Reset To resolve abnormal operation or if the unit is inoperable, use the tip of a pen to press the RESET button (located on the front panel to the left of the OPEN button). The unit will reset the main processor to the default settings.
- Page 12 AVM10BH OPERATION General Operation From the main menu screen or any operational mode (except when viewing Setup Menu video), press the icon in the bottom right corner of the screen to access the Setup menu. General • Language - Set the unit's language to English or Spanish.
- Page 13 AVM10BH OPERATION General Operation Setup Menu Bluetooth • Bluetooth - Turn Bluetooth signal on or off. • Auto Connect - Select "On" to program the unit to automatically connect to a Bluetooth device. Select "Off" to disable the auto connect feature.
-
Page 14: Am/Fm Tuner Operation
AVM10BH OPERATION AM/FM Tuner Operation Tuner Operation Select the Tuner icon from the Main Menu screen. Displays current mode of operation. Press to return to the Main Current Mode Indicator Menu screen. Information Display Displays current frequency, along with additional tuning information. - Page 15 AVM10BH OPERATION AM/FM Tuner Operation Local / Distance Press to choose between Local (LOC) or Distance (DX) tuning options. Tuning The local option tunes to nearby radio stations with sufficiently strong signals for good reception. In areas where reception is poor, switching to distance tuning enables the unit to tune in to more distant stations.
-
Page 16: Cd/Usb/Sd Operation
AVM10BH OPERATION CD/USB/SD Card Operation CD/MP3/WMA To play audio files from a disc or MP3/WMA files from a disc, USB device or JPG Operation or SD card, insert disc or device and playback will begin automatically. To return to disc, USB or SD card playback from another mode of operation, select the corresponding icon from the Main Menu. - Page 17 AVM10BH OPERATION CD/USB/SD Card Operation Press to navigate up to the previous folder. Previous Folder Press to play the first 10 seconds of each song in the playlist. Intro Press to display the keyboard for direct track/file access. Enter the...
- Page 18 AVM10BH OPERATION Media Compatibility - USB/SD Card File Type FAT 12 File System FAT 16/FAT 32 .mp3/.MP3/.Mp3/.mP3 File .wma/.WMA Extension .rmp/.m4a MPEG 1 MPEG MPEG 2 Format MPEG 2.5 MPEG 1 32/44. 1 /48kHz MPEG 2 12/16/22.05/24kHz...
- Page 19 AVM10BH OPERATION Media Compatibility - CD/DVD File Type Level 1, Level 2 ISO9660 Level 3 Playback ISO9660 JOLIET File System Extension Filename 32 bytes 32 bytes Playback ROMEO Other Filename Extensions Apple ISO .mp3/.MP3/.Mp3/.mP3 File .wma/.WMA...
- Page 20 AVM10BH OPERATION Media Compatibility Media Compatibility The following types of discs are compatible: • CD-DA, CD-ROM (ISO), CD-R, CD-RW • DVD Video, DVD+R/RW, DVD-R/RW The following types of discs/files are not compatible: • WMA files that are protected by DRM (Digital Rights Management) •...
-
Page 21: Dvd Operation
AVM10BH OPERATION DVD Operation Inserting a Disc From the main menu screen, press TILT UP until the CD slot is exposed. Insert disc into the slot, and playback will begin automatically. Sub-menus may have to be pressed to access the DVD content. Read the directions of your specific DVD disc for other features. - Page 22 AVM10BH OPERATION DVD Operation Press the standby icon (to the right of the TILT icon) to put the unit in standby Standby mode. Press any spot on the touch screen to exit standby mode. Press to enter the Setup menu (refer to page 11 for details).
- Page 23 AVM10BH OPERATION DVD Operation Press to pause playback. Press again to resume playback. Play / Pause Press to tilt the screen angle down. Screen Angle Down Press to decrease playback volume. Volume Down Press to increase playback volume. Volume Up Press to tilt the screen angle up.
-
Page 24: Dual Mirror
AVM10BH OPERATION DualMirror™ Operation The DualMirror™ technology allows you to mirror the screen of select Android smartphones as well as iPhone, iPod and iPad devices onto the receiver's screen and to charge your mobile device through the rear USB port. - Page 25 AVM10BH OPERATION DualMirror™ Operation Connecting an iPhone, iPod or iPad device iPhone (Not Included) Digital AV Adaptor (Not Included) (charge only) (sold separately. Cable No : DL3i) The DualMirror™ technology requires the following cables which are sold separately. Cable Number...
-
Page 26: Bluetooth Operation
Bluetooth device. Refer to the owner's manual for your device for more details. The device name is "Dual BT" Note: The AVM10BH can be in any mode of operation when pairing is performed. Disconnecting a To disconnect a device, enter the Bluetooth setup menu and Device select Device List. - Page 27 AVM10BH OPERATION Bluetooth Operation Bluetooth Operation Connect a Bluetooth device to the AVM10BH. Current Mode Indicator Displays current mode of operation. Press to return to the Main Menu screen. Phone Keypad Use the phone keypad to dial the desired phone number. Alternately, numbers can be dialed directly from the phone.
-
Page 28: Auxiliary Inputs/Rear Camera Operation
AVM10BH OPERATION Auxiliary Inputs - AV1 & AV2 Using AV1 Input Connect an optional audio/video source into the 3.5mm (front panel) input. Select AV1 from the Main Menu to listen to audio. Engage parking brake to watch video. Adjust volume on the external audio source as needed (if connected to the headphone output of the device). -
Page 29: Warranty
4. For more information and for the location of the original retail purchaser for products purchased from nearest authorized service center please contact an authorized Axxera dealer and used in the U.S.A. us by one of the following methods: What is covered? This warranty covers all defects •... -
Page 30: Specifications
AVM10BH OPERATION Specifications Disc Frequency response: 20Hz-20kHz Channel separation @ 1kHz: >50dB D/A converter: 24 Bit FM Tuner Tuning range: 87.5MHz-107.9MHz Usable sensitivity: 10dBf 50dB quieting sensitivity: 20dBf Stereo separation @ 1kHz: 38dB Frequency response: 30Hz-13kHz AM Tuner Tuning range:... -
Page 31: Troubleshooting
Please keep your original sales receipt and be prepared to provide this receipt in the event you require service, as your original receipt is considered the best proof of purchase and indicates the date you purchased your Axxera product. Dealer Name... - Page 32 Dual Electronics Corp. Toll Free: 1-866-382-5476 Monday-Friday, 9AM-5PM EST www.axxeraaudio.com ©2015 Dual Electronics Corp. All rights reserved. NSA0415-V01 Printed in China...
Need help?
Do you have a question about the AVM10BH and is the answer not in the manual?
Questions and answers