
Related Manuals for CaterChef 688.170


Summary of Contents for CaterChef 688.170
- Page 1 P rofe s s i o na l Su p pl i e s PIZZA OVEN Modelnr.: *688.170 - *688.172 GEBRUIKSAANWIJZING USER’S MANUAL...
-
Page 2: Table Of Contents
Schoonmaken en onderhoud .............. 5 ALGEMEEN De CaterChef pizza oven heeft een modern ontwerp en is geproduceerd volgens de nieuwste standen van techniek. Het heeft daardoor een stevige constructie, is gemakkelijk te bedienen, warmt snel op naar een gelijkmatige temperatuur en gaat zuinig met energie om. Het apparaat is voornamelijk bestemd voor professioneel gebruik in hotels, op markten, in supermarkten en tijdens evenementen. -
Page 3: Veiligheidsvoorzorgen En Gebruiksomgeving
Pak het apparaat nooit aan de bovenzijde (rand) vast om zo gevaar en beschadiging te voorkomen. 15. Gebruik bij reparatie geen onderdelen anders dan die CaterChef standaard meelevert en dus niet van CaterChef afkomstig zijn. CaterChef neemt geen verantwoordelijkheid voor schade toegebracht aan het apparaat door gebruik van de ’verkeerde’... -
Page 4: Onderdelenoverzicht
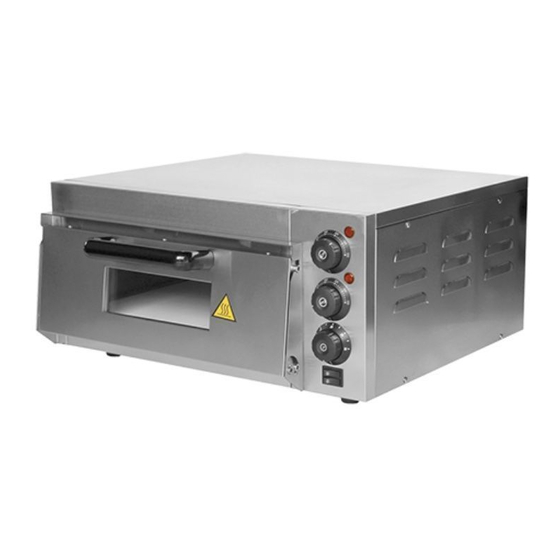
ONDERDELENOVERZICHT 1. Behuizing 3. Hendel 5. Timer 7. Schakelaar 9. Voetjes 2. Controle paneel 4. Thermostaat 6. Lichtknop 8. Deur 10. Stroomkabel GEBRUIKERSINSTRUCTIES Let op: Plaats alleen voedsel in het apparaat en plaats geen non-food producten in het apparaat. Dit kan gevaar opleveren en is daarom verboden. Let op: Het apparaat kan erg heet worden, u mag deze tijdens gebruik en gedurende de afkoelperiode niet aanraken zonder ovenhandschoen. -
Page 5: Probleemoplossing
Ononderbroken gebruik 1. Steek de stekker in het stopcontact; 2. Zet de lichtschakelaar op AAN; 3. Draai de onderste thermostaat naar de gewenste temperatuur en verwarm de oven voor; 4. Na het voorverwarmen kunt u de overige thermostaten activeren; 5. Stel vervolgens de timer in op de gewenste kooktijd; 6. - Page 6 It’s therefore mainly suitable for professional usage in hotels, markets, super-markets and other events. Caterchef wants to emphasize that the instruction manual needs to be readed carefully before usuge and should be stored for later use.
- Page 7 14. Never use other parts than the ones which are from CaterChef. CaterChef is not taking any responsibilty for damage caused by the use of other (non-related) parts. 15. During operation or cooling down: always keep the appliance out of reach of children.
- Page 8 PARTS OVERVIEW 1. Body 3. Handle 5. Timer 7. Switch 9. Feet 2. Control panel 4. Thermostat 6. Light knob 8. Door 10. Power cord USERS INSTRUCTIONS Note: Only place food on the shelves belonging to this device and do not place non-food products inside the device.
- Page 9 Uninterrupted use 1. Insert the plug into the wall socket. 2. Turn the light switch to ON. 3. Turn the lower thermostat to the desired temperature and preheat the oven. 4. After preheating, you can activate the other thermostats. 5. Then set the timer to the desired cooking time. 6.
- Page 10 688170-172 G20NE...
Need help?
Do you have a question about the 688.170 and is the answer not in the manual?
Questions and answers