Table of Contents

Related Manuals for Charge City


Summary of Contents for Charge City
- Page 1 Bicycle Owner‘s Manual For E-Bike Models This manual contains important safety, performance and service information. Read it before you take the first ride on your new bicycle, and keep it for reference. 137381 Rev 1 (02/20)
- Page 2 Safety Messages In this manual, particularly important information is presented in the following ways: Indicates a hazardous situation which, if not avoided, may result in death or serious injury. CAUTION Indicates special precautions that must be taken to avoid damage. Bicycles Cannot Protect You Bicycles are lightweight, human-powered vehicles, even Ebikes.
- Page 3 About This Owner’s Manual This manual meets EN ISO-4210 and 16 CFR 1512 Standards In case of a conflict between the instructions in this manual and information provided by a component manufacturer, always follow the component manufacturer’s instructions. If you have any questions or do not understand something, take responsibility for your safety and consult with a bicycle dealer or the bicycle’s manufacturer.
-
Page 4: Table Of Contents
Bike Models Riding Safety Charge City ... . 6 Required Safety Devices ..30 Charge Comfort ..8 Bicycling Inherent Risk . - Page 5 Component Inspection ..94 Rear Wheel Removal/Installation . . . 59 Maintenance Charge XC Front Wheel Removal . . . 60 Basics of a Good Charge XC Front Wheel Installation . . .61 Maintenance Schedule ..98 Charge XC Rear Wheel Cleaning Your Bike .
-
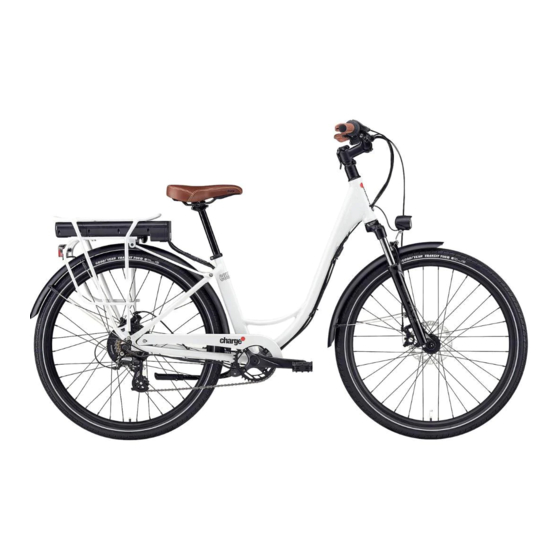
Page 6: Bike Models
E-Bike Models Charge Bicycle Owner’s Manual Charge City E-Bike Models Charge City Parts Identification Drive Unit Light, Rear 18. Rear, Rack 26. Lever, Brake, Front 2. Battery, External 10. Kickstand 19. Derailleur, Rear Charge Port 12. Seat Post 20. Chain Drive Display 13. - Page 7 Shimano Tourney 7 speed shifter with optical gear display Handlebar Lightweight 6061 Aluminium with 60mm rise t 31.8 mm dia. Grips Charge Comfort Ergo Soft Rubber Grip Stem TransX 90 degree rotateable stem with +7 degree rise, 80 mm length, 31.8 mm clamp...
-
Page 8: Charge Comfort
E-Bike Models Charge Bicycle Owner’s Manual Charge Comfort Charge Comfort Parts Identification Drive Unit Light, Rear 17. Chain 24. Chain Guard 2. Battery, Rack 10. Kickstand 18. Pedal Charge Port 11. Seat Post 19. Brake Disc, Front Drive Display 12. Seat Clamp 20. - Page 9 Shimano Tourney 7 speed shifter with optical gear display Handlebar Lightweight 6061 Aluminium with 60 mm rise 31.8 mm. Grips Charge Comfort Ergo Soft Rubber Grip Stem TransX 90 degree rotateable stem with +7 degree rise, 80 mm length, 31.8 clamp...
-
Page 10: Charge Xc
E-Bike Models Charge Bicycle Owner’s Manual Charge XC Charge XC Parts Identification Drive Unit Saddle 17. Fender, Front 25. Tire Valve 2. Battery, Internal 10. Light, Front 18. Fender, Rear 26. Lever, Brake, Rear Battery, Door 11. Light, Rear 19. Rear, Rack 27. - Page 11 Shimano Rapidfire Plus 8 speed with optical gear display Handlebar Lightweight 6061 Aluminium with 60mm rise to provide heads up, confident handling. 31.8. Grips Charge Comfort Ergo Soft Rubber Grip Stem TransX 90 degree rotateable stem with +7 degree rise, 80mm length, 31.8 clamp Brakes...
-
Page 12: Frame Labels
E-Bike Models Charge Bicycle Owner’s Manual Frame Labels Frame Labels The labels below are located on the bicycle frame. These labels contain important information. Do not remove them. This is the frame warning label. It contains Class - E-bikes in the US are defined under safety information to anyone who rides the different classes (i.e CLASS 1, CLASS 2, CLASS 3). -
Page 13: Purchase Record
Purchase Record Purchase Record Fill in immediately and retain as a record of your purchase. Please retain your sales receipt for any possible warranty claims. Your Name: Address: City/State: Date Purchased: Place of Purchase: Model Information: Wheel Size: Model Number:... -
Page 14: Important Safety Information
If you have any questions regarding the safety warnings and labels call Charge Customer Service at 833-482-3822 A Special Note For Parents As a parent or guardian, you are responsible for the activities and safety of your minor child, and that includes making sure that the bicycle is properly fitted to the child;... -
Page 15: Restricting Use Of The Bike
Important Safety Information Restricting Use of the Bike Restricting Use of the Bike WARNINGS Use of this e-bike by persons (including children) with reduced physical, sensory or mental capabilities or persons lacking experience and knowledge in the use of the e-bike could result in serious injury or death. -
Page 16: Teaching Your Child The Rules
Important Safety Information Charge Bicycle Owner’s Manual Teaching Your Child the Rules Teaching Your Child the Rules We cannot over-state how import this entire owner’s manual is to the rider’s safety. We also understand Kids need to be taught ... and to have frequently reinforced ... the following rules and lessons which adults are already expected to know. - Page 17 Important Safety Information Teaching Your Child the Rules b. Running a Stop Sign Car/bike crashes can happen when a cyclist runs a stop sign. Most cyclists who get hit riding through stop signs know that they were supposed to stop. They just thought it would be OK this time; or they may have been distracted.
- Page 18 Important Safety Information Charge Bicycle Owner’s Manual Teaching Your Child the Rules d. Riding at Dawn, at Dusk or at Night Most car/bicycle accidents happen at night where an overtaking car hits a bike. (An overtaking car is one that comes up from behind and passes the cyclist on the left.) These overtaking accidents can be very serious.
-
Page 19: Intended Use Of The Bike
Intended Use of the Bike Intended Use of the Bike The intended use of Charge City, Comfort, and XC models is ASTM CONDITION 2. A description of the standard is described in the following table: Condition 2, General Purpose Riding Bikes designed for riding Condition 1, plus smooth gravel roads and improved trails with moderate grades where the tires do not lose ground contact. -
Page 20: Understanding E-Bikes
Important Safety Information Charge Bicycle Owner’s Manual Understanding E-bikes Understanding E-bikes What is an E-bike? Electric bikes, also known as “E-Bikes” are bicycles equipped with an electric pedal assist drive system. An E-Bike IS NOT a moped or motorcycle. E-bikes share components common with pedal- only bikes. -
Page 21: E-Bike Operation
Important Safety Information E-bike Operation E-bike Operation WARNINGS Operating the Drive Assist System Turning the drive assist system ON before you are seated and have both hands on the handlebar could result in loss of control of the E-bike. Always have total control of the E-bike and be ready to ride before engaging the drive system. -
Page 22: Follow Laws & Regulations
Important Safety Information Charge Bicycle Owner’s Manual Follow Laws & Regulations Follow Laws & Regulations See also, Bike Model Specifics, “Frame Labels.” You must obey all local laws & regulatory requirements - it is your responsibility to identify and follow all local laws and regulations necessary for legal compliance. Compliance with local regulation is critical to the safety of a rider and others where the bike is used. -
Page 23: Batteries And Chargers
A damaged battery or battery charger (e.g. cable, plug or housing) may result in leakage of hazardous materials or be a potential source of sparking and fire. Always examine the battery and battery charger before each use. Never charge a damaged battery or use a damaged battery charger. - Page 24 Locate both the battery and battery charger indoors, in a clean, dry area with good ventilation to charge. Always place the battery and battery charger on an even surface. Ensure the area is free from dust, moisture, combustibles and keep the battery charger ventilation openings unobstructed.
-
Page 25: Drive System Maintenance
If you cannot resolve a problem, contact: Charge Customer Service at 833-482-3822 for all service questions. Performing maintenance on the e-bike with the drive assist system active could result in accidental activation of the drive assist system. -
Page 26: No Modifications
Important Safety Information Charge Bicycle Owner’s Manual No Modifications No Modifications WARNINGS DO NOT physically alter your frame in any way. Don’t sandblast, shot blast or glass bead your frame. Don’t use any coarse sandpaper on your bike. Don’t grind, wire brush, file, scrape or machine buff your frame. -
Page 27: Kickstands
Important Safety Information Kickstands Kickstands WARNINGS If the E-Bike is equipped with a kickstand: (1) Improperly installing a kickstand could result in the E-Bike being unstable when parked and tipping over. (2) A kickstand must only be installed by a professional bike mechanic. (3)- Riding with the kickstand in the down position may result in unexpected contact with the ground or other objects causing loss of control. - Page 28 Important Safety Information Charge Bicycle Owner’s Manual This page is left blank intentionally. 137381 Rev 1 (02/20)
-
Page 29: Foreign Objects
Important Safety Information Foreign Objects Are Very Hazardous Foreign Objects Are Very Hazardous Do Not Ride Over Sticks Or Debris (Foreign Objects). We are aware of rare but very serious accidents where a foreign object was kicked up, entered the spokes of the front wheel, was swept around and either broke the fork or stopped the wheel. -
Page 30: Riding Safety
Riding Safety Charge Bicycle Owner’s Manual Required Safety Devices Riding Safety Required Safety Devices Many states require specific safety devices. It is your responsibility to familiarize yourself with the laws of the state where you ride and to comply with all applicable laws, including properly equipping yourself and your bike as the law requires. -
Page 31: Always Wear A Helmet
Riding Safety Always Wear A Bicycle Helmet Always Wear A Bicycle Helmet Your helmet should be: • U.S. Consumer Product Safety Commission Always wear a cycling helmet which meets the (CPSC) certified (look for the label on the latest certification standards and is appropriate helmet) for the type of riding you do. -
Page 32: 23 Safety Points
Riding Safety Charge Bicycle Owner’s Manual 23 Safety Points 23 Safety Points Make sure the bike fits you and you can 8. Obey all Rules of the Road and all local operate all the controls comfortably. traffic laws. 2. Always do a Pre-Ride Checklist in this manual 9. - Page 33 Riding Safety Safety Points To Observe During Every Ride Safety Points To Observe During Every Ride 12. Ride in designated bike lanes, on designated 17. Never carry anything which obstructs your bike paths or as close to the edge of the vision or your complete control of the road as possible, in the direction of traffic bicycle, or which could become entangled in...
-
Page 34: What To Know Before Your First Ride
If you have any questions, or if you feel anything about the bike is not as it should be, consult with a professional bicycle mechanic before you ride again. The Charge XC model is an ASTM Condition 2 intended use bike. -
Page 35: Riding Off-Road
The variable conditions and hazards of off-road riding require close attention and specific skills. Start slowly on easier terrain The Charge XC model is an ASTM Condition 2 and build up your skills. If your bike has intended use bike. -
Page 36: Off Road Respect
Riding Safety Charge Bicycle Owner’s Manual About Bicycle Suspension Stay In Control Off-Road Respect Obey the local laws regulating where and how you can ride off-road, and respect private property. You may be sharing the trail with others Failure to ride in control could result in a fall —... -
Page 37: Jumping
Riding Safety Jumping Bicycle Reflectors Jumping Bicycle reflectors are designed to pick up and reflect street lights and car lights in a way that Jumping is very risky. You could have a fall may help you to be seen and recognized as a leading to serious injury, paralysis or death. -
Page 38: Riding At Night, Dusk, And Dawn
Riding Safety Charge Bicycle Owner’s Manual Riding at Night, Dusk, and Dawn Riding at Night, Dusk, and Dawn Riding a bicycle at night, dusk, and dawn is much more dangerous than riding during the day. A cyclist is very difficult for motorists and pedestrians to see. - Page 39 Riding Safety Riding at Night, Dusk, and Dawn (continued from previous page...) Riding at night/dusk or at dawn is very hazardous. Avoid riding at night. If you choose to ride at night: ■ Install front and rear lights. ■ Wear reflective clothing. ■...
-
Page 40: Bicycle Lights
Charge Bicycle Owner’s Manual Bicycle Lights Bicycle Lights Some urban, city, commuter bicycle models have built in, integrated daytime running lights or “be seen” lights. INTENDED USE: These lights are intended to be daytime running lights. They are intended to draw attention to you while riding and increase the chance of other cyclists, pedestrians and motorists seeing you. -
Page 41: Riding In Traffic/Commuting
Riding Safety Riding In Traffic, Commuting Riding In Traffic, Commuting Riding in traffic (and commuting) is hazardous and you can be severely injured or killed doing it. You must learn and obey local traffic laws. Riding in traffic is hazardous. We cannot teach you about all of these hazards. -
Page 42: Adjustment (Fit) Instructions
Adjustment (Fit) Instructions Charge Bicycle Owner’s Manual Standover Height Adjustment (Fit) Instructions NOTE: Correct fit is an essential element of bicycling safety, performance and comfort. Making the adjustments to your bicycle which result in correct fit for your body and riding conditions requires experience, skill and special tools. -
Page 43: Saddle Height
Adjustment (Fit) Instructions Saddle Height Saddle Height 2. When seated on the saddle: If your leg is locked straight at the knee with Correct saddle adjustment is an important factor your foot on the pedal in the down position, in getting the most performance and comfort the saddle is too high. - Page 44 Saddle Height Setting the Saddle Height CAUTION Use Charge torque wrench to loosen the seat Do not twist or rotate the seat post while it is post clamp bolt; turn it counter-clockwise. installed in the frame. This action could result Loosen it enough to slide the seat post up in scratching or cutting the seat post.
- Page 45 Adjustment (Fit) Instructions Saddle Height 4. Use Charge torque wrench to re-tighten the seat post clamp. Riding with an improperly tightened seat Continue until you feel and hear a loud post can allow the saddle to turn or move and clicking noise indicating that the tightening cause you to lose control and fall.
-
Page 46: Saddle Front To Back Adjustment
Adjustment (Fit) Instructions Charge Bicycle Owner’s Manual Saddle Front and Back Adjustment Saddle Front and Back Adjustment When making saddle angle adjustments with The saddle can be adjusted forward or back to a single bolt saddle clamp, always check to help you get the optimal position on the bike. -
Page 47: Handlebar Height And Angle
Adjustment (Fit) Instructions Handlebar Height And Angle Handlebar Height And Angle Your bike is equipped with a “threadless” stem, Some people have claimed that extended which clamps on to the outside of the steerer riding with a saddle which is incorrectly tube. -
Page 48: Handlebar Control Positions
Adjustment (Fit) Instructions Charge Bicycle Owner’s Manual Handlebar Controls Positions Handlebar Controls Positions Some bicycles are equipped with an adjustable angle stem. If your bicycle has an adjustable The angle of the brake and shift control levers angle stem, ask your dealer to show you how to and their position on the handlebars can be adjust if. -
Page 49: Folding Stem Instructions
Adjustment (Fit) Instructions Folding Stem Folding Stem Safety Release Bu ton Slide & Lift Handlebar Clamp Bolts 5 Nm Stop Stem Clamp Bolt Lever 17-18 Nm (shown closed) -
Page 50: Changing The Handlebar Position
Adjustment (Fit) Instructions Charge Bicycle Owner’s Manual Folding Stem Changing Handlebar Position 2. Rotate the handlebar 90 degrees into riding or storage position. See also video at www.chargebikes.com. Using your thumb, slide the safety release button (1) forward and lift the lever up (2). - Page 51 Adjustment (Fit) Instructions Folding Stem 3. Close the lever (2). Push it down until the lever arm touches the stem stop (a). The stem lever is closed correctly when: • A strong resistance is felt to the force of your hand when closing the lever. •...
-
Page 52: Adjusting The Folding Stem Lever Tension
Adjustment (Fit) Instructions Charge Bicycle Owner’s Manual Folding Stem Adjusting Folding Stem Lever Tension The stem’s tension adjust ring changes stem lever tension and stem play. It must be tensioned correctly. Some wear will occur normally over time as the stem lever is used. We suggest that stem tension be inspected frequently, more so if you use change position of your stem often. - Page 53 Adjustment (Fit) Instructions Folding Stem Safety Release Bu ton (Handlebar not shown for clarity) Lever (open) 2-3 Nm Set Screw - Tension Hole in Adjust Ring + Tension Tension Adjust Ring Stop Lever closed correctly Never ride with an open or loose lever. Make sure the lever is closed. If you ride with an open or loose lever you may lose steering control of the bicycle.
-
Page 54: Technical Information
Technical Information Charge Bicycle Owner’s Manual About Wheels Technical Information • It’s important to your safety, performance and enjoyment to understand how things work on your bicycle. • We urge you to ask a professional bike mechanic how to do the things described in this section before you attempt them yourself, and that you have a professional bike mechanic check your work before you ride the bike. - Page 55 Technical Information About Wheels Tightening Wheel Axles Riding with improperly secured wheels can allow the wheels to wobble or fall off the bicycle, or suddenly stop the wheel, which can cause serious injury or death. Therefore, it is essential that you: 1.
- Page 56 (through bolt, fig. 8) 2. Hex nuts or hex key bolts which are threaded on to or into the hub axle (bolt-on wheel, fig. 9). Charge bikes with hub motors use hex axle nuts to install the rear wheel. Figure 9...
-
Page 57: Charge City/Comfort
Skewer Bolt Axle Parts Thru-Axle Parts Secure the bike upright in a bike stand, with the wheel off the ground. Head 2. Insert the Charge torque too into the axle bolt light grease head and turn counter-clockwise to loosen Bolt Axle the axle bolt. -
Page 58: Front Wheel Installation
Technical Information Charge Bicycle Owner’s Manual About Wheels Charge City and Comfort 4. Remove the axle bolt. Front Wheel Installation See video at chargebikes.com. Secure the bike upright in a bike stand. 2. Install the wheel into the dropouts. Make sure the brake disc locates between the brake pads in the caliper. -
Page 59: Rear Wheel Removal/Installation
Do not ride the bike if dropout surface. the bolt is not torqued correctly. The Charge torque tool is pre-set to apply to a specific torque value marked on it. Torque values are indicated in newton meters. -
Page 60: Charge Xc Front Wheel Removal
Secure the bike upright in a bike stand, with the front wheel off the ground. Head light grease Axle 2. Insert the Charge torque tool into the right side of the axle. Turn the wrench counter- clockwise until the axle is free to slide out. Threads light grease Fork Dropout Figure Loosening the thru-axle. -
Page 61: Charge Xc Front Wheel Installation
Technical Information About Wheels Charge XC Front Wheel Installation See video at chargebikes.com. Secure the bike upright in a bike stand with the fork off the ground. 2. Use a clean shop towel to wipe clean the thru-axle and ends of the fork dropouts. -
Page 62: Charge Xc Rear Wheel
Technical Information Charge Bicycle Owner’s Manual About Wheels 5. Insert the Charge torque tool into the axle head and turn the axle clockwise to thread the axle into the left side fork dropout. Make sure the bolt is torqued correctly with the torque wrench. -
Page 63: Brakes
Technical Information Brakes Brakes Your bike is equipped with disc brakes, disc brakes, which operate by squeezing a hub- mounted disc between two brake pads. The brakes are operated by way of a handlebar mounted lever. 1. Riding with improperly adjusted brakes or worn brake pads is dangerous and can result in serious injury or death. - Page 64 Technical Information Charge Bicycle Owner’s Manual Brakes Brake Controls And Features How Brakes Work It’s very important to your safety that you learn The braking action of a bicycle is a function of and remember which brake lever controls which the friction between the brake surfaces —...
- Page 65 Technical Information Brakes When you apply one or both brakes, the bike Everything changes when you ride on loose begins to slow, but your body wants to continue surfaces or in wet weather. Tire adhesion is at the speed at which it was going. This causes a reduced, so the wheels have less cornering and transfer of weight to the front wheel (or, under braking traction and can lock up with less brake...
- Page 66 Technical Information Charge Bicycle Owner’s Manual Brakes Aftermarket Brake Systems WARNING Do not modify your bike in any way to mount brakes systems. Modifications can damage your bike leading to an accident. You can be severely injured or killed. Choose only brakes that mount to the frame, swingarm, or fork using only the existing disc brake, V-brake or cantilever mounts.
-
Page 67: About Seat Posts
Technical Information About Seat Posts About Seat Posts How Does It Affect My Bike? You must always have at least the required Minimum Seat Post Insert Depth minimum length of seat post inserted inside the frame. Seat Post If your frame has a minimum seat post insert Seat Tube Minimum depth, make sure the specified length seat... - Page 68 Technical Information Charge Bicycle Owner’s Manual About Seat Posts Cutting Seat Post To fit some riders who require a lower seat it may be necessary to cut the seat post. This must be done by a professional mechanic who will:...
-
Page 69: Shifting Gears
Technical Information Shifting Gears Shifting Gears The vocabulary of shifting can be pretty confusing. A downshift is a shift to a “lower” or Your multi-speed bicycle will have a derailleur “slower” gear, one which is easier to pedal. An drivetrain (see 1. below), upshift is a shift to a “higher”... - Page 70 Technical Information Charge Bicycle Owner’s Manual Shifting Gears c. Which gear should I be in? CAUTION It is not necessary to shift gears in sequence. Shifting under extreme pedaling pressure Instead, find the “starting gear” which is right for puts a great amount of stress on your level of ability —...
- Page 71 Technical Information Shifting Gears Never shift a derailleur onto the largest or the smallest sprocket if the derailleur is not shifting smoothly. The derailleur may be out of adjustment and the chain could jam, causing you to lose control and fall.
-
Page 72: About Pedals
About Pedals If your bicycle has this type of high- performance pedal, you must take extra care Charge bikes come with simple flat pedals. to avoid serious injury from the pedals’ sharp surfaces. Based on your riding style or skill... - Page 73 Technical Information About Pedals 5. Many clipless pedals are designed to allow the rider to adjust the amount of force needed to engage or disengage the foot. Getting into and out of pedals with toeclips Follow the pedal manufacturer’s instructions, and straps requires skill which can only be or ask a bicycle dealer to show you how to acquired with practice.
- Page 74 Technical Information Charge Bicycle Owner’s Manual About Pedals Toe Overlap or Toe Clip Overlap Whether or not you have overlap, or how much overlap you have can be changed. Be aware that toe clearance can be increased or decreased by...
-
Page 75: About Bicycle Suspension
Technical Information About Bicycle Suspension About Bicycle Suspension Many bicycles are equipped with suspension Changing suspension adjustment systems. There are many different types of can change the handling and braking suspension systems — too many to deal with characteristics of your bicycle. individually in this Manual. -
Page 76: About Tires And Tubes
Technical Information Charge Bicycle Owner’s Manual About Bicycle Tires & Tubes About Bicycle Tires & Tubes About Bicycle Tires Bicycle tires are available in many designs and specifications, ranging from general-purpose designs to tires designed to perform best under very specific weather or terrain conditions. If, once you’ve gained experience with your new... - Page 77 Technical Information About Bicycle Tires & Tubes CAUTION There is a safety risk in using gas station air Pencil type automotive tire gauges can be hoses or other air compressors. inaccurate and should not be relied upon for consistent, accurate pressure readings. They are not made for bicycle tires.
- Page 78 Technical Information Charge Bicycle Owner’s Manual About Bicycle Tires & Tubes Tire Size Mounting the wrong size tires can result in the tires hitting the fork or frame when riding. If this happens, you can lose control of your bike and you can be thrown off, a moving tire can be stopped because it touches the fork or frame.
- Page 79 Technical Information About Bicycle Tires & Tubes Tire & Rim Pressure Compatibility Maximum tire pressure may be limited by rim design. ALWAYS check both tire sidewall and rim pressure markings. 2. NEVER inflate tire above maximum rim pressure. In the rapidly evolving area of disc brake specific, light-weight and carbon fiber rims, some rim manufacturers have specified maximum tire pressure.
- Page 80 Technical Information Charge Bicycle Owner’s Manual About Bicycle Tires & Tubes Types of Air Valves There are primarily two kinds of bicycle tube Schrader valve valves: The Schrader Valve and the Presta Valve. The bicycle pump you use must have the fitting appropriate to the valve stems on your bicycle.
-
Page 81: About Changing Adding Accessories
Technical Information About Changing Components Or Adding Accessories About Changing Components Or Adding Accessories There are many components and accessories available to enhance the comfort, performance and appearance of your bicycle. However, if you change components or add accessories, you do so at your own risk. -
Page 82: About Using Bicycle Racks
Technical Information Charge Bicycle Owner’s Manual About Using Bicycle Racks on Cars About Using Bicycle Racks on Cars Bicycle automobile racks are available from many different manufacturers and many different rack designs exist. They are convenient devices to transport your bike. However, any bicycle rack has the potential to seriously damage your bicycle. - Page 83 Technical Information About Using Bicycle Racks on Cars Types of Car Racks TYPE OF RACK DESIGN RECOMMENDATION & CAUTIONS CLAMPS ON TIRES / WHEELS ONLY Suitable for both carbon and aluminum frames This type does not use clamps on any This is the best system design because there is no potential other part of the frame or fork.
-
Page 84: Water Bottles
Technical Information Charge Bicycle Owner’s Manual About Using Water Bottles About Using Water Bottles Side impacts to a water bottle or cage can result in damage threaded inserts due to the leverage on a very small area. In a crash, certainly the last thing you should be worried about is saving the threaded inserts in your frame. -
Page 85: Inspect For Safety
Inspect For Safety Nothing Lasts Forever, Including Your Bike Inspect For Safety Nothing Lasts Forever, Including Your Bike When the useful life of your bike or its components is over, continued use is hazardous. Every bicycle and its component parts have a finite, limited useful life. The length of that life will vary with the construction and materials used in the frame and components;... - Page 86 Inspect For Safety Charge Bicycle Owner’s Manual Importance of Frequent Inspection Importance of Frequent Inspection Frequent inspection of your bike is important to your safety. Follow the Pre-Ride Checklist before every ride. More detailed periodic inspection of your bicycle is important. How often this more detailed inspection is needed depends upon you.
- Page 87 Inspect For Safety What should you expect from your metal frame? Properties of Metals Please understand that there is no simple statement that can be made that characterizes the use of different metals for bicycles. What is true is how the metal chosen is applied is much more important than the material alone.
-
Page 88: Understanding Metals
Inspect For Safety Charge Bicycle Owner’s Manual Understanding Metals Understanding Metals Steel is the traditional material for building bicycle frames. It has good characteristics, but in high performance bicycles, steel has been largely replaced by aluminum and some titanium. The main factor driving this change is interest in lighter bicycles by cycling enthusiasts. - Page 89 Inspect For Safety Understanding Metals A few things to think about: ONCE A CRACKS STARTS IT CAN GROW AND GROW FAST. Think about the crack as forming a pathway to failure. This means that any crack is potentially dangerous and will only become more dangerous. SIMPLE RULE 1: If you find crack, replace the part.
- Page 90 Inspect For Safety Charge Bicycle Owner’s Manual Factors Influencing Product Life Fatigue Is Not A Perfectly Predictable Science Fatigue is not a perfectly predictable science, but we can give you some general factors to help you determine how often you need to inspect (or have your retailer inspect) your bicycle.
-
Page 91: Understanding Composites
Inspect For Safety Understanding Composites Understanding Composites The term “composites” refers to the fact that a part or parts are made up of different components or materials. You’ve heard the term “carbon fiber bike.” This really means “composite bike.” Any number of the components used on a bicycle can have composites. - Page 92 Inspect For Safety Charge Bicycle Owner’s Manual Understanding Composites What Are The Limits Of Composites? Well designed “composite” or carbon fiber bicycles and components have long fatigue lives, usually better than their metal equivalents. While fatigue life is an advantage of carbon fiber, you must still regularly inspect your carbon fiber frame, fork, or components.
- Page 93 Inspect For Safety Understanding Composites Composites Inspection: Finding Evidence of Damage Cracks: Inspect for cracks, broken, or splintered areas. Any crack is serious. Do not ride any bicycle or component that has a crack of any size. Delamination: Delamination is serious damage. Composites are made from layers of fabric. Delamination means that the layers of fabric are no longer bonded together.
-
Page 94: Understanding Bicycle
Inspect For Safety Charge Bicycle Owner’s Manual Understanding Bicycle Components Understanding Bicycle Components Original Equipment Components Bicycle and component manufacturers tests the fatigue life of the components that are original equipment on your bike. This means that they have met test criteria and have reasonable fatigue life. It does not mean that the original components will last forever. - Page 95 Inspect For Safety Understanding Bicycle Components Inspecting Handlebars Inspecting & Servicing Seat Posts Remove from stem. With road bars, you will need Remove from seat tube and remove from saddle. to remove the handlebar tape. Remove any Disassemble the head/saddle clamp assembly. handlebar mounted components.
- Page 96 Inspect For Safety Charge Bicycle Owner’s Manual Understanding Bicycle Components Inspecting a Saddle While the saddle is off the seat post, clean and Do not ride on a rim that has been worn out! inspect the rails carefully for cracks. Check the If the wear indicator shows that the rim is saddle rails to the saddle body;...
-
Page 97: Maintenance
Maintenance Importance of a Maintenance Routine Maintenance Importance of a Maintenance Routine 1. Regular Maintenance is important to your safety and the longevity of your bicycle. Any part of a poorly maintained bike can break or malfunction leading to an accident. While the materials and workmanship of your bicycle or of individual components may be covered by a warranty for a specified period of time by the manufacturer, this is no guarantee that the product will last the term of the warranty. -
Page 98: Basics Of A Good Maintenance Schedule
Maintenance Charge Bicycle Owner’s Manual Basics of a Good Maintenance Schedule Basics of a Good Maintenance Schedule Some service and maintenance can and should be performed by the owner, and requires no special tools or knowledge beyond what is presented in this manual. - Page 99 Maintenance Basics of a Good Maintenance Schedule (continued from the previous page...) AFTER EVERY LONG OR HARD RIDE OR AFTER EVERY 10 TO 20 HOURS OF RIDING: • Squeeze the front brake and rock the bike forward and back. Everything feel solid? If you feel a clunk with each forward or backward movement of the bike, you probably have a loose headset.
-
Page 100: Cleaning Your Bike
Maintenance Charge Bicycle Owner’s Manual Cleaning Your Bike Cleaning Your Bike Use only water and dish washing liquid. On suspension forks and shocks, cover adjustment knobs and air filter (if equipped) with a clean plastic bag secured temporarily with a rubber band or masking tape. -
Page 101: Bicycle Repair/Work Stands
Maintenance Bicycle Repair / Work Stands Bicycle Repair / Work Stands The clamping jaws of a bike stand can generate a crushing force strong enough to seriously damage your frame. See next figure. CAUTION Never place your bike in a bike stand by clamping the frame. -
Page 102: Tightening Torques
Figure Charge torque tool - a pre-set torque Bolts that are too tight can stretch and deform. wrench for specific indicated fasteners (not Bolts that are too loose can move and fatigue. -
Page 103: Limited One-Year Warranty
What’s Covered Charge Bikes provides each original purchaser of a Charge bicycle a limited warranty against defects in materials and workmanship on the bicycle frame and components for a period of one year from the date of purchase. Specific components may come with additional warranties from the component manufacturers - please check in your owner’s manual pack for information regarding these warranties. - Page 104 Charge Bikes. All liability for any damage, failure or loss caused by unauthorized service or use of unauthorized parts is expressly disclaimed.
-
Page 105: Fcc Part 15 Compliance
FCC Part 15 Compliance General Terms FCC Part 15 Compliance Any changes or modifications to this unit not expressly approved by the party responsible for compliance could void the user’s authority to operate the equipment. Note: This equipment has been tested and found to comply with the limits for a Class B digital device, pursuant to part 15 of the FCC Rules. -
Page 106: Pre-Ride Checklist
Pre-Ride Checklist Charge Bicycle Owner’s Manual Items to Check Pre-Ride Checklist Perform this pre-ride checklist before every ride. If you have any reason to suspect that your bicycle is not functioning properly, do not ride it. Frequent checks are necessary to identify and correct problems that can lead to an accident. Do not ride your bike if it does not operate normally or has broken, damaged, or missing parts. - Page 107 Pre-Ride Checklist Items to Check Check wheels and tires. Are your wheels’ properly fastened in the dropouts? Are they in good condition, no dents cracks or loose spokes? Be sure to read the section on proper operation installation of the wheels. See “About Wheels”...
- Page 108 The drive system or lighting can malfunction if this happens. Do you have a full battery charge? Make sure the battery is fully charged, and mounted securely. Follow the drive system charging instructions. Battery charge and discharge capacity will decline with usage.
- Page 110 Before every ride read and follow the Pre-Ride Checklist just inside. Charge Customer Service - 833-482-3822 www.chargebikes.com...
Need help?
Do you have a question about the City and is the answer not in the manual?
Questions and answers