Table of Contents
Advertisement
Quick Links
Advertisement
Table of Contents

Related Manuals for ATIGO A1702


Summary of Contents for ATIGO A1702
- Page 1 A1702 2-Wire Video Receiver User manual...
-
Page 2: Table Of Contents
Contents Video Receiver A1702 ........................2 Parts & Functions.........................2 Key functions ........................2 Terminal description......................2 Mounting ..........................2 Main Menu ..........................3 Answering a call........................3 Monitoring ..........................5 Zoom............................5 Scale............................5 Screen and volume adjustments ..................... 6 Image adjustments.......................6 Volume adjustments ......................6 Door release ........................6 Call another room or apartment (Intercom) ................6... -
Page 3: Video Receiver A1702
Video Receiver A1702 Mounting Parts & Functions Key functions Embed the mounting box into the wall. • Speaker Enables communication with the visitor • Press for hands-free communication Use screws to fasten the Talk/Mon button with the visitor • mounting bracket to the mounting Press to view the camera in standby LCD screen •... -
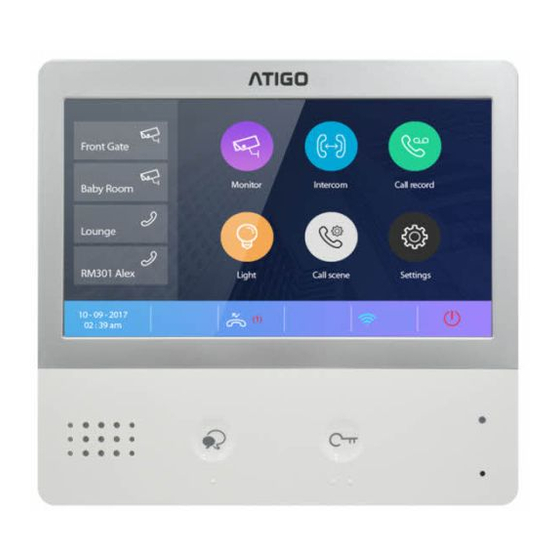
Page 4: Main Menu
Main Menu The Main Menu is the starting point for all To access the Main Menu, touch anywhere the applications on the receiver. on the receiver screen in standby mode. Below is an image while the receiver is in communication Answering a call Touch Talk/Mon button to answer the call. -
Page 5: Monitoring
Monitoring By using an internal CCTV camera, you can use this function to monitor the interior of the house (i.e., garage, hallway, garden) or a secondary entrance. During a call, press the Monitor button from the Main Menu. If more than one camera is configured or the system has a secondary video door entry panel, press the Monitor button to cycle through. -
Page 6: Screen And Volume Adjustments
Screen and volume adjustments During an active call either from the door entry panel or intercom communication, you can adjust the contrast, brightness, colour or volume. Image adjustments There are three predefined modes to select from: Normal, Bright, and Soft. Each mode can have its contrast, brightness or colour further tweaked as needed. -
Page 7: Do Not Disturb
Note: When a call is received from entry panel while using the intercom function, the system will prioritise the incoming call and end any internal call. For the Inner Call function to work, all receivers that are in the same house must use the same User ID. Use “V” to scroll the page. Calls not answered will end within 30 seconds if not answered. -
Page 8: Ring Tone Volume
Ring tone volume The ring call tone volume can be increased or decreased as required within the range of zero to nine. Select Settings from the Main Menu. Press the Ring tone volume. Use “<<” or “>>” to adjust the volume levels. Note: Setting the volume to 0 will mute the receiver and it will not ring for any incoming call. -
Page 9: Restoring The Default Settings
Note: By default, the Intercom function is turned ON. Restoring the default settings To restore the factory default settings, follow below steps. Select Settings from the Main Menu. Press the Restore button. Press the Restore button on the side menu. Press the Check button to confirm, alternatively if you want to Cancel, press the X button. -
Page 10: Concierge Unit
Setting code number and definition Code number Description Code number Description 2419 Reset to default 8016-8017 Reserved 2500-2549 Reserved 8018-8020 Video format 8000-8003 Primary/secondary receiver 8401-8499 Unlock time 8004-8005 Enable concierge unit 8505-8520 Reserved 8006-8007 Panel ON/OFF 9017-9018 Reserved 8008-8009 Date mode 9030-9031 Reserved... -
Page 11: Unlock Mode
On the keypad, type 8401 for one second ~ 8499 for 99 seconds to set the unlock time. Setting the user code On the ATIGO system, every receiver must have assigned an identification code called User Code. DIP Switch addresses The DIP switches are used to set the user code for each monitor and maximum are 6 Bits. - Page 12 Specifications Power supply 20~28V DC Power consumption Standby 0.25W; Working 5W 7” digital colour TFT Monitor screen Display resolutions 800 x 480 pixels Video signal 1Vp-p, 75Ohm, CCIR standard Wiring 2-wires non polarised Dimensions 161 x 174 x 22 mm (H x W x D) Precautions All components should be protected from vibrations and not suffer any impact.
Need help?
Do you have a question about the A1702 and is the answer not in the manual?
Questions and answers