Advertisement
Quick Links
1
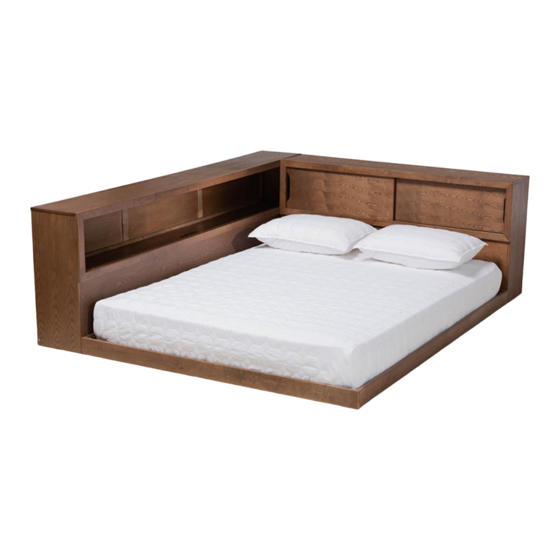
Assembled View
Storage A
2
Parts List
Parts in Box A- Storage A:
0031 Queen Bed
Assembly Instructions
Storage B
Storage B
Left
Right
Storage can be assembled
on the left or on the right.
A
Storage Top Panel x 1
B
Storage Front Frame x 1
C
Storage Rear Frame x 1
D
Storage Lower Panel x 1
E
Storage Center Panel x 1
F
Storage Lower Rail x 1
Storage A
Use 2 People
Note: Do not assemble
using power tools.
This can cause the bolts
to be overtightened
Storage Side Panel
(Left Hand) x 1
Storage Side Panel
(Right Hand) x 1
Storage
Support Bar x 2
WII-1219
G
H
J
Page 1 of 15
Advertisement

Subscribe to Our Youtube Channel
Related Manuals for Baxton Studio 0031 Queen Bed


Summary of Contents for Baxton Studio 0031 Queen Bed
- Page 1 0031 Queen Bed Assembly Instructions WII-1219 Assembled View Storage B Storage B Storage A Storage A Use 2 People Left Right Note: Do not assemble Storage can be assembled using power tools. on the left or on the right. This can cause the bolts...
- Page 2 0031 Queen Bed Assembly Instructions WII-1219 Part List Parts in Box B- Storage B: Longer Lower Panel x 1 Top Panel (Longer) x 1 Shorter Lower Rail x 1 Center Panel (Shorter) x 1 Front Frame x 1 Storage Side Panel...
-
Page 3: Hardware List
0031 Queen Bed Assembly Instructions WII-1219 Hardware List M4 Allen Key Center Rail 'L' Bracket Bracket x 2 (5005-3) 'L' Bracket Plug x 1 Spring Flat (5003) x 4 Washer x 8 Washer x 8 Wood Screw Wood Screw Wood Screw... - Page 4 0031 Queen Bed Assembly Instructions WII-1219 Assemble the Lower Panel (O) & Lower Rail (P) to the Storage Support Bar (S). Back Fit the Side Panel (Q & R) to the Lower Panel (O) & Lower Rail (P). Back Page 4 of 15...
- Page 5 0031 Queen Bed Assembly Instructions WII-1219 Attach the Center Panel (L) to the Storage Side Panel (Q & R). Back Fit the Front Frame (M). Front Page 5 of 15...
- Page 6 0031 Queen Bed Assembly Instructions WII-1219 Fit the Rear Frame (N). Back Attach the Top Panel (K). Front Page 6 of 15...
- Page 7 0031 Queen Bed Assembly Instructions WII-1219 Tighten the Front Frame (M) with Wood Screw (M4 x 25mm). Front Tighten the Rear Frame (N) with Wood Screw (M4 x 32mm). Back Page 7 of 15...
- Page 8 0031 Queen Bed Assembly Instructions WII-1219 Assembled the Storage A Fit the 'L' Bracket in place. Assemble the Storage Lower Panel (D) & Storage Lower Rail (F) to the Storage Support Bar (J). Page 8 of 15...
- Page 9 0031 Queen Bed Assembly Instructions WII-1219 Fit the Storage Side Panel (G & H) to the Storage Lower Panel (D) & Storage Lower Rail (F). Back Attach the Storage Center Panel (E) in place. Back Page 9 of 15...
- Page 10 0031 Queen Bed Assembly Instructions WII-1219 Attach the Storage Front Frame (B). Fit the Plug into the cut-out holes. Front Fit the Storage Rear Frame (C). Back Page 10 of 15...
- Page 11 0031 Queen Bed Assembly Instructions WII-1219 Attach the Top Panel (A) to the Storage Side Panel (G & H). Front Tighten the Storage Top Panel (A) with Wood Screw (M4 x 25mm). Front Front Page 11 of 15...
- Page 12 0031 Queen Bed Assembly Instructions WII-1219 Tighten the Storage Top Panel (A) with Wood Screw (M4 x 32mm). Back Fit the Center Rail Bracket to the Head / Footboard (T). Page 12 of 15...
- Page 13 0031 Queen Bed Assembly Instructions WII-1219 Assemble the Side Rail (U) to the Head / Footboard (T). Bolt the Long Support (V) to the Center Rail Brackets on the Head & Footboard (T). Page 13 of 15...
- Page 14 0031 Queen Bed Assembly Instructions WII-1219 Bolt & screw the Bed Slats (W) to the Side Rail. Fit the Assembled Storage B to the Headboard. Assembled Storage B Page 14 of 15...
- Page 15 0031 Queen Bed Assembly Instructions Storage can be assembled on the left or on the right. On the Left Assembled Assembled Storage B Storage A Assemble the Assembled Storage A to the Side Rail (U). Assembled Storage B On the Right...
Need help?
Do you have a question about the 0031 Queen Bed and is the answer not in the manual?
Questions and answers