
Subscribe to Our Youtube Channel
Related Manuals for EdenPURE Bio SpeedCLEAN VX200


Summary of Contents for EdenPURE Bio SpeedCLEAN VX200
- Page 1 Bio SpeedCLEAN Bio SpeedCLEAN VX200 Model No. A5969 Model No. A5969 Owner’s Manual Owner’s Manual PLEASE READ PLEASE READ AND SAVE THESE SAVE THESE INSTRUCTIONS INSTRUCTIONS...
- Page 2 Do not place the battery pack near high temperatures. Do not disassemble the battery pack. If this vacuum is not working properly, contact custserv@edenpure. com. Do not try to repair the unit yourself. Do not let children play with or use this machine or the battery pack.
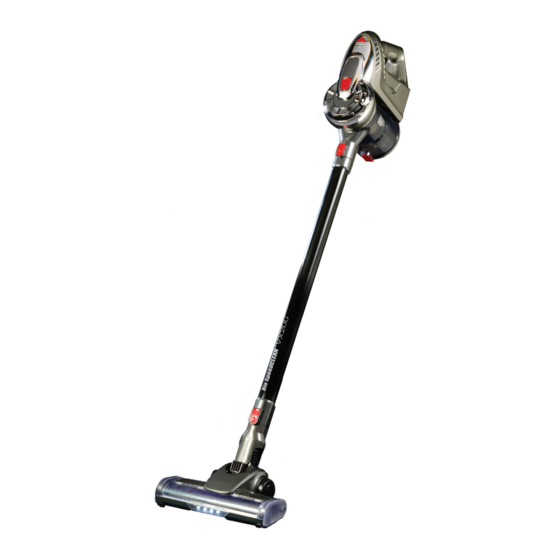
- Page 3 ON/OFF BUTTON SPEED CONTROL CHARGING BUTTON NEEDLE PORT DUST CUP ASSEMBLY RELEASE BUTTON CHARGING INDICATOR LIGHT MOTOR RELEASE BUTTON DUST CUP ASSEMBLY DUST CUP RELEASE BUTTON VACUUM TUBE RELEASE BUTTON MOTORIZED FLOOR BRUSH UV LIGHT...
- Page 4 ON/OFF BUTTON WALL MOUNT HANDLE BATTERY UNIT DUST CUP RELEASE MINI MOTORIZED BRUSH 2-IN-1 UPHOLSTERY BRUSH CHARGING CORD LONG CREVICE TOOL...
-
Page 5: Parts & Assembly
PARTS ASSEMBLY Battery Unit Insert the battery unit into the bottom of the motor. When it is locked into the motor, you will hear it click. Dust Cup Insert the lower plastic clip into the hole on the motor. Th en snap the upper cover with the upper release button on the motor. - Page 6 Connection of Vacuum Tube and Motorized Floor Brush Insert the upper end of the Motorized Floor Brush into the lower connection of the Vacuum Tube until you hear it click in and lock into place. Connection of the Motor and the Vacuum Tube Insert the upper end of the Vacuum Tube in to the main hole of the Motor below the Dust Cup until you hear it click in and lock into place.
- Page 7 Connection of the Mini Motorized Brush and the Motor Insert the upper part of the Mini Motorized Brush into the main hole of the Motor below the Dust Cup until you hear it click in and lock into place. Connection of accessory pieces to the Motor Insert the accessory brushes into the main hole of the motor below the Dust Cup until you hear them click in and lock into place.
-
Page 8: Wall Mount
Connection of the Vacuum Tube with the accessory pieces Insert the accessory brushes into the bottom of the Vacuum Tube until you hear them click and lock into place. WALL MOUNT Attach wall mount to a wall using the screws and anchors that are included. - Page 9 USES Low Speed, High Speed, Off Press the Speed Control Button once to turn the unit on. Press it again to turn the unit off. Use the Speed Control Button to switch the speed between low and high by touching the + or – on the button. Use of 2-in-1 Upholstery Brush 1.
-
Page 10: Cleaning The Unit
CLEANING THE UNIT Clean Dust Cup after each use Press the upper button on the Motor to release the Dust Cup Assembly Unit, then press the lower button to release the Dust Cup Lower Cover. Dust Cup Cleaning A. Press the button at the bottom of the Dust Cup to release the Lower Cover of the Dust Cup to empty B. -
Page 11: Troubleshooting Tips
1-800-225-6595. Prior to your call, we encourage you to visit our service related website www.edenpuresupport.com for troubleshooting tips and service instructions if needed. EdenPURE ® 7800 Whipple Avenue NW N. Canton, OH 44720 custserv@edenpure.com ©2021 EdenPURE® I-5699 BR12066R-1...
Need help?
Do you have a question about the Bio SpeedCLEAN VX200 and is the answer not in the manual?
Questions and answers
Battery is charge and runs without the wand nozzle. When you connect the wand it won’t work
If the EdenPURE Bio SpeedCLEAN VX200 works without the wand nozzle but not when it is connected, the issue could be that the accessory pieces, including the wand nozzle, are not properly inserted or locked into place. Ensure that the accessory brushes or attachments are clicked and locked securely into the Vacuum Tube.
This answer is automatically generated
My vacuum kept stopping during use so i replaced the batttery pack and it still does this.It works but won't stay on continuously.It is fully charged
Edenpure VX200: After you take the filter out of the dust cup, can you clean the "basket" that holds the filter? If so, how? Just running under water?