
Subscribe to Our Youtube Channel
Related Manuals for Goldmaster CD-3090 USB


Summary of Contents for Goldmaster CD-3090 USB
- Page 1 CD-3090 USB FM/AM Radyolu, CD/MP3/USB/SD/MMC Çalar Oto Teybi Kullaným Kýlavuzu www.goldmaster.com.tr...
-
Page 2: Table Of Contents
ÝÇÝNDEKÝLER GÜVENLÝK BÝLGÝSÝ Bu ürünü tercih ettiðiniz için teþekkür ederiz. Güvenlik Bilgisi ...........2 CD Notlarý Ürünü uygun þekilde kullanmak için lütfen Panel Kontrolü ...........3 Kirli veya tozlu CD kullanmak sesin iyi kullanma talimatlarýný okuyunuz. Okumanýz Kumanda Kontrolü ........4 çýkmamasýna neden olabilir. bittikten sonra kýlavuza tekrar baþvurmak için güvenli bir yerde saklayýnýz. -
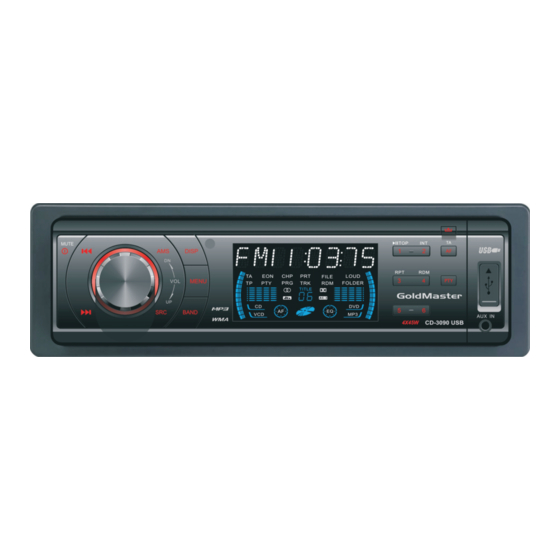
Page 3: Panel Kontrolü
PANEL KONTROLÜ Cihaz Açma/Kapama: tuþunu kullanarak açma/kapama yapabilirsiniz. 1. - Cihaz açma - (1-6) tuþlarý: Radyo kayýdý /BAL/FAD modlarýný seçebilirsiniz. - Sessiz Kayýtlý istasyonlarý dinlemek için tuþlarý kullanýnýz. - Sistem menüsüne girmek için basýlý tutunuz. - Cihaz kapama (2 saniyeden uzun basýnýz.) Ýstasyon kaydetmek için istediðiniz tuþa 2 saniyeden 7. -
Page 4: Kumanda Kontrolü
REMOTE CONTROLS Uzaktan Kumanda çalýþma aralýðý 1. - Açma/Kapama Uzaktan Kumandanýn Pillerini 2. - Ses seviyesi Degistirme Uzaktan kumanda 3~5m mesafe aralýðýnda 3. - Sessiz çalýþýr. Uzaktan kumanda uygun menzilde gerekli - VOL/BAS/TRE/FAD ‘ý seçmek için basýnýz, fonksiyonlarýný yerine getiremiyorsa pili yeni bir seviyesini ayarlamak için ses tuþlarýný... -
Page 5: Genel Kullaným
GENEL KULLANIM SRC tuþu Açma/Kapama Tuþu Saat Ayarý Radyo, Disk (disk takýlý iken), USB (USB takýlý iken), Aracýnýz çalýþýr durumda iken cihazý açmak için Saati ayarlamak için DISP tuþu kullanýlmaktadýr. Kart(SD/MMC kart takýlý iken) ya da AUX oynatma tuþa basýnýz. Cihazý kapamak içinse tuþa basýlýlý Saati ayarlamak için aþaðýdaki adýmlarý... -
Page 6: Cd Çalar Kullanýmý
CD ÇALAR KULLANIMI Sonraki Parça Disk Takma Tekrar Oynatma Disk oynadýðý sürece, RPT ON seçmek için Disk oynadýðý sürece bir sonraki parçaya gitmek Diskin etiketli yüzü üstte kalacak þekilde 3/RPT tuþuna basýnýz, böylece geçerli parçayý için >>| tuþuna basýnýz. diski cihazýn disk yuvasýna yerleþtiriniz. sürekli oynatabilirsiniz. -
Page 7: Radyo Kullanýmý
RADYO KULLANIMI RDS (RADYO BÝLGÝ SÝSTEMÝ) FM/AM Bandý RDS servis hizmeti bölgelere göre deðiþiklik CT servis (saat) gösterebilir. Eðer bölgenizde RDS servisi yoksa RDS istasyon yayýný alýndýðýnda CT servisi Radyo oynadýðý sýrada, 3 FM ve 2 AM bandlarý aþaðýdaki servis özellileri kullanýlamaz. saati otomatik olarak ayarlar. -
Page 8: Usb/Sd/Mmckullanýmý
RDS (RADYO BÝLGÝ SÝSTEMÝ) USB/SD/MMC MP3 OYNATMA TA: Trafik bilgisi o andaki istasyondan veya 1. SD/MMC Kart T akma baþka bir aðdaki istasyondan alýr. SD/MMC kartý önde saðdaki giriþe takýnýz. AF: Kayýtlý RDS kanallarýnýn frekans listesi Cihaz müzikleri otomatik olarak çalacaktýr ve LCD ekranda MEM-CARD EON bilgisi ile güncellenir. - Page 9 MP3/WMA DOSYA OYNATMA Ekran Bilgisi Dosya arama Mp3 Notlarý Oynatma sýrasýnda, ID3 etiket bilgileri ekranda "FILE SCH" moduna girmek için AMS düðmesine Mp3" teknolojisi( MPEG audio layer3 ) audio listelenir: FOLDER(klasör), FILE(dosya), iki defa basýnýz. Girmek için VOL/MENU kontrol CD 'lerinin dijital verilerini ses kalitesini koruyarak ALBUM(albüm), TITLE(parça ismi), ARTIST düðmesine basýnýz, klasör seçmek için düðmeyi önemli ölçüde küçültür.
-
Page 10: Mp3/Wma Dosyalarý Oynatma Menü Fonksiyonu
MP3/WMA DOSYA OYNATMA MENÜ FONKSÝYONLARI · Cihaz “MPEG 1 audio layer 3” ü de içeren bütün Menüye girmek için VOL düðmesine 2 saniye · Cihaz ID3 tag versiyon 1.XX ve 2.XX destekler. MPEG bit oranýný destekler. Sadece MPEG bit oraný 16 karaktere kadar ekranda þarký, albüm ve artist basýlý... - Page 11 MENÜ FONKSÝYONLARI MASK DPI modu: Yalnýzca, kimliði gizlenmiþ MULT ON/OFF VOL Modu programlara sahip olan AF. MULTI OFF: Karýþýk CD, bir session CD. Volume modunu seçmek için ses düðmesini MASK ALL modu: Farklý kimlikli programlara MULTI ON: Karýþýk, ekstra, multi session CD. çeviriniz.
-
Page 12: Elektriksel Baðlantýlar
ELEKTRÝKSEL BAÐLANTILAR Baðlantý Diyagramý Sub-woofer çýkýþý Anten Green (Siyah) Sigorta 15A Konnektör Arka kablo çýkýþý R(Kýrmýzý) (Gri) L(Beyaz) ISO Konnektör Fonksiyon VW/Audi ya da Opel(Vauxhall) gibi bazý araç modelleri Konnektör A Konnektör B için sekilde gösterilen kablolama modifiyesi yapmaniz Arka Sað (+) / Mor gerekebilir, yoksa araç... -
Page 13: Kurulum
KURULUM ANTI-THEFT SÝSTEM Kuruluma Baþlama Kurulum Ýþlemleri Bu teyp çýkarýlabilir ön panele sahiptir. Ön paneli yanýnýza alýp gidebilirsiniz, Bu cihaz aþaðýdaki ölçülerdeki herhangi bir 1. Cihaz kullanýma uygun hale getirildi ise, hýrsýzlar ön paneli olmayan teybi çalmak kýzaða takýlabilir. baþka bir ses sistemini aracýnýzdan kaldýrýnýz. istemediði için teybinizin çalýnma riski azalýr. -
Page 14: Pratik Çözümler
PRATÝK ÇÖZÜMLER Aþaðýdaki kontrol listesi size cihazý kullanýrken karþýlaþabileceðiniz bazý sorunlarý çözmeye yardýmcý olabilir. Herhangi birþeye danýþmadan önce baðlatýlarýný kontrol ediniz ve kullaným kýlavuzunda bulunan talimatlarý uygulayýnýz.Cihazý olaðandýþý durumlarda çalýþtýrmayýnýz, mesela sesin çýkmamasý veya duman ve kötü kokulu yayýlmasý durumunda yangýn çýkabilir veya elektrik arklarý oluþabilir. Hemen cihazý kapatýn ve cihazý aldýðýnýz yeri arayýnýz. -
Page 15: Teknik Özellikler
TEKNÝK ÖZELLÝKLERÝ Disk Oynatýcý Genel 12V DC (11V-16V) Sistem: Disk dijital ses sistemi Güç Kaynaðý Test voltajý 14.4V, negatif toprak Frekans tepkisi: 20Hz-20kHz Maksimum güç çýkýþý: 45Wx4 kanal Sinyal/gürültü oraný: >80 dB Sürekli güç çýkýþý: 20Wx4 kanal (4 ,10% T.H.D.) Toplam harmonik gürültü: Less than 0.20% (1kHz) Uygun hoparlör empedansý:... -
Page 16: Safety Information
CONTENTS SAFETY INFORMATION Thank you for purchasing this product. Please Safety Information ........2 CD NOTES read through these operating instructions Playing a defective or dusty CD can cause Panel Controls ..........3 so you will know how to operate your model dropouts in sound. -
Page 17: Panel Controls
Panel Controls Power On/Off : Press to turn on/off the unit. 1. - Power on rotate the knob to adjust level. - Radio preset - Mute - Hold it to system menu. Press 1~6 to listen to a preset station. - Press more than 2 seconds to power off. -
Page 18: Remote Controls
REMOTE CONTROLS Operating range 1. - Power on/off R epla cing the lithium ba tt er y of 2. - Volume remote control unit. Point the remote control unit to the remote 3. - Mute sensor when you operate with it. When the range of the operation of the card 4. -
Page 19: General Operation
GENERAL OPERATION Mode Button (SRC) Setting the Clock Power On/Off Button Press the SRC button to change between The correct time of day can be set by pressing Press the POWER button to turn the unit on Radio, DISC (when disc is in), USB (when and holding the DISP button. -
Page 20: Cd Player Operation
CD PLAYER OPERATION Inserting a Disc Seek Up/Next Track Track Repeat Play Select With the label surface facing up, fully insert Press the next track >>| button during disc During disc play, press the 3/RPT button to a compact disc into the disc slot until the play to select the beginning of the next track. -
Page 21: Tuner Operation
TUNER OPERATION RDS (RADIO DATA SYSTEM) RDS service availability varies with areas. Band CT Service ( Clock Time ) Please understand if RDS service is not During radio play, press the BAND button to When receiving an RDS station, the CT (Clock available in you area, the following service is choose between three FM, two MW bands. -
Page 22: Usb/Sd/Mmc Operation
RDS (RADIO DATA SYSTEM) USB/SD/MMC MP3 PLAYBACK TA: Traffc informationcanbereceivedfrom the current station or stations in other network. 1. Loading SD/MMC Card The frequency l ist of pre set RDS Open the panel, insert the SD/MMC card into the slot, with the stations is updated by EON data. -
Page 23: Playing Mp3/Wma Files
PLAYING MP3/WMA FILES Display Information Searching Folders/Files MP3 Overview During playback, ID3 tag information display Press the AMS button twice and press the MP3 is short for MPEG Audio Layer 3 and scrolling on the screen: FOLDER, FILE, knobtoaccesstheflesearchoption. refers to an audio compression technology ALBUM, TITLE, ARTIST and Track Number/ 2. -
Page 24: Menu Function
PLAYING MP3/WMA FILES Menu Function Press VOL knob more than 2 seconds to enter When playing a disc of 8kbps or VBR*, the the CD-R otherwise it takes a long time menu mode, then each press changes the elapsed playing time in the display window until the unit starts mode as follows: will not be correct and also the intro play... - Page 25 Menu Function O n l y A F w h i c h h a s d i f f e r e n t p r o g r a m MULT mode VOL mode identifcationismasked. MULT OFF: Mixed CD, one session CD. Rotate the knob to choose volume last/adjust MASK ALL mode : MULT ON: Mixed, extra, multi session CD.
-
Page 26: Electrical Connections
ELECTRICAL CONNECTIONS Wiring Diagram Sub-woofer out Green ANTENNA (Black) R(Red) Rear lineout (Gray) L(White) Function Location Connector A Connector B Rear Right (+) / Purple Tele-mute / Pink Rear Right (-) / Purple with Black Stripe Front Right (+) / Gray Battery 12V(+) / Yellow Front Right (-) / Gray with Black Stripe ANT/AMP control / Blue... -
Page 27: Installation Guide
INSTALLATION GUIDE ANTI-THEFT SYSTEM This unit is equipped with a detachable panel. Installation Opening Install the unit Removing this panel makes the radio totally This unit can be installed in any dashboard inoperable. Important: having an opening as shown below. The Remove the two screws on the top of the unit Remove the detachable panel dashboard should be 4.75mm - 5.56mm thick... -
Page 28: Troubleshooting
TROUBLESHOOTING The following checklist can help you solve some problems which you may encounter when using the unit. Before consulting it, check the connections and follow the instructions in the user manual. Do not use the unit in abnormal condition, for example without sound, or with smoke or foul smell can causefreorelectricshock,immediatelystopusingitandcallthestorewhereyoupurchasedit. -
Page 29: Specifcations
SPECIFICATION General Disc Player 12V DC (11V-16V) System: Disc digital audio system Power supply: Test voltage 14.4V, negative ground Frequency response: 20Hz-20kHz Maximum power output: 45Wx4 channels Signal/noise ratio: >80 dB Continuous power output: 20Wx4 channels (4 ,10% T.H.D.) Total harmonic distortion: Less than 0.20% (1kHz) Suitable speaker impedance: 4-8 ohm... - Page 30 GoldMaster...
Need help?
Do you have a question about the CD-3090 USB and is the answer not in the manual?
Questions and answers