Table of Contents
Advertisement
OPERATOR'S MANUAL
2 GALLON PORTABLE AIR COMPRESSOR
F2G2PAK
FOR ASSISTANCE IN CANADA
CUSTOMER SERVICE
PLEASE CALL
1-866-242-4298
1-803-980-6570
Your air compressor has been engineered and manufactured to FINI's high standard for dependability, ease of operation,
and operator safety. When properly cared for, it will give you years of rugged, trouble-free performance.
Thank you for buying a FINI product.
F2G2PAK OM Ver. 07/12
Advertisement
Table of Contents

Subscribe to Our Youtube Channel
Related Manuals for Fini Advandced F2G2PAK


Summary of Contents for Fini Advandced F2G2PAK
- Page 1 1-866-242-4298 1-803-980-6570 Your air compressor has been engineered and manufactured to FINI’s high standard for dependability, ease of operation, and operator safety. When properly cared for, it will give you years of rugged, trouble-free performance. Thank you for buying a FINI product.
-
Page 2: Table Of Contents
STOP STOP IMPORTANT DO NOT RETURN TO STORE This unit was fully tested and inspected prior to shipment and will operate properly when instructions are followed. Refer to your owner’s manual for basic troubleshooting. To avoid unnecessary return to the store, simply call Compressor Support toll free for additional assistance. 1-866-242-4298 Compressor Support: 1-803-980-6570... -
Page 3: General Safety Rules
GENERAL SAFETY RULES Additional safety protection will be required in some environments. For example, the working area WARNING: may include exposure to a noise level which can lead to Read and understand all instructions. Failure to hearing damage. The employer and user must ensure follow all instructions listed below may result in electric that any necessary hearing protection is provided shock, fire, and/or serious personal injury. - Page 4 GENERAL SAFETY RULES Never point any tool toward yourself or others. Disconnect the power supply, open the drain valve to decompress the tank and allow water to drain, Keep the exterior of the air compressor dry, clean, and allow the air compressor to become cool to the and free from oil and grease.
-
Page 5: Specific Safety Rules
SPECIFIC SAFETY RULES Know your power tool. Read the operator’s manual Always follow all safety rules recommended by the carefully. Learn its applications and limitations, as well manufacturer of your tool, in addition to all safety as the specific potential hazards related to this tool. rules for the air compressor. -
Page 6: Symbols
Do not adjust regulator to result in output pressure greater than marked maximum pressure of attachment. Do not use at pressure greater than the rated maximum pressure of this compressor. Always wear ear protection when using this tool. Failure to do Risk to hearing so may result in hearing loss. - Page 7 SERVICE Servicing requires extreme care and knowledge and should be performed only by a qualified service technician. For service we suggest you contact Customer Service at 1-866-242-4298. For assistance in Canada please call 1-803-980-6570.
- Page 8 SPEED AND WIRING The no-load speed of the electric motor varies by model and specification. The motor speed is not constant and decreases under a load or with lower voltage. For voltage, the wiring in a shop is as important as the motor’s horsepower rating. A line intended only for lights cannot properly carry a power tool motor.
-
Page 9: Glossary Of Terms
SCFM (Standard Cubic Feet Per Minute) A unit of measure of air delivery. L/min (Liter Per Minute) A unit of measure of air delivery. Tank Pressure Gauge Indicates the pressure in the air tank. Thermal Overload Switch Automatically shuts off the compressor if the temperature of the electric motor exceeds a predetermined limit. -
Page 10: Electrical
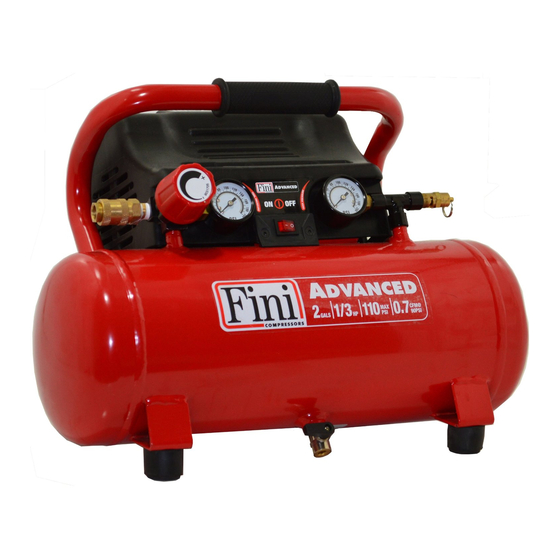
FEATURES PRODUCT SPECIFICATIONS Air Tank Capacity ............2 gal. Gauges ............1.5 in. diameter Air Pressure ............110 PSI max. Input......... 120 V, 60 Hz, AC only, 1.8 Amps Lubrication .............. Oil-Free Net Weight (compressor only) ........19.6 lbs. Fig. 2 REGULATOR PRESSURE GAUGE QUICK... -
Page 11: Assembly
FEATURES KNOW YOUR AIR COMPRESSOR PRESSURE REGULATOR KNOB See Figure 2. Use the pressure regulator knob to adjust the amount of Before attempting to use this product, familiarize yourself air being delivered through the hose. with all operating features and safety rules. REGULATOR PRESSURE GAUGE OIL-FREE UNIVERSAL MOTOR The current line pressure is displayed on the regulator... - Page 12 ASSEMBLY QUICK ATTACHING HOSE COUPLER Insert the hose into the quick coupler already installed on the compressor (Fig. 3). WARNING: Do not attach any tools to the open end of the hose until start-up has been completed. Firmly grasp the open end of the hose; hold facing PRESSURE ON/OFF SAFETY...
-
Page 13: Operation
OPERATION APPLICATIONS WARNING: Air compressors are utilized in a variety of air system Do not allow familiarity with tools to make you careless. applications. Match hoses, connectors, air tools, and Remember that a careless fraction of a second is accessories to the capabilities of the air compressor. sufficient to inflict serious injury. - Page 14 OPERATION See Figure 7. Rotate drain valve right to open. DRAIN VALVE (Rotate drain valve right to open) Fig. 7 SAFETY WARNING: VALVE Unplug the air compressor and release all air from the tank before servicing. Failure to depressurize tank before attempting to remove valve may cause serious personal injury.
-
Page 15: Maintenance
MAINTENANCE Inspect the tank yearly for rust, pin holes, or other WARNING: imperfections that could cause it to become unsafe. When servicing, use only identical replacement parts. Use of any other parts may create a hazard or cause Avoid using solvents when cleaning plastic parts. Most product damage. -
Page 16: Troubleshooting
TROUBLESHOOTING Problem Possible Cause Solution Compressor will not run Tank has sufficient pressure. Compressor will turn on when tank pressure drops to cut-in pressure. No electrical power. Check to be sure unit is plugged in. Blown stop/house fuse. Replace shop/house fuse. Tripped shop/home breaker. -
Page 17: Brad/Nailer
BRAD/NAILER lead to loss of control. WARNING: b) Do not force the tool. Use the correct tool for the application. The correct tool will do the job better and safer When using tools, basic precautions should always be at the rate for which the tool is designed. followed, including the following. - Page 18 BRAD/NAILER WARNING: SPECIFIC SAFETY RULES a) If not used correctly and without suitable Remove finger from the trigger when not driving maintenance, the brad/nailer can cause serious injury. fasteners. Never carry the tool with finger on trigger, the b) Always wear goggles and ear plugs when using the tool is able to fire a fastener.
- Page 19 BRAD/NAILER 2) Check that protector (A) of the brad/nailer is working correctly. Check that is free to move in and out without any obstruction (Fig. 11). 3) Release the outer part of cartridge (C) from the locked position, pressing lever (D) (Fig. 12). 4) Slide the outer part of cartridge (C) downwards (Fig.
- Page 20 BRAD/NAILER MAINTENANCE 4) Reconnect air supply to the tool. LUBRICATION The tool requires lubrication before using the tool for the first time and before each use. If an inline oiler is used, manual lubrication through the air inlet is not required on a daily basis.
- Page 21 BRAD/NAILER CLEARING A JAM FROM THE TOOL If a nail remains jammed inside the nail gun, comply with the following procedure: 1) Switch off the compressor. 2) Disconnect the brad/nailer from the compressor. 3) Release the outer part of cartridge (C) from the locked position, pressing lever (D) (Fig.
-
Page 22: Multipurpose Stapler
MULTIPURPOSE STAPLER lead to loss of control. WARNING: b) Do not force the tool. Use the correct tool for the application. The correct tool will do the job better and safer When using tools, basic precautions should always be at the rate for which the tool is designed. followed, including the following. - Page 23 MULTIPURPOSE STAPLER WARNING: SPECIFIC SAFETY RULES a) If not used correctly and without suitable Remove finger from the trigger when not driving maintenance, the stapler can cause serious injury. fasteners. Never carry the tool with finger on trigger, the b) Always wear goggles and ear plugs when using the tool is able to fire a fastener.
- Page 24 MULTIPURPOSE STAPLER 1) Disconnect air hose from tool. Remove all nails from tool. ● ALL SCREWS MUST BE TIGHTENED. If any screws are loose, tighten them. ● THE SAFETY AND TRIGGER MUST MOVE SMOOTHLY. 2) Adjust the air pressure to 60PSI, connect the air hose. Do not load any nails in the tool.
- Page 25 MULTIPURPOSE STAPLER METHODS OF OPERATION This tool is equipped with the safety (A) (Fig. 24) and does not operate unless the safety is depressed. The methods of operation to drive nails with this tool is sequential actuation mechanism. 1) Position the nail outlet on the workpiece with finger off the trigger (B).
- Page 26 MULTIPURPOSE STAPLER MAINTENANCE LUBRICATION The tool requires lubrication before using the tool for the WARNING: first time and before each use. If an inline oiler is used, manual lubrication through the air inlet is not required on a FASTENER AND REPLACEMENT PARTS daily basis.
-
Page 27: Warranty
2 YEARS LIMITED WARRANTY If within two years from the date of purchase, this FINI air tool product fails due to a defect in materials or workmanship, please immediately contact Product Support at 1-866-242-4298 (8am to 5pm EST, M-F, except normal Holidays). Do not return the air tool to the store. - Page 28 OPERATOR’S MANUAL 2 GALLON PORTABLE AIR COMPRESSOR F2G2PAK FOR ASSISTANCE IN CANADA CUSTOMER SERVICE PLEASE CALL 1-866-242-4298 1-803-980-6570...
Need help?
Do you have a question about the Advandced F2G2PAK and is the answer not in the manual?
Questions and answers